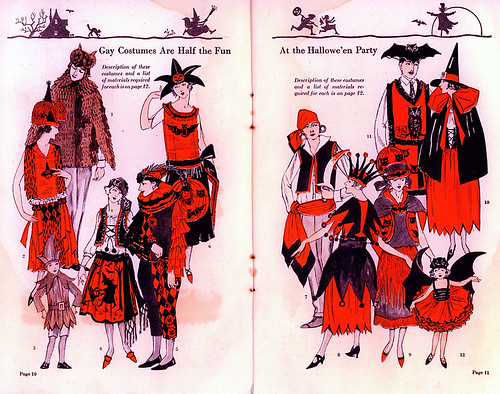
First, the inspiration:
I've been on a 1920's kick lately. All I've wanted to do is make a 1920's style dress. I was supposed to go to a party where the theme was fancy dress in monochrome but my truck decided to break down. Instead, I finished the dress for Halloween.
 |
| 1922 Halloween Costumes |
 |
| 1920's Celestial Fancy Dress |
This was not the original inspiration for the owl cut outs but I can't find the dress I saw that originally inspired it. All I recall is that the dress was in the lower left hand side of the catalog page and had owls around the hem similar to the owls on the lower part of the upper right hand guy's tabard. For a better idea:
 |
| 1920's Owl Decoration |
The cut outs for the hem of the dress are very similar to the head of the paper owl here. The eyebrows don't meet because these are fabric cut outs (black velvet) and the eyes also have to be somewhat more restrained.
Since I wanted to make a new dress for the 1920's, I had to make new undies as well. Although my original 1920's bra was serviceable, I wanted something cuter and more attuned to my skills now.
 |
| 1927 Bra |
 |
| 1927 undies |
 |
| 1920's Bra off of Etsy |
Second, making the outfit:
I don't have any pictures of making the bra and panties. Basically, the underwear itself was pretty simple. For the undies, I took two rectangles for the front and back, a small rectangle for the crotch out of both silk and cotton, and gores out of both the silk and lace for the sides. Once I sewed it up, I added elastic to the waistband.
For the bra, it wasn't much more difficult. I started with a band that was 3" bigger than my bust measurement at it's fullest by about 7". I marked out where the darts should go - one bust dart on either side, darts for across the bust but under the arms, and one dart on either side directly under the arms. The dart under the arms is to straighten the band once you make the bust dart so the silk band will go around your back in a straight line. I also added straps and lace to the front to make it pretty.
The hooks and eyes on the back of the bra are actually hook and eye tape. I used that by folding the silk over the tape to hide it and add strength to the hooks and eyes. This is also partly why I made the bad bigger - you'll lose a lot of fabric by folding the eyes into the fabric.
The dress - the dress is my own pattern as well.
I drew out each of these designs on just plain computer printer paper. Using a box cutter, I cut four of each design from the scrap black velvet. I glued each design exactly one foot apart on the hem of the dress - the skirt was made out of two 2 yard panels of silk.
Once the designs were glued on, I let them dry overnight. This meant laying the entire four yards across my living room. I had newspaper underneath to prevent the glue getting to the hardwood floors.
The tunic part of the dress was pretty simple. I drew it out, cut it out, sewed the shoulders and sides, tried it on, and redrew where I wanted the neckline and underarms to be. I then cut those pieces out better, and sewed down the rolled edges.
I realized I had cut the tunic a bit too short so I added a belt of black velvet. I think it actually helps the dress a lot.
Third, the actual dress:
Materials: Silk, velvet, rayon lace, and a small amount of cotton
Notions: Thread, Glue
Cost: The white silk was $3 a yard at a closeout sale. The velvet and orange silk were stash as was the cotton. The was a Joann's remnant for $3, I think. The pink silk was a joann's remnant that I bought years ago - I have no idea how much but I'm guessing $5 for the pink silk. Since I only used under 3 yards for the dress, I don't think the dress cost much more than $20 to make.
Fourth, the critique:
My biggest complaints are as follows: I made the undies too short and the skirt of the dress too long. The dress is pretty easy to fix - rip the skirt off the dress, chop six inches off from the waist, and resew. There isn't any help for the undies other than to make the rectangles more square like next time.
The coat I'm wearing in the photo is one I made a couple of years ago that works well for late teens and into the 1920's.


No comments:
Post a Comment