Sunday, November 27, 2016

Crafting with Oldest Nephew: Making a "Stuffy"

I promised my eight year old nephew that we'd have a "crafting" day today - just the two of us. He was very excited at the idea and said that he couldn't wait. I wasn't sure what he wanted to make but promised to help with anything he wanted.

We went to the "big" Joann's fabric store in Wheaton Maryland. It's about twice the size at the one near my house and is quickly starting to have the better fabrics as well. Since Joann's was having a big sale, I figured we could stop by and check out all the fabrics to see what he wanted to make. Also, since they have paints, clay, jewelry making, and a whole bunch of other crafts, we could easily switch to that as well.

After looking all around the store and at patterns, he told me what he wanted - a stuffy. Apparently, a stuffy is like the Raggedy Andy doll we saw a pattern of but he wanted one that looked like Link from Zelda. Okay, this I can do pretty easily and make my own pattern. We ended up with "flesh" toned muslin (I don't think anyone is really that color), a green cotton flannel remnant, a brown cotton remnant, and a huge thing of stuffing to make the stuffy with.

Once home, I drew out that pattern using my frixion markers (most amazing things ever!) and he cut it out.


Once he finished cutting it out, I had him try to sew it together.  


However, that didn't work.  Unfortunately, I didn't cut it quite right and his stitches were a bit too big so we ended up cutting out a second stuffy out of the yard and a half of "flesh" tone muslin I got.   I then sewed it on the sewing machine.  He did try the peddle for a bit but the corners and curves are too tricky for an 8 year old who is learning to sew.   

Once we turned the muslin inside out, he was very happy to see it was human shaped - but without a skeleton.  So, we worked out a new system - I stuffed the stuffy and he handed me the stuffing or other things as needed.  He did try to stuff it but, like he said, it was not as easy as it looked like it should be.  Also, wooden spoons work wonders for pushing the stuffing into legs and arms.  

Once it was stuffed, I sewed up the head and started on the "hair".  The hair is just left over yellow yarn from a Navy (blue & gold) team colors scarf I made last year.   I showed him how to do it and he did do one row at least.


However, soon after this picture was taken, he got upset at his lack of ability to make perfect stitches and asked me to do the rest.   Once I sewed up the yarn on the back of the head, we started on clothing for the now naked stuffy.

I drew out a simple t-tunic patten and had him cut it out.


I also cut out a hat, sewed it up, but had him sew the hat to the head.  This way, he'd be able to point to what he sewed easily plus he got some more sewing done.   Mostly, he did all the cutting - which is also an excellent skill to have.   

Nephew with the finished stuffy!!!   We weren't able to get around to making the boots but that will be fine for next time.  The stuffy is not naked - a very important point- and does have a ribbon belt so, according to my nephew- he was good.  He later took a sharpie and drew in eyes and a mouth.  

Anyway, just a cute little project to do with my oldest nephew.   I might try something easier next time that he can sew himself - like a t-tunic or pajama bottoms.

Sunday, November 6, 2016

Commercial Sounding Post! Rocksbox is awesome!

I hate sounding like a infomercial and I know I've told a few of you about this already - Rocksbox.  Rocksbox is a neat little company I saw on pinterest that looked interesting. I only signed up a couple of months ago and I LOVE it. It's the netflix of jewelery. You tell rocksbox what your personal style is and they send you three pieces or jewelery every month. ...Did I mention this will sound like an infomercial?

It's $19 a month which is a bit $$$ when I'm used to spending that on a piece of jewelery or two. However, I also hate buying a piece, getting bored of it after a few days or not wearing it for months. This allows me to rent pieces that I like (you have a wish list that gets saved) without storing it. I can live with that. If you do like the piece (I LOVE the earrings I got in my box first box), you can buy them at a discounted rate. They also have sales on a lot of the jewelry and the second piece I bought from them I wore recently to a costume dinner.

As for shipping - they give you a return label, a reuseable mailing bag, a box, and velvet bags for the jewelry. Shipping back is easy - just like netflix used to be. :-D

This is my third box and it's great!


I'm in love with the pink necklace - I plan on wearing it on Tuesday all day. I probably will wear the dainty pink and gold dangling earrings tomorrow. Today, I wore this piece from the box:


A lovely pair of crescent shaped earrings!

If anyone wants to sign up and wants a free month, use code ElizabethCBFF29.  I've been getting great costume jewelry each month and the nice thing is I can just send it back after wearing it for a couple of weeks.  The stylists also happily take your wish list into consideration and you can mention specific pieces if you have something coming up.  They can't guarantee anything, but I've been pretty happy so far.

Tuesday, November 1, 2016

1920's Halloween

First, the inspiration:


I've been on a 1920's kick lately.   All I've wanted to do is make a 1920's style dress.  I was supposed to go to a party where the theme was fancy dress in monochrome but my truck decided to break down.  Instead, I finished the dress for Halloween.

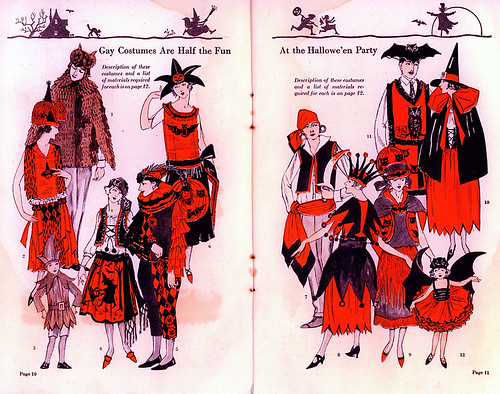
1922 Halloween Costumes
From this catalog page above, I really liked the idea of having just Halloween shapes cut out and adding them to the hem of a normal 1920's dress.  I took the crescent moon idea from the lady in the bottom left and the stars from the guy in the upper right.


1920's Celestial Fancy Dress
I couldn't track this one down to the source but I wanted to show another example of stars being used in Halloween costumes in the 1920's.

Gay Costumes are half the fun at the Halloween Party
This was not the original inspiration for the owl cut outs but I can't find the dress I saw that originally inspired it.  All I recall is that the dress was in the lower left hand side of the catalog page and had owls around the hem similar to the owls on the lower part of the upper right hand guy's tabard.  For a better idea:


1920's Owl Decoration

The cut outs for the hem of the dress are very similar to the head of the paper owl here. The eyebrows don't meet because these are fabric cut outs (black velvet) and the eyes also have to be somewhat more restrained.


Since I wanted to make a new dress for the 1920's, I had to make new undies as well.  Although my original 1920's bra was serviceable, I wanted something cuter and more attuned to my skills now.

1927 Bra

1927 undies

1920's Bra off of Etsy


Second,  making the outfit:


I don't have any pictures of making the bra and panties.  Basically, the underwear itself was pretty simple.  For the undies, I took two rectangles for the front and back, a small rectangle for the crotch out of both silk and cotton, and gores out of both the silk and lace for the sides.  Once I sewed it up, I added elastic to the waistband.

For the bra, it wasn't much more difficult.  I started with a band that was 3" bigger than my bust measurement at it's fullest by about 7".   I marked out where the darts should go - one bust dart on either side, darts for across the bust but under the arms, and one dart on either side directly under the arms.  The dart under the arms  is to straighten the band once you make the bust dart so the silk band will go around your back in a straight line.   I also added straps and lace to the front to make it pretty.

The hooks and eyes on the back of the bra are actually hook and eye tape.  I used that by folding the silk over the tape to hide it and add strength to the hooks and eyes.  This is also partly why I made the bad bigger - you'll lose a lot of fabric by folding the eyes into the fabric.

The dress - the dress is my own pattern as well.


I drew out each of these designs on just plain computer printer paper.  Using a box cutter, I cut four of each design from the scrap black velvet.  I glued each design exactly one foot apart on the hem of the dress - the skirt was made out of two 2 yard panels of silk.

Once the designs were glued on, I let them dry overnight.  This meant laying the entire four yards across my living room.  I had newspaper underneath to prevent the glue getting to the hardwood floors.

The tunic part of the dress was pretty simple.  I drew it out, cut it out, sewed the shoulders and sides, tried it on, and redrew where I wanted the neckline and underarms to be.   I then cut those pieces out better, and sewed down the rolled edges.

I realized I had cut the tunic a bit too short so I added a belt of black velvet.  I think it actually helps the dress a lot.


Third, the actual dress:


Materials: Silk, velvet, rayon lace, and a small amount of cotton
Notions: Thread, Glue
Cost: The white silk was $3 a yard at a closeout sale. The velvet and orange silk were stash as was the cotton. The was a Joann's remnant for $3, I think.  The pink silk was a joann's remnant that I bought years ago - I have no idea how much but I'm guessing $5 for the pink silk.   Since I only used under 3 yards for the dress, I don't think the dress cost much more than $20 to make.

Fourth, the critique:


My biggest complaints are as follows: I made the undies too short and the skirt of the dress too long.  The dress is pretty easy to fix - rip the skirt off the dress, chop six inches off from the waist,  and resew.  There isn't any help for the undies other than to make the rectangles more square like next time.

The coat I'm wearing in the photo is one I made a couple of years ago that works well for late teens and into the 1920's.