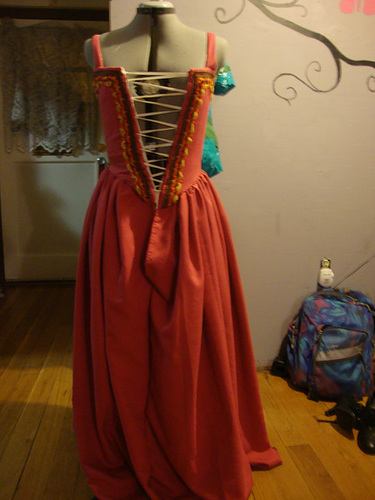
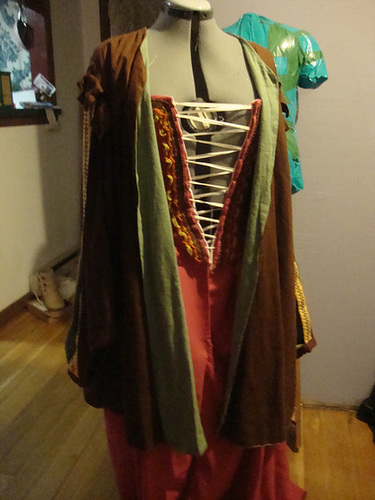
I made this dress last year for Bladensburg but only got to wear it for a few hours thanks to the rain. I wore it again this year for a lovely picnic/party/archery shoot. :-) The picture of me is courtesy of Gloria from In the Long Run. (Really, it was her husband Mike that took the picture. :-) )
I put up the fashion plate with the dress to show a couple of things. One, the color green I'm wearing is quite period correct and the use of paisleys is also correct. Also, having a too short dress is easily overcome with a gratuitous use of petticoats - which I did. The sari I used wasn't quite long enough but turns out, this is perfectly fine for the 1810's. The style I made is different - the fashion plate has it as an open center front and I made mine a fold over. The reason I did that was because of the sari - the hidden edge doesn't have the paisleys going up the front of the skirt. The sleeves are also different.
I wore a tiara because I couldn't go bare headed - that would be unseemly. I did try on a couple of different hats and...they just looked terrible. I couldn't find my turban (maybe it's in the trailer?) so...tiaras it is! That and it is one of Kat's parties - tiaras are necessary. ;-D
Now, at least, I have a proper picture of this dress!
(And I swear, I am sewing. I sewed already this morning. I'm in full Pennsic Panic mode and trying to get at least four dresses done before Pennsic. I'm hoping to have pictures of one of them tonight. We'll see)
Wednesday, June 24, 2015
Tuesday, June 23, 2015
Beef Pockets
This is something I came up with today while looking at what I had in the fridge. It is so terribly good! I have to write the recipe down so I'll remember.
Ingredients:
I preheated the oven to 425f. I then rolled out the shells on the cookie tray so I could fill them easily. I probably should have greased the bottom of the cookie tray with some of the olive oil but I didn't.
I chopped up the carrots (peeled and chopped small), onion, and potatoes (just chopped, not peeled). I then added the two eggs, spices, and ground beef, mixing it all together the best I could in the bowl. It doesn't have to be perfect but it does need to be mixed.
I then took the filling, and put half inside each pastry shell, folding the pastry shells over. Again, doesn't have to be perfect. I drizzled olive oil on top and put these in the oven for 45 minutes.
This should be enough food for probably 6 people. Each pastry shell should feed three. I will be eating this for the rest of the week. It's really quite good and I think I might make it at Pennsic (with smaller portions!). It is a modern recipe - I made it up this evening- but nothing in it screams modern either. Well, maybe the ground beef but if you wanted to do this for a medieval type dinner, you could use small pieces of steak instead.
Ingredients:
- 2 pastry shells - I use the roll out kind you find near the eggs in the grocery store
- 2 eggs
- 1 lb of ground beef - I like the lean kind but any kind will do
- 1/4 sweet onion
- 3 potatoes
- 4 carrots
- 1 tablespoon rosemary
- 1/2 tablespoon salt
- 1 teaspoon garlic salt
- Olive oil to drizzle over the shells when you put them in the oven
I preheated the oven to 425f. I then rolled out the shells on the cookie tray so I could fill them easily. I probably should have greased the bottom of the cookie tray with some of the olive oil but I didn't.
I chopped up the carrots (peeled and chopped small), onion, and potatoes (just chopped, not peeled). I then added the two eggs, spices, and ground beef, mixing it all together the best I could in the bowl. It doesn't have to be perfect but it does need to be mixed.
I then took the filling, and put half inside each pastry shell, folding the pastry shells over. Again, doesn't have to be perfect. I drizzled olive oil on top and put these in the oven for 45 minutes.
This should be enough food for probably 6 people. Each pastry shell should feed three. I will be eating this for the rest of the week. It's really quite good and I think I might make it at Pennsic (with smaller portions!). It is a modern recipe - I made it up this evening- but nothing in it screams modern either. Well, maybe the ground beef but if you wanted to do this for a medieval type dinner, you could use small pieces of steak instead.
Thursday, May 28, 2015
Historical Food Fortnightly 26: Working-Class Dinner
The Challenge:26. Working-Class Dinner May 15 - May 28
We all like making beautifully molded aspics, delicate cakes and pastries, and airy creams, but the vast majority of the world has dined on much simpler fare throughout history. For this challenge, give your best interpretation of the food eaten by the nameless rabble. Be sure to document what makes it “working-class”!
The Recipe: (where did you find it, link to it if possible) I've used this recipe several times and variations of it. Specifically, for this bread, I used the following:
1 cup starter
2 cups rye flour
1 tablespoon olive oil from Spanish olives
2 teaspoons raw honey
1 teaspoon salt
~1/3 cup water
I made the starter (50/50 rye flour and water) last week. It started to bubble by the third day and is currently very bubbly and happy.
There are several articles on bread making in the middle ages. Rye, by all accounts, was among one of the "poorer" grains. This is why I choose it for the flour. Since the average person would have access to honey but not sugar, I used the raw sugar. Olive oil was everywhere - even in countries like England that imported it.
As for why I choose bread, it's because of several saints who are said to have - at least for a period of time- eaten nothing but bread with some herbs and drank water. Bread was the very basic stuffs for any dinner and was sometimes the only thing many people - both sinners and saints- got to eat.
The Date/Year and Region: Roughly the 15th/16th century and Continental Europe
How Did You Make It: (a brief synopsis of the process of creation)
After waiting a week for that starter, I used half of it for the bread. I combined all the ingredients, kneaded the dough, and waited for the slightest hint that the bread rose. It did very slightly five hours later. So, I kneaded it again and waited....it took a total of 12 hours just waiting for this thing to rise even slightly twice! I then cooked it for 45 minutes at 400F in my modern oven.
Time to Complete: FOR.EV.ER. It was a week for the starter and all day for the bread to rise.
Total Cost: The rye flour was about $3.50 for the bag. I had everything else on hand.
How Successful Was It?: (How did it taste? How did it look? Did it turn out like you thought it would?) I would have liked to let it sit for longer but I had to get the bread done today. However, the bread itself is quite yummy. It's a bit different from whole wheat but quite good.
How Accurate Is It?: (fess up to your modifications and make-dos here) I tried to be as accurate as possible with the ingredients. Honey can taste different depending on the regions so that's going to be a bit off. I used sea salt and tap water. The olive oil is probably very close to what my ancestors would have used. The rye flour was organic rye so I'm pretty sure it's close to what would have been used. However, modern oven and modern bread pan.
Sunday, May 24, 2015
Venetian Bodice Closure
The above is one of my favorite outfits to wear in the SCA and at Renaissance Faires.
I normally wear it with the jacket (as above) and a bright orange apron. It's ridiculous in colors but actually pretty accurate for the late 16th century.
For lacing, since I wanted to keep the dress as accurate in look as possible, I did something a bit different. I created a regular bodice, using the same pattern as I used for the dress, and punched a bunch of eyelets in it and sewed them up. I then cut out the bodice fabric for the dress but added a couple of inches along the front edge. I folded the edge over, stitched it down, and basically used the fashion fabric as a cover for the bodice. At the front, I just made a few stitches between each of the lacing holes to hold the fabric down and over the bodice. I know this probably doesn't make much sense so here are some photos!
| The front of the dress with some of the lacing already done |
| Pinching open the space between the fashion fabric and the bodice layer. The lacing goes under the fashion fabric as well. |
| Showing the inside of the bodice. Notice it's spiral lacing. |
Hopefully the photos help to make more sense!
1950's Inspired Dress
I bought some linen with an orange and brown print at the thrift store a couple of months ago. It wasn't my color choice but I can't pass up 4 yards of linen for $4.90! There was just something about it that it wanted to be made into a nice summer dress.
So, I began to look around for ideas when I stumbled upon these photos:
I figured something like the above would be perfect but I didn't have any vintage or vintage inspired patterns that even came close to that so....I drafted my own.
As you can see, Abby helped. The really wide part of the pattern is the front. This pattern ended up being way more complicated than I originally intended. I had to sew down and iron each of the pleats to make sure they'd stay.
Unfortunately, the pleats kept acting up so I'd have to repin, play with the material, repin again, and do this over and over until finally they behaved and I could sew them down and iron them. The skirt is just a half circle skirt. Because I didn't have much in the way of yardage, the stripes are upside down on one half of the skirt. Eh, whatever.
I managed to find a vintage brown zipper that was the perfect length in my collection of zippers (they kept selling pack of ten of them at the thrift store for $1 so...I have a lot). Amazingly, the zipper went in without any issues.
Below is a picture of the finished dress.
I'd like to add a belt eventually (and cut the grass later today) but it works for now. Yay!
So, I began to look around for ideas when I stumbled upon these photos:
I figured something like the above would be perfect but I didn't have any vintage or vintage inspired patterns that even came close to that so....I drafted my own.
As you can see, Abby helped. The really wide part of the pattern is the front. This pattern ended up being way more complicated than I originally intended. I had to sew down and iron each of the pleats to make sure they'd stay.
I managed to find a vintage brown zipper that was the perfect length in my collection of zippers (they kept selling pack of ten of them at the thrift store for $1 so...I have a lot). Amazingly, the zipper went in without any issues.
Below is a picture of the finished dress.
I'd like to add a belt eventually (and cut the grass later today) but it works for now. Yay!
Thursday, May 21, 2015
Lilac 1500's Venetian Dress
Using the pattern I created here, I cut out my bodice and skirt for a simple, working class early 16th century dress.
Fabric: Linen/Rayon blend at Joanns. I loved the color. The lining is 100% linen. The interlining is some purple striped duck cloth I got at Ikea.
Directions: First, I cut out all the bodice pieces - one front and one back out of the lining, interlining, and fashion fabric. I then took the rest of the fabric, folded it in half, and ripped it down the middle. (For most simple weaves, you can make a small cut where you'd like to start a straight cut and just tear the fabric in half from there. Makes for some nice, super straight lines.) I realized the fabric is longer than the 45" I'm used to and also ripped off the excess - about 9". The linen strips I have left will probably make some nice hem facing on later historical gowns.
The two skirt pieces, I machine sewed the hem and rolled the edges, sewing those down as well. I then sewed the two rectangles together, leaving about a 7" gap at the top.
For the bodice, I sewed the shoulders together first. I then put the interlining on the table, followed by the lining facing up, and then the fashion fabric facing down. I pinned at the corners and seams, machine sewing from the waistline, around the armsyce, and back down the back. I then turned it and hand sewed the neckline.
I pleated the skirt to the bodice. The front has double pleats at the sides and the back had double pleats at the back. This was to get most of the fabric towards the back and sides, away from the front of the skirt. Once those were pleated, I machine sewed the skirt to the bodice and hand sewed the lining closed. I then punched seven eyelets on each side, sewing those.
I also hand sewed down the neck trim which you can't see clearly in these photos. Sorry! It's a nice wool trim in purple and blue.
Things you'd do differently: The neckline should be lower - that I can easily fix. Also, I need to make the bodice a bit more fitted at the underbust - another easy fix. However, as the photos show, it fits and it's honestly pretty comfortable. I think I'll be quite happy with it at Pennsic.
Sunday, May 17, 2015
Pennsic!
It's that time of year, again. Where my brain goes to all Pennsic, all the time. There is only a month left to pre-register for a space at a camp online. The mail in date is only a week away. If you don't pre-register, you will, most likely, be in singles camping. The further you get to the center of things, the more likely that land is precious - every person is allocated 250sq when they pre-register. If you don't pre-register, your encampment looses that 250sq and that means they have to make room for you if they can and are overly nice.
Another good reason to pre-register is that you do get a discount. It is only $10 but still, it's like getting the 10¢ for bringing a reuseable bag at the grocery store. You get money back for not being forgetful. ;-)
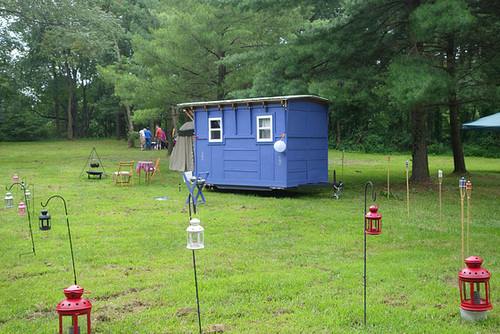
What is the entire two weeks on Pennsic like? Fun! It really is a vacation for me. Of course, since I have this:
I don't have to worry about tent poles and leaky tents anymore. I get to stay inside my nice comfortable tiny house when it rains and not worry about things like flooding as well. Wind really isn't an issue anymore either. Yeah, I know.
But for the first er...seven Pennsics? I went to, I did have to worry about those things. I used pallets to raise the tent floor off the ground. Throw a couple of boards down and some rugs on top of that? You have a fabulous comfortable floor that is just high enough that water isn't an issue. If your tent falling down has been an issue (it wasn't with an easy up and the cover I made for it), check your ropes daily. Tighten them as much as you can. The rain and sun can cause the ropes to lengthen a bit.
The very first night of Pennsic - appropriately called First Night- looks like this:
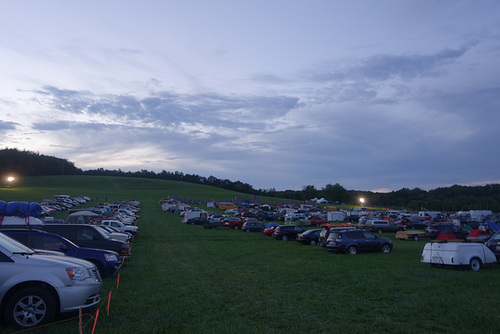
You might recognize the battlefield if you've ever been to Pennsic before. Everyone who is a land agent camps out on the field Friday night. For me, it's easy. I just go and sleep in the trailer. Some people put up "earth pimples", some sleep in their cars on top of their stuff, others stay up all night. If you actually have the other land agents on your land show up Friday night, you can do a quick registration, get everyone to agree on who goes where, and then drive to your space that night - but some people can't get there on Friday with very good reasons.
Being a land agent and registering your space can be easy or difficult depending on the other land agents, If you aren't down in the Serengeti or the Bog, you'll probably have an easier time than if you are. Because land is at a premium in those locations, some people might get a bit upset if their "traditional" lines are messed with. What it all comes down to though is who has the most people pre-registered. This is why pre-registration is so important. If you have 25 people pre-registered, then you get to mark off 6250sq of space. If the other land agent has only 7 but thinks as many as 12 people are coming, well, guess what happens? The group that has the most pre-registered gets the most land. If there suddenly isn't enough space for those extra people, there is little you can do.
Each land agent is given a map of their slotted land. You draw boundary lines on the map for each group that will be camping in that location. The finished map with all the lines and group names gets handed in as land registration. You are then given a plastic baggy and a piece of paper that shows your group is registered to be on that land. This piece of paper is vital. You need to have it displayed in a conspicuous manner. Most people have it attached to their gates some how.
Once all that is done, you get to set up camp! Some camps are WAY more elaborate than others. No matter what, if you are the land agent, you'll probably be in charge of setting up the basics yourself or with whomever you managed to bring with you. Basics as in a shower tent, a kitchen tent, a fire pit, ect. Not everyone will have a kitchen tent - there are plenty of places to eat at Pennsic- but most will have a shower tent and a fire pit. Whatever the basics are for your camp, you'll probably have to at least lay the foundation for them.
Once that's done, take a walk around Pennsic. See if anyone else needs help. If you are too tired, just sit back and relax for a couple of days until some of the rest of your camp comes in. A lot of people come in either the Friday or Saturday of Peace week (the first full week of Pennsic).
Although a land agent must be "in charge" of their encampment 24/7 at Pennsic that doesn't mean you can't leave the grounds. You are free to go grocery shopping, to the laundry, or just to Walmart. Home Depot is also good depending on what you might have forgotten. I also go to Church down the road on Sundays...followed by going to Aldi's because they have those cookies I love. As long as you can get back to the site in a reasonable amount of time should an emergency occur, you're fine.
Clean up once everyone heads home is also your responsibility. The doesn't mean that your campmates get to trash the place and leave you to clean up - everyone should be helping - but if the Coopers have anything to say about the state you left the place in, they'll contact you.
Let me know if you have any questions about Pennsic or if you are planning on going! I'd love to see some of you there!
Another good reason to pre-register is that you do get a discount. It is only $10 but still, it's like getting the 10¢ for bringing a reuseable bag at the grocery store. You get money back for not being forgetful. ;-)
What is the entire two weeks on Pennsic like? Fun! It really is a vacation for me. Of course, since I have this:
I don't have to worry about tent poles and leaky tents anymore. I get to stay inside my nice comfortable tiny house when it rains and not worry about things like flooding as well. Wind really isn't an issue anymore either. Yeah, I know.
But for the first er...seven Pennsics? I went to, I did have to worry about those things. I used pallets to raise the tent floor off the ground. Throw a couple of boards down and some rugs on top of that? You have a fabulous comfortable floor that is just high enough that water isn't an issue. If your tent falling down has been an issue (it wasn't with an easy up and the cover I made for it), check your ropes daily. Tighten them as much as you can. The rain and sun can cause the ropes to lengthen a bit.
The very first night of Pennsic - appropriately called First Night- looks like this:

You might recognize the battlefield if you've ever been to Pennsic before. Everyone who is a land agent camps out on the field Friday night. For me, it's easy. I just go and sleep in the trailer. Some people put up "earth pimples", some sleep in their cars on top of their stuff, others stay up all night. If you actually have the other land agents on your land show up Friday night, you can do a quick registration, get everyone to agree on who goes where, and then drive to your space that night - but some people can't get there on Friday with very good reasons.
Being a land agent and registering your space can be easy or difficult depending on the other land agents, If you aren't down in the Serengeti or the Bog, you'll probably have an easier time than if you are. Because land is at a premium in those locations, some people might get a bit upset if their "traditional" lines are messed with. What it all comes down to though is who has the most people pre-registered. This is why pre-registration is so important. If you have 25 people pre-registered, then you get to mark off 6250sq of space. If the other land agent has only 7 but thinks as many as 12 people are coming, well, guess what happens? The group that has the most pre-registered gets the most land. If there suddenly isn't enough space for those extra people, there is little you can do.
Each land agent is given a map of their slotted land. You draw boundary lines on the map for each group that will be camping in that location. The finished map with all the lines and group names gets handed in as land registration. You are then given a plastic baggy and a piece of paper that shows your group is registered to be on that land. This piece of paper is vital. You need to have it displayed in a conspicuous manner. Most people have it attached to their gates some how.
Once all that is done, you get to set up camp! Some camps are WAY more elaborate than others. No matter what, if you are the land agent, you'll probably be in charge of setting up the basics yourself or with whomever you managed to bring with you. Basics as in a shower tent, a kitchen tent, a fire pit, ect. Not everyone will have a kitchen tent - there are plenty of places to eat at Pennsic- but most will have a shower tent and a fire pit. Whatever the basics are for your camp, you'll probably have to at least lay the foundation for them.
Once that's done, take a walk around Pennsic. See if anyone else needs help. If you are too tired, just sit back and relax for a couple of days until some of the rest of your camp comes in. A lot of people come in either the Friday or Saturday of Peace week (the first full week of Pennsic).
Although a land agent must be "in charge" of their encampment 24/7 at Pennsic that doesn't mean you can't leave the grounds. You are free to go grocery shopping, to the laundry, or just to Walmart. Home Depot is also good depending on what you might have forgotten. I also go to Church down the road on Sundays...followed by going to Aldi's because they have those cookies I love. As long as you can get back to the site in a reasonable amount of time should an emergency occur, you're fine.
Clean up once everyone heads home is also your responsibility. The doesn't mean that your campmates get to trash the place and leave you to clean up - everyone should be helping - but if the Coopers have anything to say about the state you left the place in, they'll contact you.
Let me know if you have any questions about Pennsic or if you are planning on going! I'd love to see some of you there!
Subscribe to:
Posts (Atom)