Showing posts with label Regency. Show all posts

Wednesday, June 24, 2015

Old Dress but new picture

I made this dress last year for Bladensburg but only got to wear it for a few hours thanks to the rain.   I wore it again this year for a lovely picnic/party/archery shoot.  :-)  The picture of me is courtesy of Gloria from In the Long Run.  (Really, it was her husband Mike that took the picture. :-) )

I put up the fashion plate with the dress to show a couple of things.  One, the color green I'm wearing is quite period correct and the use of paisleys is also correct.  Also, having a too short dress is easily overcome with a gratuitous use of petticoats - which I did.  The sari I used wasn't quite long enough but turns out, this is perfectly fine for the 1810's.   The style I made is different - the fashion plate has it as an open center front and I made mine a fold over.  The reason I did that was because of the sari - the hidden edge doesn't have the paisleys going up the front of the skirt.   The sleeves are also different.

I wore a tiara because I couldn't go bare headed - that would be unseemly.   I did try on a couple of different hats and...they just looked terrible.  I couldn't find my turban (maybe it's in the trailer?) so...tiaras it is!   That and it is one of Kat's parties - tiaras are necessary.  ;-D

Now, at least, I have a proper picture of this dress!

(And I swear, I am sewing.  I sewed already this morning.  I'm in full Pennsic Panic mode and trying to get at least four dresses done before Pennsic.  I'm hoping to have pictures of one of them tonight.  We'll see)

Sunday, January 18, 2015

New Pink Spencer!

This is something I've wanted to make for a while.  I had *just* enough pink silk taffeta to make a decent early 1820's spencer.  I also have this lovely -albeit not period- dupoini silk my Dad got me in Singapore.  It's cream colored but with green and pink embroidery.  It is VERY me and I love it - but he only got 3 yards.  It's enough for a skirt.

So, I've had the concept of this outfit planned out for at least two years.  I'm so happy I finally finished it.

Here are some of the inspirations for the spencer:


I used the Sense and Sensibility pattern as a base and edited to fit what I wanted it to look like.  Yeah, I know - the mock up fabric looks like Scooby Doo and the Mystery Van crashed into it.  That is why it's mock up fabric.

 Basically,  I did two things: I made the neckline higher and close right in the middle, rather than be a double breasted spencer.  Since I wanted a collar, I just drew the collar I wanted on the side I wasn't going to use as a pattern and cut the collar out.  I then traced that on to another piece to make it look more smooth and....

Voila!  Collar pattern.

I didn't have enough time to roll the bias ribbon trim I made to decorate the front of the spencer, S I folded it over as best I could.  It doesn't look bad - just not as thin as I would like.  


 It did take hours to hand sew this down and make sure it matched the other side well.  Most of the inside stitches are machine sewn - it's only the stitches that I knew would be seen that are hand sewn.

 Back of the spencer.  It's largely unchanged from the original pattern.

 Cuff of the sleeve.
 Top of the sleeve.

The full outfit!   I probably should get a close up of the skirt fabric.  It may be a rather slubby dupioni, but it is really pretty.

I'm so glad I finally got this outfit DONE.  I might redo the skirt a bit but the spencer doesn't need anymore work.  

Thursday, January 15, 2015

Historical Sew Monthly: Foundations

The Challenge:
Foundations: make something that is the foundation of a period outfit.

Fabric:
Cotton Muslin, Cotton Duck Cloth

Pattern: 
My Own!

Year: 
First Half of the 19th C from 1820 to 1860

Notions:
Pink cotton thread, white cotton thread, Bamboo wood edge from a placemat, cotton twine

How historically accurate is it?
For 1860 - not to shabby. It's machine sewn in part with the upper edge being hand sewn, hand bound eyelets, and hand done embroidery.

Hours to complete:
5 or 6, I think?

First worn:
This weekend, I hope.

Total cost:
Everything was stash so maybe $6?  I think the placemat was $2 when I bought it and I know the muslin wasn't exactly pricey.  The thread was part of a large batch I got years upon years ago from a thrift store for 10 cents.


And the rest of the story!

So, gussets don't like me.  Actually, I know of very few ladies who are gifted up top that can wear gussets without complaint.  Therefore, I went looking for a pair of stays that would work for the Romantic era that didn't have gussets and I found a few.

The first pair I found, and the pair I based this one off of is actually from 1860.  Although it does have side gussets, it's not the type that you typically see with the earlier stays.  Rather, these look more like piecing than that for cup size.  Another one I liked that was from the right time period (1810 - 1830) is at the Met and also lacked the cup gussets.  Both are pretty similar in shape.

The sides to the pieces for the stay I made are curved but the back edge is straight.  I thought it looked way too plain once it was done so I added a bit of embroidery where the busk is.   The busk being the bamboo edge to a placemat I took apart years ago.

It's not the prettiest pair of stays, but it is functional and I finally have a pair of long stays!

EDIT:   Here is another example of stays without gussetsAnd another...  And another!  They might not have been the most common, but they also weren't unknown.  

Saturday, August 23, 2014

War of 1812 Outfit

For the Battle of Bladensburg, I made a new dress out of an old green sari I got for $4.90 at the local thrift store. The sari had woven borders and a woven pallu while the petticoat part of the sari was all green organza. It was stunning as a sari. I hoped to make it just as lovely for a War of 1812 dress.

I cut off the pallu (the heavily decorated edge that goes over the shoulder on most saris) but left one small border of it because it worked well as a decorated edge opening for the wrap gown I ended up making. The upper border of the sari, I cut off and used as trim around the bottom of the sleeves. I lined the dress in some of the pink silk from the curtains I cut up in the Under $10 HSF.

This was after I had worn it for a few hours so it's rather wrinkly.
Sorry for the blurry back photo!  It's not really that wrinkly, it's more that it's silk organza and that doesn't photograph well.
You can see the bottom border here.
Close up of the bodice.

On most of the fashion plates from the early 1810's, ladies are wearing partlets during the day.  I took my old renaissance partlet pattern I designed a few years back and used that with some minor edits.  I was going for something similar to this partlet.


The biggest difference between a 16th C partlet and a 19th c partlet is the collar. I made the collar twice as long and then pleated it to the neck opening. The collar edge is rolled under. Very simple but it worked well.

Really, the biggest issue I had wearing this was that it would not stop raining! So I ended up coming home early. I hope the British troops go home soon and take their weather with them!

Monday, June 2, 2014

Mom's Late 1810's/Early 1820's Outfit

 Myself in my handsewn blue checked wool apron front I made last year and Mom in her new Regency Era outfit.  Mom actually liked the petticoat at least.  However, she ended up not liking the dress - she doesn't want a cross front- or the jacket.  *sigh*

Part of the problem was that the Sense and Sensibility pattern I used is ridiculously bulky.  Because I was already piecing the blue wool together from scraps, it ended up with even more seams than necessary as I took it in.  Below is the left back shoulder.  There should be one seam.  There are three.
Even with me taking it in, the jacket was still a bit big for her.   Oh well, it matched the bonnet!

I couldn't do much with the cross over dress - it had to cross over because of the way the tablecloth I used for the skirt was constructed.  It had scallops on three sides but not the fourth.  Therefore, the fourth side had to be hidden in a cross over.  I took off the scallops on the top side to use as trim around the neckline and sleeves. 

The stays and the petticoat are what Mom kept.  The stays are based on an extant pair in my collection.  The pattern for them is available up at Spoonflower.  The petticoat was super simple - just a bunch of trapezoids connected to a waistband with a wide eyelet trim at the bottom.  I also added the cording using a zipper foot - only two rows as I was trying to go for late 1810s/early 1820s.  I wanted the skirts to keep from getting stuck as Mom walked and figured the cording would help.  It did.  :-)

Saturday, May 31, 2014

Mom's Spencer


It's not completely done, but it's close.  I still need to add the cuffs and the hooks and eyes.  That's it!   The spencer is out of  navy blue wool scraps that I pretty heavily pieced to get the straps and sleeves.   I'll take more detailed photos later showing the piecing.  I really only had enough of the blue wool for the spencer.

The pattern is the Sense and Sensibility one that I think everyone has.  :-)  I changed it up slightly - adding a casing of blue wool to the bottom of the spencer.  I also had to shorten the sleeves, take in the shoulder straps, and take in the back of the spencer to get it to fit nicely. 

The spencer is lined in very much not period flannel backed baby blue poly satin.  Maybe it's rayon satin.  Something not natural satin. It's all part of the "leftovers" pile.  Mom's cape that she loves is lined in the same satin. So I know it's safe. 

Mom's Corded Late Regency Petticoat


I decided I wanted to play with cording a petticoat. I honestly haven't tried before - I've bought all my hoopskirts- but I saw one of my buddies on my Livejournal friend's list do one a few months back using a zipper foot. It worked. Well, actually. I just did a couple of channels around the hem to give a bit of a puff. I used cotton/poly twine you get at Home Depot. I folded over the hem, held the cord inside the hem, and ran the zipper foot with the needle all the way over to the right. It's not super stiff, but it does add dimension to the dress.

Side view.  The mess is a couple of different projects.  One is my Edwardian UFO and the other is the pattern pieces to the spencer I'm working on next.

The dummy mummy and my Mom now have different dimensions- which is why the fit is a bit off on the dummy mummy.  However, you can see the skirt flares well for the 1810s/early 1820s look.

Side view with the petticoat.  It's not a big amount of puffiness - just enough to keep the dress "light" looking. 


A close up of the cording under the dress.  I added some wide eyelet edging to the hem of the petticoat - so, should it peek out, it's okay. You'll just see more muslin and embroidered lace.

If she likes this style, I might make her more petticoats in different colors - I have some green that would look fabulous beneath this dress.  Right now, she has a lovely blue bonnet with a white feather courtesy of the Bohemian Belle.  I'm trying to create a wardrobe for her that will match that.  Which means I should probably make a navy blue petticoat next rather than green.  ;-)

Friday, May 30, 2014

Mom's Regency Dress


Originally, the skirt was a tablecloth.  :-)  I bought the tablecloth years ago on etsy as part of a lot.  The other tablecloth already became my Regency era gown. This one will be Mom's. 

The tablecloth was only finished on three edges.  The far width edge was rolled over and sewn down.  I cut off the top scallop edge of the tablecloth (actually, I cut it and then ripped the cut right down to the other width edge so that it would be straight..) and used that for trim.  The edge is now on the sleeve edge as well as around the neckline.  I only have maybe 8" of it left! 

The pattern is one I developed for Mom.  She tried on her stays I made her and the mock up only needed a few minor changes.  The lines of the pattern are based on extant garments.  Except the sleeves...those are the basic trapezoid with a bell curve at the top.   The entire dress is machine sewn.  

Saturday, February 15, 2014

Historical Sew Fortnightly ’14 Challenge #3: Pink


The Pink 1790's Dress is done!!!  Yay!!!

So, first, the inspiration:


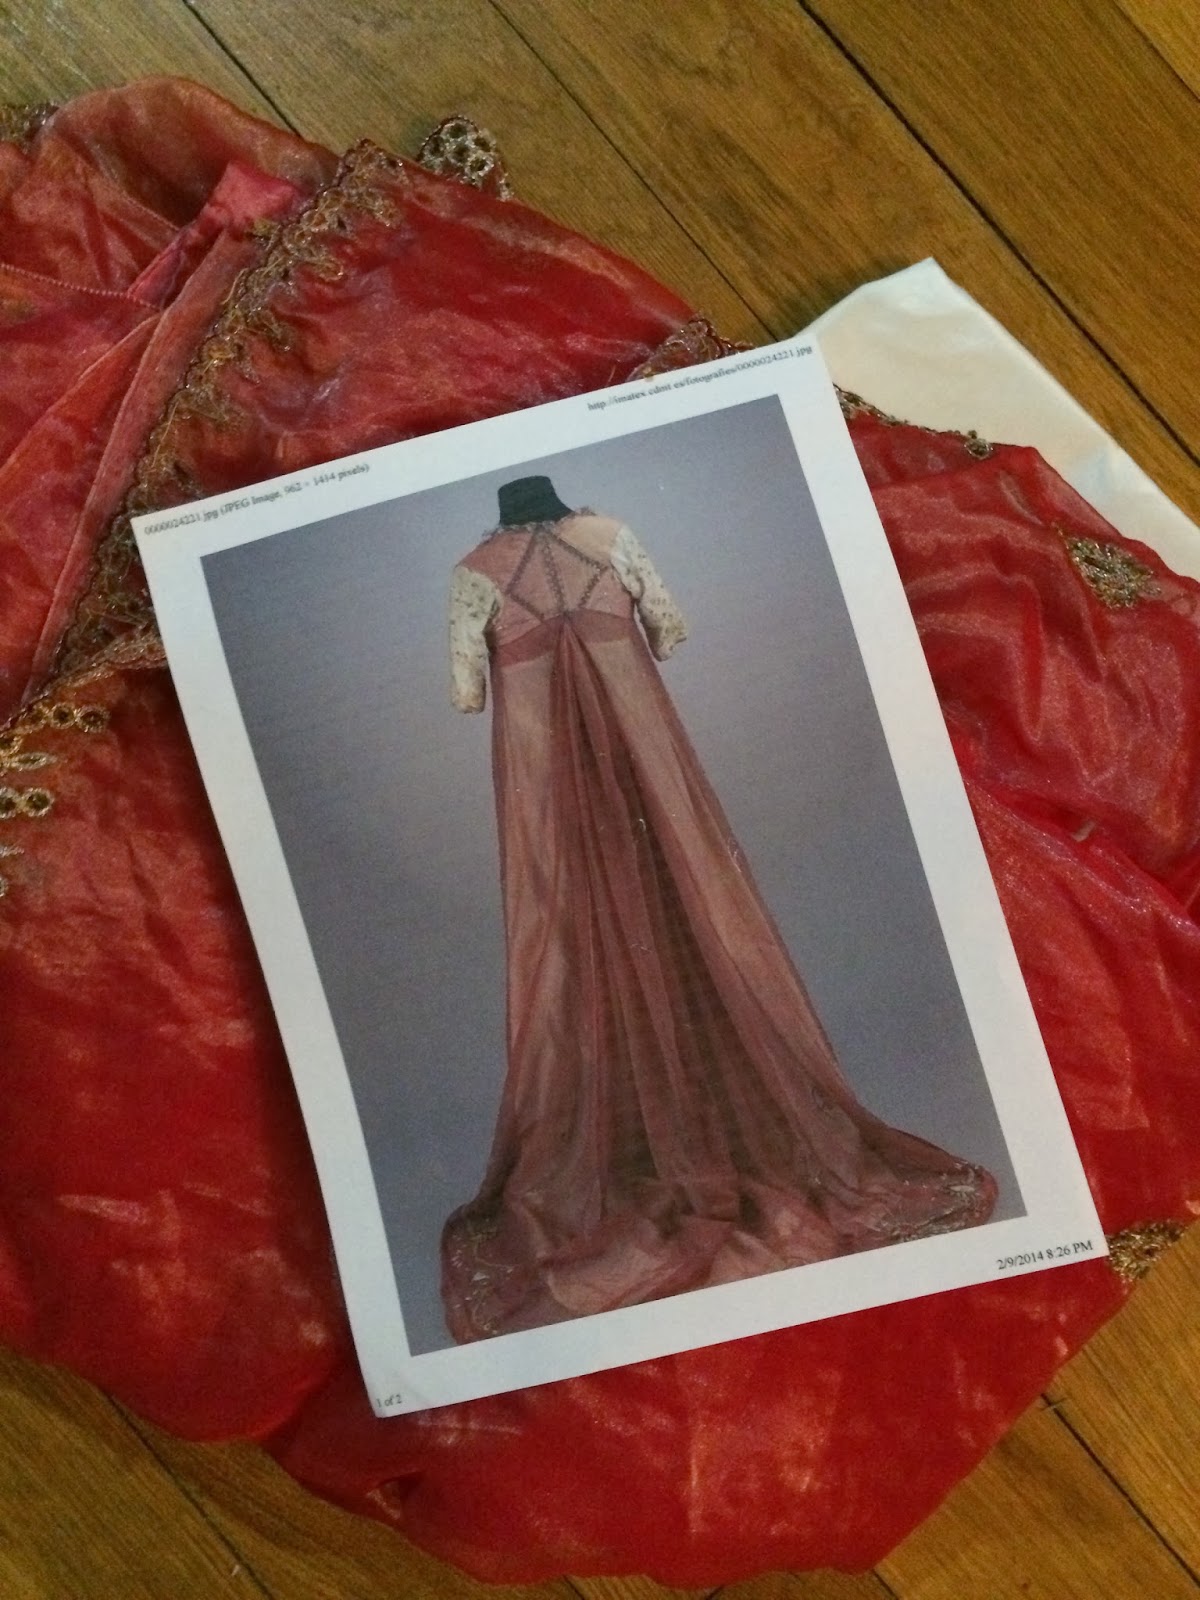
This dress can be seen online here. Just type in 1795 into the "cerca simple". The pink dress is in the middle row, typically, of the search results. Click on "Fixta completa" and a new window will pop up with a lot more information. In the new window, click on "imatges" and then "ampliar" for really big photos of the front, back, and embroidery.

I did deviate from the original in a few things beyond mine being more pink - the sleeves.  I couldn't figure out the original sleeves and what the heck is on them.    I just added silver metal sequins to the white silk taffeta sleeves on my dress and then took some silver zari lace to add that to the bottom of the sleeve.

I also couldn't really figure out the skirt.  As far as I can tell, there isn't a seam in the thing!  And how did the seamstress gather the back to allow for that lovely full train?   I have no idea.  However, in the 1790's, it was perfectly acceptable to just cut a rectangle and gather a lot of it to the back to give you that back puff without the use of a bumroll - which they had.  So I did that.

However, the bodice is pretty much cut and constructed the way I think this dress is.


 First, the back.  Those that have been following the blog have already seen these photos.   I constructed a pattern based on the lines of the original gown.   This meant a diamond shaped back.

 Rather than gathering the front for the pattern, I just pinned it.  It worked.

 The sleeve is based on the pattern from Janet Arnold.

 Back of the sleeve.

 Print out I was going by and the sari before I chopped it up into pieces.  You can also see the silk taffeta peeking out.  The silk taffeta was left over from my 1860's ball gown.


 The bodice!   I had done everything except attach the skirt last night, pretty much.   The sleeves worked, the lace was added to the neckline, the dress was nearly done - but this was also taken at 1 am in the morning and I figured finishing the dress that late/early really wasn't a good idea.

 So skip to this morning when I added the skirt!   The bottom of the bodice also has a gathering ribbon in it.  I had to gather the front part of the skirt (which was the pallu of the sari) to the ungathered tube of the bodice and then stitch the rest of the skirt to the back of the dress.

 The photos look funnier than the dress really is.  It is puffy in the back but it actually looks nice - well, nice for the 1790's.  The attached petticoat skirt was easy to sew around the bodice.   I just machine stitched that.  However, it was just four trapezoids (the original dress doesn't show gathers in the attached petticoat so I tried to copy that) and didn't need to be gathered.

The sleeve!   Those sequins kept jumping away from me as I tried to sew them down. 

Now the important stuff:

The Challenge: Pink
Fabric:A sari from my stash of silk organza, white silk taffeta, a ton of muslin
Pattern:  My own! Pictures to prove it too!:-)
Year:  1795
Notions: Not accurate nylon yellow ribbon, accurate silver zari lace, silver sequins
How historically accurate is it? I'm going to put it at about 90%. I did machine sew the big seams but you can't see them. Anything you see is probably hand sewn.
Hours to complete: Maybe 12?
First worn:Tonight!
Total cost:
Probably about $17 for the sari, if I recall. I think the silk taffeta was some of that $5 a yard stuff I got years ago as well. And the muslin was $1 a yard. So...$32 for the fabric? Maybe $40 total with the notions?


Small edit:

Me wearing the dress!

Sunday, February 9, 2014

Historical Fortnightly Pink Progress

For the pink one, I decided to somewhat recreate this stunning 1790's dress in the print out above.  If you go to http://imatex.cdmt.es/_cat/fitxa_cerca_resultats.aspx and type 1795 into the Cerca simple, you'll see it as one of the examples.   I don't like how the back waistline is - I prefer the waistline and the skirt to match up- but I love everything else about this dress.

For the fabric, I'm using a pink silk organza sari I have.   The sleeves will be out of some left over white silk taffeta I have from my 1860's ball gown.  I plan on adding silver sequins to the sleeves.   It won't be an exact match, but it should look pretty close to the original gown.

Now, the pattern. 

I already have a lot of Regency patterns.  So I took the same one I used for the 1820's dress and just redrew the lines.   I ended up not being too far off.

On the right, I've recut the pattern to better fit.  The left is still a little crazy but that doesn't matter.  This is just the mock up to make the pattern. 
The front.  I just pleated it to get a general idea.  It will be gathered in the finished dress. 
The sleeve!  This one was more complicated than the 1820's dress.   It's still using the more complex Rococo patterning.  This means I need to remember there is a left and a right.  Grr...


The back of the sleeve.  It will be lightly gathered at the top of the sleeve.   I used Janet Arnold again - the half dress sleeve pattern- to get an idea of what I needed.   I plotted out the major points; from armscye seam to armscye seam and then the length down to the elbow plus the from elbow seam to elbow seam.  You end up with a sideways "H" this way.  (I originally said an "I", which is true, but the font this blog uses doesn't show the crossbars as the top and bottom of the "I"). However, from that, I can redraw the curves shown in Janet Arnold around the sideways "H" to get a half way decent pattern. 

More tomorrow!