Thursday, August 10, 2023

New sheer handsewn linen camica


The camica laid out on my bed at Pennsic.   It's too sheer to model as it's out of 2.5oz linen I bought from Fabric Store.   


Close up of the neckline.  I used linen thread I would run through beeswax to sew the entire camica.   Each of the edges are rolled or are wrapped in what is essentially linen bias tape.   


Close up of one of the cuffs.  I still need to add twill tape or some sort of fastener to the cuffs.  

Overall, it took me maybe three days, on and off, to sew the camica up while at Pennsic?  This included cutting out the garment and going to classes or walking around.   It really didn't take too terribly long.

The pattern is very simple.  One yard of linen for the front.  One yard of linen for the back.  30" of  the linen, cut in half for the sleeves (so the "top" of the yard is one sleeve and the "bottom" is the other).  5"ish to make squares.  I cut the bottom of the front and back to make binding for the neckline and cuffs.  Overall:  3 yards of fabric used.  

It's very lightweight and perfect for summer.   I'll probably wear it to the North Carolina Renaissance Festival in a few weeks.  :-) 

Saturday, May 6, 2023

Late 16th Century Venetian Style Peasant Dress


Materials

3 1/2 yards of red linen/cotton blend from Fabric Mart

1/2 yard of cotton duck cloth

1/2 yard of white cotton

1/2 yard of linen rayon blend stripes from Fabric Mart

DMC thread because no one carries red linen and I thought the event originally was a weekend ago

White linen thread from Thimble and Plume

A boot lace

3 ish yards of trim I bought from Lace & Trims on ebay

Pattern

I used McCalls M7763 for the bodice but with edits. I upped the neckline by at least a good inch. I took two inches off the front shoulder strap and redesigned them to be more narrow at the top. I took some off the upper inside of the front side seam as well.

The skirt is just pleated yardage that I then attached to the bodice. The apron is well, a rectangle with a long, thin strap of material to make the ties.

First Wearing

I didn't get the chemise I wanted to wear with the outfit done in time.  I ended up just wearing a blouse I found at Goodwill that looked close enough.   


The bodice probably could have been laced a bit tighter but, overall, it was pretty comfy to wear.  I love the length of it and will probably make a couple more dresses from the pattern.


It was also the correct outfit to wear as it was pretty warm in the sun at the event.  Unfortunately, I had to leave early because the pup wasn't used to the heat.  She's fine - she cooled down quickly on the car ride home- but I just didn't want her to get sick.   


Research


It was pretty much based on the same images as I used for my friend's dress a couple of years ago.  This one in particular:


Pietro Ronzelli: Nativita di Maria, Chiesa del Carmine, Bergamo


I just did the inverse colors - primarily because I didn't have a bright red Venetian dress.  Now that I do, I think I'll work on making more chemises to wear with my dresses and gowns.  I'll need them come Pennsic!   Who else is going?


Sunday, April 9, 2023

Happy Easter! Naturally Dyed Easter Eggs!

 I've been slowly getting into natural dyeing for years now.  This year, I wanted to naturally dye the Easter eggs.  After looking at a few different options, I went with Turmeric for yellow and purple cabbage for blue.  


The one green/gray one is due to dyeing it with turmeric for a couple of hours and then throwing it in the cabbage dye overnight.  

Yellow Dye Recipe:


  • Two heaping spoons of tumeric
  • A couple of cups of water
  • About 1/4 cup of white vinegar


I put this all on a glass bowl and mixed it up.  I didn't heat up the mixture (which may have made it quicker but eh).  Really, I just put the hard boiled eggs in the mix and left them in the fridge (with a lid) overnight.  


Blue Dye Recipe:

  • Half a head of purple cabbage
  • A couple of cups of water
  • another 1/4 cup of white vinegar
Just rip up the cabbage leaves or chop them and thrown them into a pot.  Add in the water and once, the water is boiling, set it to simmer for 15 minutes.  I accidentally used too much water (4 cups) and while it worked, I think it would have been slightly quicker to dye if I hadn't used so much water.   

Once it's boiled, the leaved will be a pale purple with a lot of green.  It was really amusing to see.  Just gather up the purple water and add the white vinegar to that for your dye bath.  I left the eggs in the dye bath overnight (glass bowl with the lid) to get the indigo color.  


I was hoping for a bright green with the cross dyed one but oh well.  It was a fun experiment.   The nice thing is that purple cabbage was known in the Middle Ages.  I need to see if I can find a recipe or mention of using it as a dye as this does seem to work well and is easy to accomplish for a pretty decent blue.  

Saturday, February 4, 2023

Hairpins in the Medieval Era

Hello!   Is this thing on? I know it's been a long while since I've posted.  I'm back in the States, working at a wonderful new fully remote job where I get to do research all day!   

I thought to post because I came across yet another "Medieval Myth" today that bugged me.  Someone said that they didn't have bobby pins in the middle ages and they always did hair taping.


Now, hair taping was a thing but it was not the only thing going on.  There is more than enough archeological evidence for hairpins.  Here are just some of the examples we have:


V & A Museum, C. 900's-1200's


That's pretty clearly a hairpin as we would know them today but here's some more.

V & A c. 960-1279

V & A c. 960-1279


Basically, we have plenty of extant evidence for hairpins.  While these are all medieval and I haven't seen any in the 15th or 16th C, I also haven't researched more than 10 minutes on this.  I just knew it was wrong.   :-)


Sunday, September 12, 2021

New Regency Era Court Gown


Hello! I have been sewing, it's just been a lot of modern stuff until this week! (I got tired of posting all the modern stuff because, well, how many knit dresses do y'all really want to see?)

Since I live in England now, I got to go to the Jane Austen festival finally. It was toned down this year but amazing. I absolutely love Bath and had a great time.

My gown for the ball was the only new gown I made (because I have umm....a lot of Regency gowns? Like....a lot?). I looked through all my fabric and saw this old sari that I didn't have anything in particular planned for. It immediately got snatched out to of the closet and declared to be the fabric for the gown.

Pattern:

I actually used a pattern that I apparently drafted up ten years ago. Eeck! It only needed a couple of minor changes to it at the back (it was slightly too big of all things!). The sleeves for the pattern were a new draft. I used nearly the exact same method as here to recreate a sleeve base from Janet Arnold (one of the early 1800's gowns). For the gauzy sleeve you see, I simply cut the sleeve base in four, expanded the sleeve base out, and played a game of connect the dots. So, the linen undersleeve is the same as the new sleeve base I drafted out but the gauzy sleeve is the expanded one. I gathered the gauzy silk to the linen undersleeve and stitched those together first. I then added the cuff trim to the bottom of the sleeve and then sewed the sleeve up. It made it much easier that way (trying to fit cuffs around the sewing machine is always a nightmare.).

The skirt is just three big rectangles. I cut off the pallu of the sari and made most of that the train for the gown. The train was lined in the same blue silk taffeta I used to make Felicity's Christmas Gown for Carnivale last year. I still have enough of the silk left to maybe make a forepart, line some sleeves, and make a bodice? We'll see!

The "skirt" of the sari I used for the skirt of the dress; I just cut it into two because I wanted an apron front gown. The top of the skirt has a "belt" of the silk taffeta which the gathered bodice piece is attached over.

The bodice itself is an old pattern but, as I mentioned, I modified slightly. Other than taking it in in the back, I also curved the front to have an "open" front - or apron gown- rather than a normal closed front. The two embroidered front pieces are pinned down to the apron front but I might eventually add a gold belt to hold them together.

First Wearing

Honestly? This gown came out a lot better than I expected. I finished it just a couple of hours before the ball. (I brought my sewing machine with me to the hotel!) My mind has been so on 18th Century and Renaissance that I forgot how to do Regency and had to remind myself how to piece together an apron front gown. Once I got to making it, I quickly remembered, thankfully!.

I wore the train over my arm most of the time (like in a lot of court gown fashion plates from the period!) to dance and it was very easy to dance in as well as wear. I didn't have any major issues but might make more petticoats to really puff out the gown.

Inspiration

M5053MA_MODX06X00068_L_2


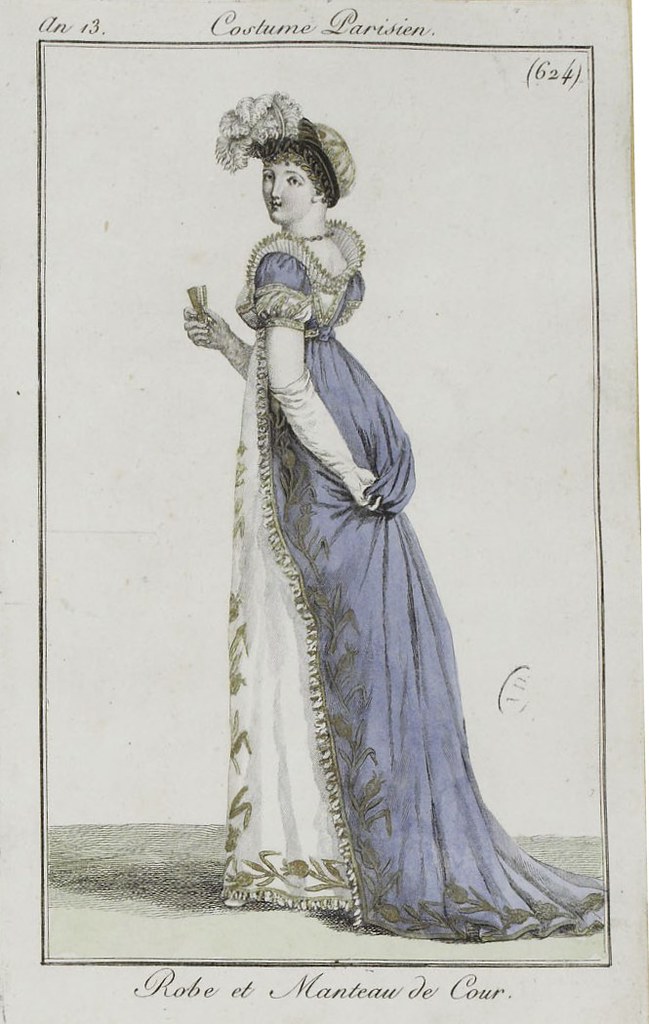
Although the second isn't a court gown, these were three of my main inspirations.  All are from about 1804-1805.   

I'll probably make another gown like this one and will definitely add some stuff (it needs gold trim around the neckline!) to the new blue court gown I have now!


Friday, June 4, 2021

New Hawaiian Shirt Dress

 For the summer, Friday's at work are now Hawaiian Shirt days!   The problem:  I don't have a Hawaiian Shirt.  Eek!    

The solution:  I happened to have a lovely Hawaiian print cotton I planned to make into a dress anyway.  

With Sew Magazine, I fairly recently received a copy of New Look 6449.


I only had 3 yards of the cotton print and that's all the shirt dress calls for.  Easy!


I think it came out pretty cute.  I did place the shirt pocket a bit too high.  Mea Culpa.  The back yoke ended up being a bit tricky.  The collar wouldn't fit unless I pleated and stitched down the center back of the yoke.  The problem is when I did that, I didn't cut down the neckline itself to force the new lines of the yoke to fit better in the back.  The shoulder "scrunch up" a bit because of that but it's not a huge issue.   

I do like the deep pockets on the dress and the overall fit is good.  I also added a bit more at the skirt (maybe an extra 4" on either side of the front and back pieces) because I wanted a bit more of an a-line look going on.  I wore the dress today with leggings from April Cornell.  It ended up being very comfortable and I'm definitely going to wear the dress again.  

Probably should point out that my favorite aspect of the dress is really the sleeves.  Those little tabs are amazing.  :-)

Sunday, March 28, 2021

Modern Clothing: New Look Pattern 6529/ Red cotton leggings and gray fleece hoodie

Front View
Back View

Hello! Finally mostly settled in my new house and I can start sewing again. Because we are still sort of in Lockdown (we can do day trips tomorrow!!!!), I wanted to make a comfy lazy day outfit. That, and I really need more cotton leggings. :-)

For this outfit, I used New Look 6529. The leggings came out a bit on the loose side but that's fine. I might make them a tiny bit slimmer next time. The tunic neck with the hood is a bit tricky and I messed it up but, well, this is a lazy day outfit and my ability to care is sort of out the window.


Pattern: New Look 6529

Materials: A gray "mystery knit" from last year's Fabric Mart mystery sales.  It turned out to be a lightweight stretch fleece that is just perfect for spring.  

The leggings are out of a red 100% cotton knit.  

Notions: A slight bit of trim to hide the seams in the hood (maybe a yard and a half?), red thread, gray thread, and enough 1 1/2" elastic to go around my waist.  :-)

Time: The leggings were super quick - maybe an hour?  The hard part was waiting for the red thread to come in when I discovered I did not have any red thread.  Blues, greens, pinks, but no red.  All the pattern is is the two legs and, for the waistband, you sew the elastic to the upper outside waistline then fold it in and sew it down.  It's a good "I need leggings now" pattern if you have a lot of knit on hand.

The hoodie took a bit longer.  Maybe two and a half hours?  I'm not sure partly because I had trouble with the hood.  First, I sewed it in the wrong way and then I couldn't get the edges to meet correctly in the front.  I gave up a bit and what you see in the photo is sort of the end state.  Again, this is a lazy day outfit so I'm not trying to make this look perfect - just comfy.  And it is comfy.  :-)

Recommend Pattern?  Yes!!  I'm going to try a couple of the other tunic views and make a few more leggings in different colors.