Monday, December 30, 2013

Historical Fortnightly 2014 Plans Thus Far


Once again, I plan on doing at least some of the Historical Sew Fortnightly. We'll see how many I actually end up doing - and how many times I change my mind on what project I do for each!
  • #1: Make Do & Menddue Wed 15 Jan. I have no idea what I'm doing for this one. Maybe the embroidered and lace chemise I've been planning forever?
  • #2: Innovation - due Sat 1 Feb. One of the greatest inventions for anything fiber in the late 15th/early 16th C is something we hardly ever think about anymore - the flyer on a spinning wheel. Probably invented around the 1470's, the flyer made it so you didn't have to stop cranking the wheel, wind the string/thread/yarn around the bobbin and then pick up the roving again. This way, you just held the roving with one hand, hand cranked the spinning wheel with the other, and the yarn wrapped itself around the bobbin. It saved a lot of time - and the yarn didn't get so crinkly and knotted either. Treadles didn't come until around the 1630's for spinning wheels. Still, the quicker you can make the yarn for the fabric, the quicker you can make fabric. This included at home- which may be part of the reason we see such a range in clothing and the start of fashion crazes around this time - fiber was getting easier to make. For this, I'm debating about two different pieces. I could do one of my favorite but simple embroidered jackets or I could go peasant. I'm leaning towards the latter but we'll see how much time I have.
  • #3: Pink - due Sat 15 Feb. Easy - Pink 1790's dress for the ball.
  • #4: Under it All – due Sat 1 March. No idea. Maybe go crazy and make a 1650's pair of stays?
  • #5: Bodice - Due March 15 Probably a doublet.
  • #6: Fairy Tale - Due April 1 I'm super excited for this one because I know exactly what I want to do. Not telling but it will be yellow with a touch of pink and very, very 16th c German.

Sunday, December 29, 2013

Historical Fortnight #26: Celebrate!


The Challenge: Celebrate!
Fabric:Silk dupioni
Pattern:  The redone trims are all my own
Year: 1822
Notions: Lots and lots of reclaimed silk dupioni
How historically accurate is it? ~70% ish. It's machine sewn and all silk dupioni so that knocks a lot of points off. However, the cut is accurate for the time period.
Hours to complete: The dress itself was already made. The retrim was about 5 hours just because I had to yank the old trim off!
First worn: Dec 29th at the Christmas Regency Tea
Total cost: None! Yay!

All the other important stuffs:

For this challenge, I wanted to make something for the annual Christmas Tea. However, I only have a gazillion Regency era dresses and I didn't want to make a new one. Any new Regency dresses are to be hand sewn - this is partly to prevent me from making new ones. ;-) Of course, I do have two hand sewn Regency dresses so you can see how well that's working!

Anyway, rather than making a new dress, I decided to do what any Regency era lady would have done when faced with an upcoming party - retrim your old dress.


This is how my watermelon dress looked after I finished it three years ago.

I was vaguely going for something like this:


But with pink and green. I didn't like the trims I put on the dress pretty much right away but there was little I could do at the time. So, therefore, the dress languished in the back of the closet until last night.

First thing, rip off all the trim and even the sleeves. Originally, I had put a growth pleat into the skirt and stuck the bright pink skirt trim under the growth pleat. This worked and is period but I ripped everything out this time. I then cut the skirt and re-hemmed it properly.

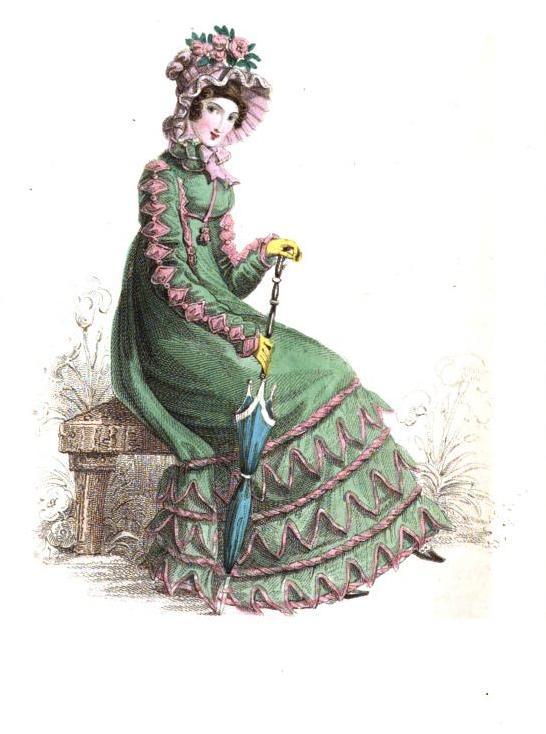
With the massive 8" I had to cut off the skirt, I decided to use that to recreate at least one row of the trim seen in this fashion plate:

From Dames a la Mode

I really love the hem on the fashion plate and it's pink and green too! Woohoo!

So I took the 8" of silk I yanked off the hem of the dress, folded it over and over, drew on it with chalk, and cut it to make it look like trim. 


On the bodice of the dress, I wanted something a little different. I really liked the bodice trim of this extant dress but went a bit simpler. The pink trim is just the old neckline trim, cut in half, and ironed.

Here is the entire finished dress. It's not super trimmed up, but I like how it came out now. I might add some more pink trim to it - I have a ton left from the old pink skirt trim- but it is fine as it is for now. 

A close up of the new skirt trim. I cut some of the old skirt trim into bias tape (about half of it) and used that around the bottom edge. The top edge is just the rest of the old neckline trim plus a small bit extra from the old pink skirt trim. I hope that all makes sense! I reused everything, pretty much, to make this dress go from roughly 1818 to 1822.

A close up of the bodice trim. It's not really that bright. The pink is bright but not hurt your eyes bright. The dress is also very clearly a nice dark green and not the least bit a muted black/green.

I was very happy to get it done in time to wear it to the Christmas Tea. It's not a ball gown, but it is a party dress - perfect for a late afternoon tea.

Thursday, December 26, 2013

Christmas


For Christmas, I like making people gifts. To me, making them something is a lot more personal and you can customize the object.
This is the apron I made my Mom. The cell phone photo is horrid, but you can see the ruffles. The apron also has pockets and can tie in the back. Mom loves blues and greens so I had to get these fabrics to make up her apron.

Star trek

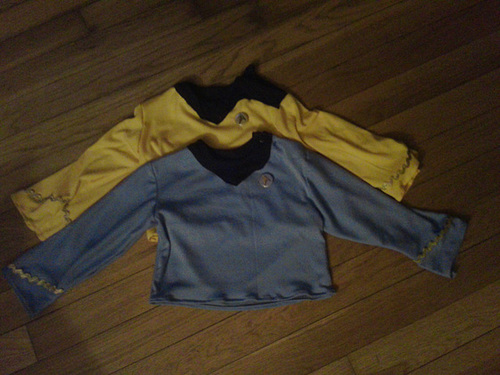
My oldest nephew wanted a Star Trek uniform for Christmas. He's five for a couple more weeks. :-) When asked what color, he specified blue. Knowing that middle child nephew will want whatever his older brother wants, I made middle child a gold uniform. Although not in this picture, I also made the uniform pants.

To say oldest nephew was thrilled wouldn't be enough. He put on his uniform after church (he opened the present before church and wanted to put it on then. We told him after church.) and was completely ecstatic about it. I think his mom might have to fight him to even wash it.

You might notice the collar on the gold uniform is off. This is partly because I wasn't thinking while I was putting together the outfits. I used New Look A6398 for a pattern. The pattern top has a side shoulder opening so you can fit the t-shirt over a little kid's head. Perfect for my 5 and 3 y/o nephews. The pattern also has a neckfacing that I did edit to have the little angled front.

I cut two of the neckfacing so that there would be one inside the shirt and one outside to give the proper Star Trek look. On the gold shirt, I forgot to cut the outside neckfacing so the gold of the shirt would show. Whoops! Instead, I just sewed the neckfacing all the way around. Unfortunately, attempting to get tiny stitches out of stretch material is a nightmare. So middle child's uniform is slightly off.

On the blue shirt, I remembered. I sewed the inside neckfacing at the should opening with right sides together. I then flipped it, matched up seams, and stay stitched the neckline. The outside neckfacing had the shoulder opening cut so I stitched it, right side of the inside neckfacing to the outside neckfacing and then flipped the outside neckfacing...out. That sounds kind of funny but it's what I did to get the neckline right. I then pinned the bottom edge on both the inside and the outside and stitched those down. It came out pretty well, I think. I know my nephews think so!

The pants for the uniform I did up just like the pattern says - they are basic black pants. They fit my oldest nephew as he was running around by the end of the day in his full uniform, wearing an Iron Man mask, and waving a lightsaber (glow stick with flashlight).


My Christmas dress. I wanted something I could sew up quickly but also would look nice. The material is that stretchy velvet stuff but I loved the color. The pattern is my 1920's dress pattern and I tried to stay with the 1920's dress ideal. So, although the material is modern, the dress style itself is very 1920's. Mom liked it. :-) I wore it to church.

The sleeves I drew onto the velvet using sidewalk chalk. I really, really like sidewalk chalk because it's cheap, it lasts forever, and it works. Very basic trapezoid with a curved top. Since it's stretchy material, it's a bit more forgiving on the sleeves. The main dress pattern was the same as the one I used for my 1920's gown. I just made the front short and gathered the rectangle panels to the bottom of both the front and back to make the skirt. I then sewed up a tube of velvet (a 5" by 50" - the width of the fabric) for the belt and stitched the top of the belt to the dress at the fallen waistline. The Christmas tree pin holds the belt in place.

Monday, December 16, 2013

Historical Fortnightly #25: One Metre

The Challenge: One meter
Fabric: silk dupioni for the lining and silk satin for the main fabric
Pattern:  My own!
Year:  3rd quarter of the 18th Century
Notions: silk thread
How historically accurate is it? 95% because dupioni isn't correct. However, it is hand sewn.
Hours to complete: 3 hours
First worn: hopefully in Feb if not earlier
Total cost: $5. The dupioni was a .5 yard remnant that was 50% off. The silk satin was stash.

More!:

I wanted to make something that wasn't an apron or a pair of pockets or a coif or something else I've already done. I've been needing a pair of fingerless mittens - badly- for my gowns and knew it wouldn't take much fabric at all. I don't think it even really took half a meter for both the facing and lining fabrics.


 First, I had to create a pattern since I didn't have a commercial pattern on hand. I basically draped the muslin on my arm and cut off the excess.  I also draped the thumb.
 The rather wonky pattern.  Eh, whatever.  It works.

 Cutting out the rather wonky pattern from the silk satin scrap.


 The finished hand sewn fingerless mitten.  I would show both on but I needed one hand to take the picture and the other hand to show that it actually fit pretty well.


A close up of the folded back mitten to show off the lovely aqua silk dupioni.


Both the mittens on the floor. :-)