Tuesday, May 31, 2016

Historical Sew Monthly: Holes

The Challenge:  
  • May – Holes – sometimes the spaces between stuff are what makes a garment special.  Make a garment that is about holes, whether it is lace, slashing, eyelets, etc.
Material:  Linen
Pattern:   I used the bodice from Mccall's M5444 as a base.  From there, I lengthed it slightly, took out the darts, and just used the length of fabric for the skirt.  
Year: 1570's   Italian

Notions:  Cotton Thread and a piece of ribbon to lace with since I couldn't find my normal laces
How historically accurate is it?    The entire dress is handsewn.   Linen and cotton are both period correct for Italy - Italy not being far from the cotton capital of the 16th C world, Egypt.   The cut is correct and the colors are correct.   
Hours to complete:    I have no idea.   It got thrown in the corner for a bit when I realized I cut it out too small for me.  However, I realized it would fit my sister in law perfectly...
First worn:  Probably not until the fall when we get to go to the Maryland Renaissance Festival.  
Total cost:  about $10.  The yellow saffron trim was scrap from another dress.  The purple linen I got at the thrift store for under $5.  The blue lining was originally white that I got at the thrift store for $4.   The thread I had on hand.   The inner lining was stash but even it was only $1 a yard when I bought it.


Although holes can be decorative in clothing, they can also be practical.  In this case, the eyelets are meant to be holes for lacing the dress shut in the front.  There are also holes at the top of the shoulder straps to lace sleeves to the dress.  A peasant wouldn't spend money, necessarily, on buttons or hooks and eyes - eyelets are a cheap and easy way of getting the job of keeping the clothing closed.  

Friday, May 27, 2016

Pink Cape For a Little Girl


It's rather simple but I wanted to post this because it's the first thing I've completed on my old sewing machine that I've started to use again.  My singer finally gave up the ghost (I've had it for five years of near constant use) and I realized that five years ago my sewing machine expertise weren't quite what they are now.  So, I took out my old sewing machine, a EuroPro, to see if I could fix the problem.

Five years ago, I was very frustrated with it and was going to take it in but realized that just buying a new machine would be cheaper so...the EuroPro went to sit in the corner like a bad machine.  I never went to get it fixed because the Singer worked so well for so long!   However, after the bad, impossible to fix, issues the Singer gave me, I dug the EuroPro back out.  The problem?  The tension was off.  Within a minute I had it working good as gold.  /facepalm.  Oh well, good thing I never got rid of it!

So this pink and green cape was sewn on the EuroPro.  I'm doing the Reddit Santa thing again and the lady I got said she has two pups and a 6 year old girl.  Both Mom and Daughter's favorite colors are pink and green.  I went to Joanns and picked up some pink cotton flannel and basic green broadcloth.  I only got a yard of each.  The cape is just three panels - one cut on the fold.  the hood is two rectangles.  The straps are just scrap pink flannel that I folded over and stitched down.

I pleated the hood to the neckline of the cape, leaving a few inches on either side of the opening free.  I bag lined most of the rest of the cape - just pulling the hood through the very bottom back of the cape and then sewing that shut.   It's simple but I think it's cute.   I'm hoping the 6 year old Daughter likes it.   I think every kid needs at least one good cape growing up - whether to play superheros or fairy tale characters.

Thursday, May 26, 2016

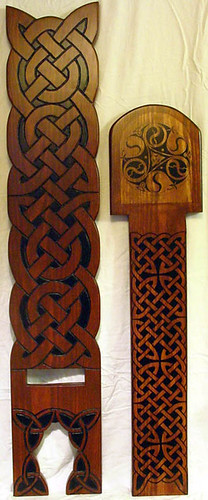
The true origins of the "Bog"/"Norse"/"X" chairs

Pennsic 064

If you have ever been to an SCA event, you've seen them. The chairs that many call Norse (or Viking if they have yet to be corrected). They are two planks, one whittled out a bit and inserted into the other forming a lopsided X. The photo above is from Pennsic in 2010 at my campsite in n24.  There are several such chairs around the firepit.

Like probably many of you, I just took for granted that they are period for a lot of reasons.  A) They are wood;  B) They are simple;  and C) There are a ton of them at any SCA event.  However, they are not period.  In fact, what they really are gave me quite a delightful giggle when I found out and I hope you love the irony too.


A question came up about the authenticity of the Norse chairs and I was curious as well - so, I took to searching for any information on them.

First, I found this "my-fingers-hurt-from-just-looking-at-it-but-it's-lovely" chair:
bog chair standing


The person posting the picture called it a bog chair so I searched for bog chairs. I know, it sounds a bit to basic but this is how I typically find things - just follow the rabbit down the hole.

I came across The Anglo Scandinavian Chronicle Blog and found an entry on the chairs from back in 2011.  In that, I found another important clue.

Simply put, there are no such chairs from the Viking Age in northern Europe. The chair, it has been conjectured, was introduced from Africa in the nineteenth century and became really popular in the early twentieth century when Boy Scouts began to manufacture and make them. All this is second hand and not even trustworthy second hand. Like folding stools with backs, they seem to have just popped up!


Okay, so I started to search African chairs and found...

African Chair


Tada! Something that looks like the "Norse" Chairs! Yay! So where is the humor in all this?

Well, when most people think of the Norse, or more commonly by the verb Viking (seriously, it ends in ING for a reason. You went a Viking. You weren't a Viking anymore than a mall rat today would be called a Shopping.) they think big burly bearded men with axes. Crazy, strong warriors who fight and drink and fight some more. They think "manly" men!

So what is it really? It's a birthing chair.

That's right, this style chair is not only not period for the SCA, it's also incredibly feminine! I am greatly amused at the irony.

African Birthing Chair

Notice in the picture above, there are four women carved into it with a cradle. From the auction page:
An intricately hand carved vintage African birthing chair. The characters include a bee, snake, 4 female figures, a crocodile, and more.
It is made of thick heavy wood. The back piece is 42 inches tall, and the seat is 33 inches tall. The two pieces fit together nicely and are well balanced. The birthing chair is an ancient practice intended to provide balance and support to mothers giving birth. The chair is in very good overall condition with minor chips.


Although, the only problem is that all the sites that mention birthing chairs tend to be auction sites and the books that mention African birthing chairs don't give descriptions or pictures.  So, it's impossible to tell if that's what these really are or if it's also something made up.   More research needed!

Friday, May 13, 2016

A Post in Which Isabella Dyes

I normally cheat.  By cheat, I mean I go to the store, get some RIT dye, throw that into the washing machine with some salt, and throw my fabric in.   I know that scarlet turns a lovely light red to a pink on white fabric but will turn a fabulous shade of lavender on pale blues.   I end up using that one a lot.   However, I really wanted to try something different.  I wanted to dye with a natural color because that's what they did back in the 15th and 16th centuries.  So...I bought an indigo dye kit!

Got it at Amazon
It was $8 for the kit and has everything you need to dye except the bucket to kick.  :-D  You also need a stick, some sort of spoon, and clothing line.   I bought a tinted but clear Tupperware container (29quarts) and I had everything else on hand.   The instructions are pretty simple.   Mix the dye, the soda ash, and the mordant into about 4 gallons of warm but not hot water.  Let it sit for a half hour.  Pull out the flower - ie the bubbly stuff in the middle that looks like this:

The Flower
 If anyone is curious what indigo dye smells like, come with me to Pennsic.  It smells almost exactly like the Pillaged Village store tent.  If you can't, try dying with indigo to get the smells of Pennsic.   It's not exactly pleasant or unpleasant.  It dried, matted, and then wet vegetable matter.

The colors are really cool looking; almost like a beetle wing!
Stirring stick
 The stirring stick became an iridescent blue/green with a hint of purple.  It was lovely!  The water itself was green until it oxidized after a few seconds and then it would turn blue.  Because of this, the fabric was also quite green until it oxidized.
Linen freshly dyed
 The linen was in the second dye bath.  I bought the linen at Joanns - it's 100% linen- for the purpose of dying.  I also dyed some wool and another linen yardage.  All in all, I probably dyed about 15 yards of fabric!
In the wool!
 This was after it oxidized a bit but you can see how lovely the wool looks!  It's a deep but bright blue.
Linen in a box
 The linen in the container is still quite green.  The moment you take it out, it turns blue.
Tie dyed but not really!
 See, blue!   However, it will turn much darker after I start cleaning everything up.  I threw away the bags, containers that I couldn't re-use, and put the third dye bath linen in the washer as an experiment. When I came back out, the linen was the color it is below:
Much darker!

The wool!

Apple in the middle!
Yes, my yard is taken up by both the linen (left) and wool (right).  I'm not sure what style dress I'll do with them but I will get some neat SCA outfits out of them.

Using the dye kit was EASY.  Seriously, it doesn't take long and it's pretty cheap.  If you are considering dying, I'd start with this.  I plan on using it again if I ever need a nice blue fabric.

The final product was a bit uneven once it dried but it's not horrible.  I doubt it was always an even color in period either.

The wool is to the right and the linen is to the left.  The linen is a bit more evenly dyed than the wool.  

Sunday, May 8, 2016

BANANA! Early 16th Century Venetian Dress


I was originally going to call this the Strawberry Lemonade dress because it's lemony yellow with pink sleeves but then I watched Minions while sewing the eyelets...and I really want an indigo dyed linen apron to go with this now.


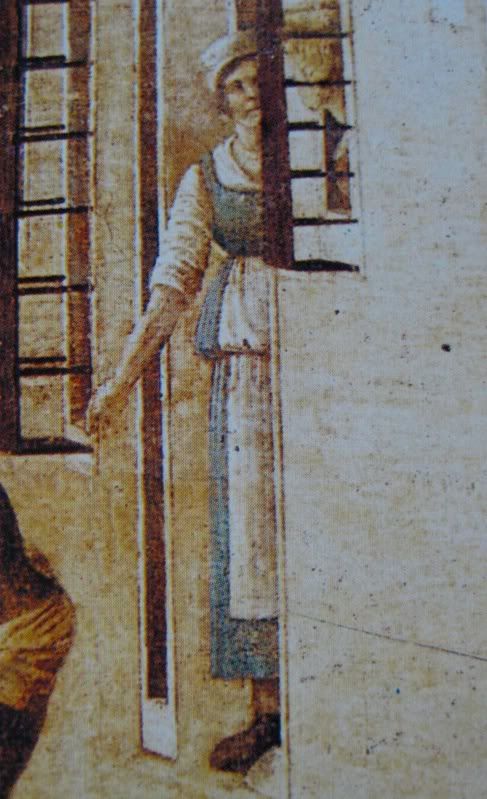
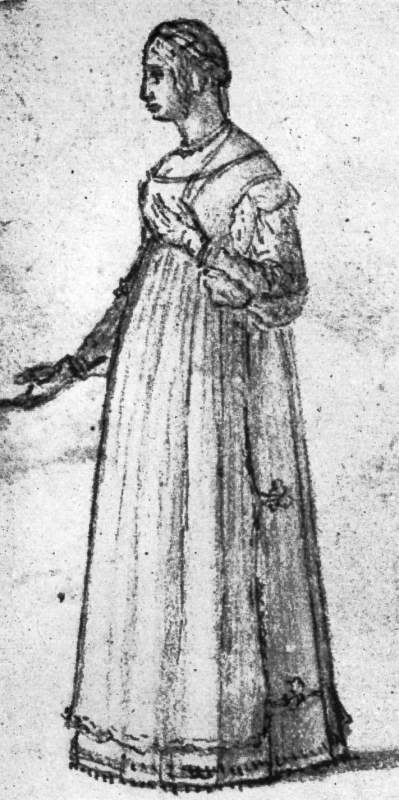
The dress is done in the early 16th C Venetian style a la:

 photo bellini1496maid.jpg photo carpstud1.jpg


I love this style. It's pretty, it's simple, and it's the sports bra of the Renaissance. I can still eat, move, bend like normal but I am in full period garb.  The dress is out of yellow linen (it's a very period appropriate color.  Think saffron.) and the sleeves are pink wool lined in gray linen.  The sleeves are hand sewn but the dress is a mix.  The skirt panels are machine sewn but I sewed them together by hand.  The bodice seams you can't see are machine sewn but the neckline is by hand.  I also gathered the skirt by hand because it's so much easier.

The dress is laced under the arms:


The back is slightly higher than the front.  It looks much higher and longer in the back bodice area than it really is.


I can't wait to wear this dress! It's part of my Pennsic wardrobe.