Saturday, February 15, 2014

Historical Sew Fortnightly ’14 Challenge #3: Pink


The Pink 1790's Dress is done!!!  Yay!!!

So, first, the inspiration:


This dress can be seen online here. Just type in 1795 into the "cerca simple". The pink dress is in the middle row, typically, of the search results. Click on "Fixta completa" and a new window will pop up with a lot more information. In the new window, click on "imatges" and then "ampliar" for really big photos of the front, back, and embroidery.

I did deviate from the original in a few things beyond mine being more pink - the sleeves.  I couldn't figure out the original sleeves and what the heck is on them.    I just added silver metal sequins to the white silk taffeta sleeves on my dress and then took some silver zari lace to add that to the bottom of the sleeve.

I also couldn't really figure out the skirt.  As far as I can tell, there isn't a seam in the thing!  And how did the seamstress gather the back to allow for that lovely full train?   I have no idea.  However, in the 1790's, it was perfectly acceptable to just cut a rectangle and gather a lot of it to the back to give you that back puff without the use of a bumroll - which they had.  So I did that.

However, the bodice is pretty much cut and constructed the way I think this dress is.


 First, the back.  Those that have been following the blog have already seen these photos.   I constructed a pattern based on the lines of the original gown.   This meant a diamond shaped back.

 Rather than gathering the front for the pattern, I just pinned it.  It worked.

 The sleeve is based on the pattern from Janet Arnold.

 Back of the sleeve.

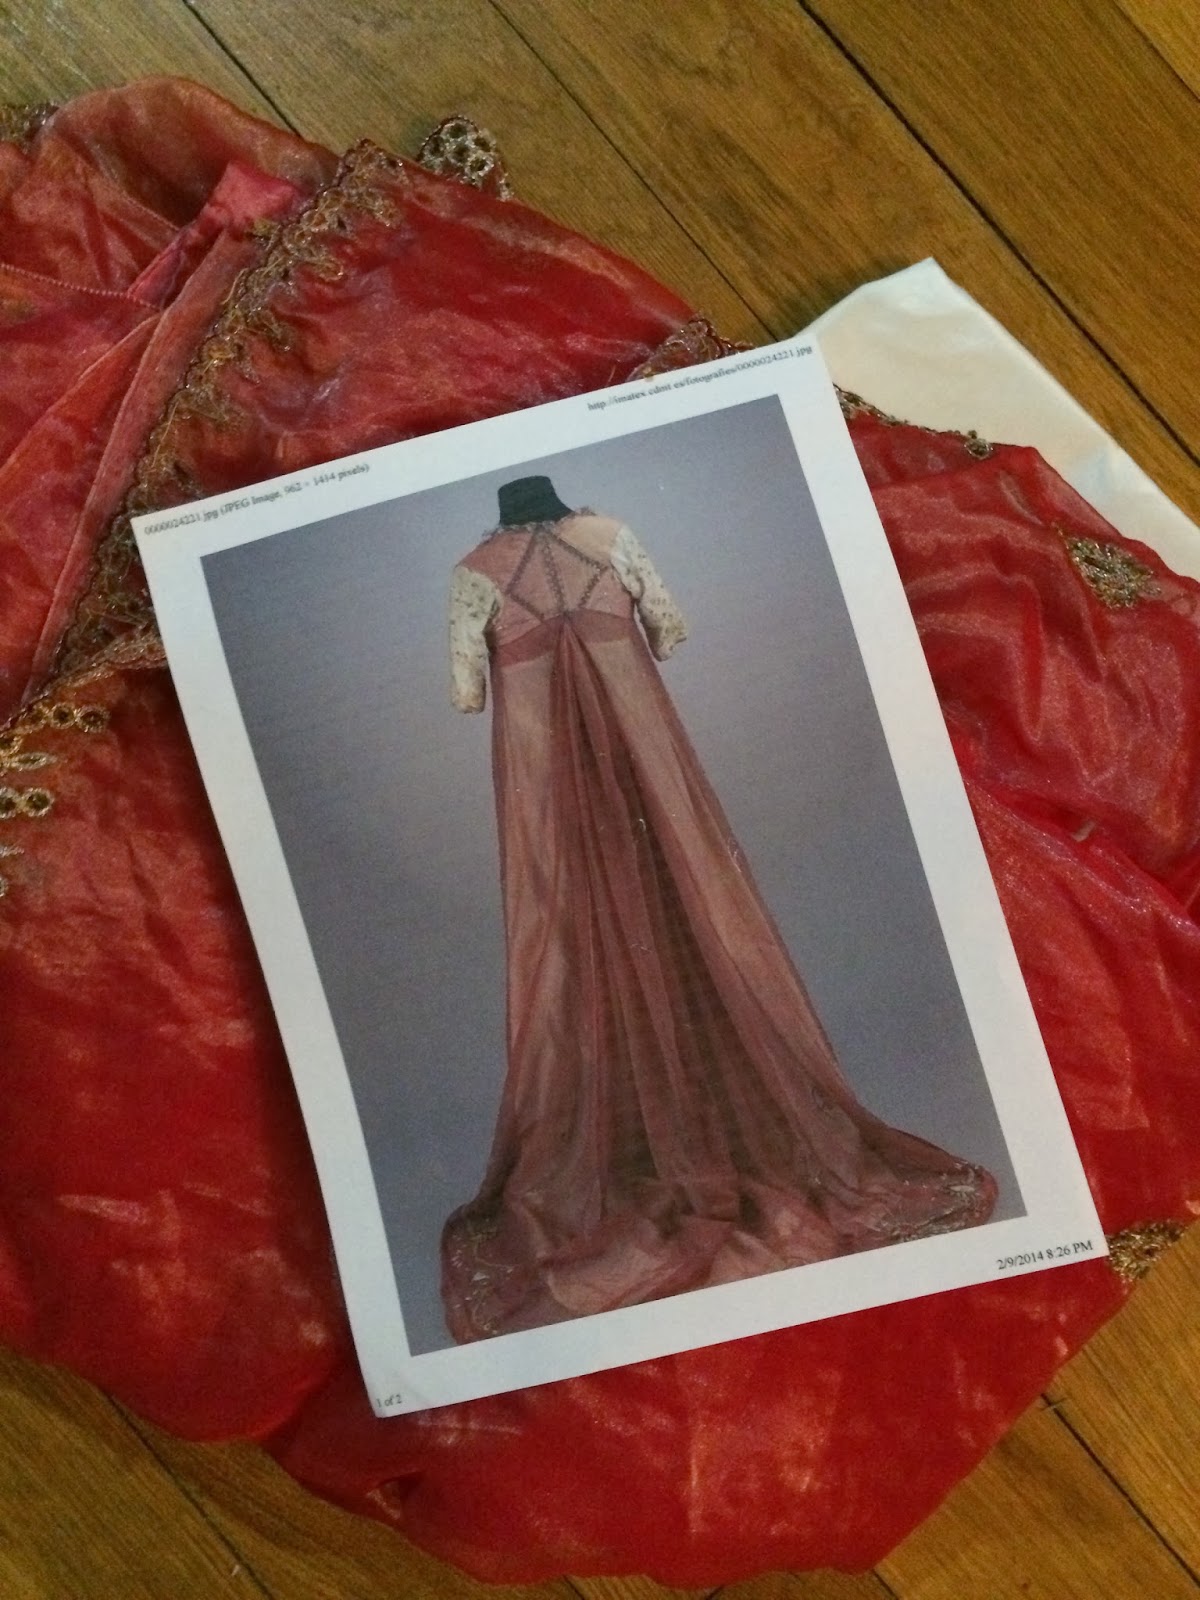
 Print out I was going by and the sari before I chopped it up into pieces.  You can also see the silk taffeta peeking out.  The silk taffeta was left over from my 1860's ball gown.


 The bodice!   I had done everything except attach the skirt last night, pretty much.   The sleeves worked, the lace was added to the neckline, the dress was nearly done - but this was also taken at 1 am in the morning and I figured finishing the dress that late/early really wasn't a good idea.

 So skip to this morning when I added the skirt!   The bottom of the bodice also has a gathering ribbon in it.  I had to gather the front part of the skirt (which was the pallu of the sari) to the ungathered tube of the bodice and then stitch the rest of the skirt to the back of the dress.

 The photos look funnier than the dress really is.  It is puffy in the back but it actually looks nice - well, nice for the 1790's.  The attached petticoat skirt was easy to sew around the bodice.   I just machine stitched that.  However, it was just four trapezoids (the original dress doesn't show gathers in the attached petticoat so I tried to copy that) and didn't need to be gathered.

The sleeve!   Those sequins kept jumping away from me as I tried to sew them down. 

Now the important stuff:

The Challenge: Pink
Fabric:A sari from my stash of silk organza, white silk taffeta, a ton of muslin
Pattern:  My own! Pictures to prove it too!:-)
Year:  1795
Notions: Not accurate nylon yellow ribbon, accurate silver zari lace, silver sequins
How historically accurate is it? I'm going to put it at about 90%. I did machine sew the big seams but you can't see them. Anything you see is probably hand sewn.
Hours to complete: Maybe 12?
First worn:Tonight!
Total cost:
Probably about $17 for the sari, if I recall. I think the silk taffeta was some of that $5 a yard stuff I got years ago as well. And the muslin was $1 a yard. So...$32 for the fabric? Maybe $40 total with the notions?


Small edit:

Me wearing the dress!

Almost done! Historical Fortnightly Pink Progress.


I just have to add the skirt - which is sewn.  I just didn't think it was a bright idea to sew what is a slightly complicated skirt to the bodice at 1 am.  I'm sure if I did sew the skirt to the bodice, there would be much tearing of seams and gnashing of teeth.   As you can see, now though, the bodice is quite pink.  :-)  The skirt will be too.  

Wednesday, February 12, 2014

Historical Fortnightly Pink Update


One sleeve down.  One more to go.   The sequins aren't perfect but it doesn't matter.  When the sleeve is sewn, it won't be obvious that some are further apart than others.  

The dress has been cut out and waiting to be put together for a couple of days now.  It's just getting all the sequins on the sleeves!  Once I get that done, I can just machine sew a lot of the rest and it shouldn't take very long to get the dress together. 

Sunday, February 9, 2014

Historical Fortnightly Pink Progress

For the pink one, I decided to somewhat recreate this stunning 1790's dress in the print out above.  If you go to http://imatex.cdmt.es/_cat/fitxa_cerca_resultats.aspx and type 1795 into the Cerca simple, you'll see it as one of the examples.   I don't like how the back waistline is - I prefer the waistline and the skirt to match up- but I love everything else about this dress.

For the fabric, I'm using a pink silk organza sari I have.   The sleeves will be out of some left over white silk taffeta I have from my 1860's ball gown.  I plan on adding silver sequins to the sleeves.   It won't be an exact match, but it should look pretty close to the original gown.

Now, the pattern. 

I already have a lot of Regency patterns.  So I took the same one I used for the 1820's dress and just redrew the lines.   I ended up not being too far off.

On the right, I've recut the pattern to better fit.  The left is still a little crazy but that doesn't matter.  This is just the mock up to make the pattern. 
The front.  I just pleated it to get a general idea.  It will be gathered in the finished dress. 
The sleeve!  This one was more complicated than the 1820's dress.   It's still using the more complex Rococo patterning.  This means I need to remember there is a left and a right.  Grr...


The back of the sleeve.  It will be lightly gathered at the top of the sleeve.   I used Janet Arnold again - the half dress sleeve pattern- to get an idea of what I needed.   I plotted out the major points; from armscye seam to armscye seam and then the length down to the elbow plus the from elbow seam to elbow seam.  You end up with a sideways "H" this way.  (I originally said an "I", which is true, but the font this blog uses doesn't show the crossbars as the top and bottom of the "I"). However, from that, I can redraw the curves shown in Janet Arnold around the sideways "H" to get a half way decent pattern. 

More tomorrow!

My new 1820's Dress!

I decided, a few weeks ago, that I love the look of the early 1820's.  You still have those Regency waistlines but you get those cute little puffy sleeves too.   I just had to make one.   Here are some of my inspiration first:


I love that it wasn't pastel and that trim around the neckline. The trim goes only around to the back opening and then comes over the shoulders, down to the front waistline like you see here. It's at the MET if you'd like to see more pictures.


This one I liked for it's simplicity. It only has the neckline trim and let's the actual cut of the dress and the pattern of the fabric speak for itself. More at Whitaker Auction


To start with, I needed a new pattern. I've made...a few... regency era patterns for myself. I took one of the many (the first one I found) and used that as a base. From there, I re-cut pieces to make more sense for 1820's. For instance, I has to make the armscye more curvy and take out the side piece so there wouldn't be a visible seam anywhere near the front of the dress - all the seams where in the back or back side.


Once I got the bodice done, I started on the sleeve. I flipped to Janet Arnold, and saw a diagram for the early 1820's sleeves. They are stupid simple. Seriously. It's a trapezoid with a bloated top line. I made mine at 8" for the wrist and about 28" for the top line before it got a massive allergy attack. ;-) In the photo above, the sleeve is just pleated and pinned to the pattern. I ended up gathering my sleeves which, I think, looks really cute.


The dress completely sewn! I was going to add trim but I ended up not having the time. So, I wore it like this! But with a giant red ribbon around my waist.

Close up of the back of the dress. I noticed on a lot of the 1820's dresses, they seem to have slight v-backs. This works well with my pair of short stays!


This is what I was planning on doing. I did cut out the trim and started to sew it but it looked horrible. I'd much rather have a plain dress than one with horrible looking trim. I just need to sit down and handsew the piping along the edge rather than even attempt to machine sew it.

Robin got this great photo of my at the Betsy Ross house.   You can't see the dress, of course, because it was cold out so I had my properly period coat on.  The shawl I have was $4 at the thrift store and the straw hat was $2.   It's a very fine straw - I was surprised to find one that worked decently for Regency.  I just added a black silk ribbon to it and tied the hat down.  Easy! 


Now, no outfit is complete without shoes. Luckily, the flats that were so popular in the 1820's are popular again. Yes, our flats are not historically correct - I machine sewed the dress. I'm not too concerned about straight last shoes with this outfit.

Back in October, I was looking for a good, but cheap pair of flats to wear with my dresses simply because I'm tired of wearing my pink kitten heels with everything.   Not that they are cute, but I need a new pair of shoes!   With that in mind, I saw this:


I immediately made grabby hands for the screen. See that toe? That toe is exactly like the toes I have in a pair of extant shoes and like many pairs of extant Regency shoes I've seen. The elastic would stretch and not be obvious around the foot - and there isn't any at the toe. I needed these shoes.

Insert problem.

They haven't made these shoes since 2006. NOOOOOOOOO!!!!!!!!!

I looked EVERYWHERE. The shoes just didn't exist at all. So, I set up an ebay alert. Tada! Two weeks later, a lady was selling a red pair - but with gigantic mirrors on the toes. I have no idea why anyone would want mirrors on the toes of your shoes. Although I do know a few ...individuals at Renn Faire that would think this was awesome for kilt checking, the problem is everyone else can see up your skirt when you aren't kilt checking. Not a good idea.


So the mirrors came off. Now the problem was the glue left behind.


I ended up adding a bit of black silk to the toes of the shoes to cover up the glue.

By the end of the day, it didn't look all that great.

IMG 0250

Oh well.  Try again!  

Monday, February 3, 2014

Green & Yellow & Courtesans

This is something I've been working on for a while but I think I should share my research.   Basically, it's well known that in various city states throughout Italy, there was some sort of sumptuary law declaring courtesans should wear a scarf or veil of yellow.  Also, there is the old poem "Marry in Green, Ashamed to be seen" with green being associated with taking a roll in the hay.   I was curious as to what truth there was behind these color associations - particularly in the early 1500's.   What I found is a bit surprising - to me at least.

Anea already has explained some of the sumptutary laws regarding prostitutes or courtesans being ordered to wear yellow scarves but here are a couple more sources.

[Tullia D’Aragona] was held in high esteem and respect. When, in 1546, Cosimo, Duke of Florence, ordered all prostitutes to wear a yellow veil or handkerchief as a public badge of their profession, Tullia appealed to the Duchess, a Spanish lady of high character, and received permission to dispense with this badge [sic]. (G. Biagi, “Un’ Etera Rmana” Nuova Antologia vol. iv, 1886, pp 655-711, S. Bongi, Rivista critica della Letteratura Italiana, 1886, IV, p 186) From Studies in the Psychology of SexBy Havelock Ellis

However, since many of the portaits I found of ladies with some sort of yellow scarf are before this date, I also found this footnote:

Starting in at least 1416 with the injunction that prostitutes and procurers should wear yellow scarves to identify themselves, sporadic laws throughout the 16th and 17th centuries also attempted to limit their wearing of silk, gold, silver, lace, and pearls.From Encyclopedia of Prostitution and Sex Work, Volume 2 edited by Melissa Hope Ditmore

So there is some connection of yellow veils/scarves and courtesans - one that wasn't always followed based on the numerous complaints of the day. However, what about green? Green, it turns out, doesn't have a negative association in the 16th Century. Rather, it stands for chastity according to Lisa Jardine's book Worldly Goods (page 15). This could be seen two ways - the portraits I'm seeing particularly in the 1520's and 1530's of what I believe to be courtesans are all just playing a practical joke (very, very period. It was so common that several individuals lamented at the time that courtesans were dressed up as noblewomen or widows -even nuns- causing the actual noblewomen of Venice and Rome great distress)or it's just a coincidence that these ladies are wearing the same shade of green with a yellow scarf. I think it's the former rather than the latter.

Green also stood for one of the three cardinal virtues. But it could also mean love which makes a lot of sense in the context of it being worn by a courtesan. The idea of it being a symbol of love is re-enforced much later during the Baroque era.

With this in mind, here are some of the portraits I've been looking at.

The Magdalen, Bernardino Luini c 1520s

Mary Magdalen is easy to spot in any period painting as she is normally shown with a perfume jar, as in the painting above. She is also commonly accepted to have been a prostitute prior to admonishing her ways and following Christ - therefore, she is often painting wearing flashy to somewhat scandalous clothing for the time. Knowing that, I realized that the yellow scarf might be the yellow scarf of the courtesan. However, I didn't think about the green dress until I kept seeing this kelley green and a yellow scarf together in multiple paintings.

The Conversion of the Magdalene or An Allegory of Modesty and Vanity, oil on panel painting by Bernardo Luini, c. 1520

Again, Mary Magdalen is pretty easy to spot. She's wearing a dress more closely associated with southern Italy in this painting, however.

Giulio_Campi_-_The Chess Players c 1530

The lady, not having a bodice to her gown in the same kelley green as both the Mary Magdalen's, is most likely a courtesan. She is shown, surrounded by men, playing a game - very much what a courtesan would do. Her scarf is a harlequin of yellow and white - probably acceptable enough to pass for any law.

Bartolomeo Veneto, Portrait of a Lady in a Green Dress, 1530

Again, the yellow scarf with the same shade of green.

 photo innocenzofrancucci1530sbolognaborghese.jpg
Innocenzo Francucci da Imola, Portrait of a Woman c1530s

This green is a bit lighter - however that may be due to age. Still, she has the yellow scarf about her shoulders.

Portrait of a Lady C 1530/1540

It looks like she has a light yellow scarf about her shoulders. Again, the bright green dress.

Of course, it is possible that this was simply a fashion statement - however, there are paintings of Mary Magdalen wearing a yellow scarf with a green dress, known laws at the time instructing courtesans to wear yellow scarves, and evidence that green meant love.

I'll keep a look out for more paintings from this era to see if I can find anything more solid - but I do believe that at least around the 1530's in most of Italy, there was something to green being worn by courtesans.

Sunday, February 2, 2014

Kingdom Arts and Sciences documentation 2014

Here is my documentation for my Royal Baker entry. I've included links both back to older entries in my blog and to the original sources were possible.

Who: Lady Isabella Mea Caterina D'Angelo
Competition: Royal Baker
What: Simple Bread, Apple Pie, and Fritters


Greetings! With winter's grasp upon us, it is hard to thing of spring. However, soon it will be Lentyn time again and with that, I wish to show all the wonderful variety of foods that one may sample during a time of fasting and prayer. First, a simple bread.

The bread is made in accordance to Jean le Renaud de Pyraness of the Canton of Stowe-on-the-Wowld within the Kingdom of Lochac' instructions . I used a starter that I created from nothing more than a good flour and water during the Christmas season. I also used olive oil, honey, additional flour, a small bit more water, and Mediterranean sea salt. All the ingredients would be acceptable, according to the Church, during Lent. If you would like to know more about the use of honey during lent, please see Two Fifteenth Century Cookbooks for a recipe that calls specifically for honey during Lent.

With this mixed, I kneaded the bread dough and waited for it to rise. Upon it's doubling in size, I beat it again and waited for it rise again. Upon this second rising did I bake the bread and it is good.


Apple Pie

For apple pie, I have found numerous recipes for apple pie during Lent. Two of my favorites are as follows:
Source [The Neapolitan Recipe Collection, Terence Scully (trans.)]: French-Style Apple Tart. Cook whatever apples you want, whether in water or in must syrup, whether in a baking dish in the oven or under the coals; then get pinenuts that have soaked a night in water, and are not rancid, grind them up with the apples; get a lot of sugar, a little cinnamon, a little ginger, a little saffron and a beaker of ground and strained pike eggs, and mix and strain everything with rosewater or some other water; then make a dough of sugar, flour, oil, water and salt, mix them together to make the dough, spread it over the bottom of a low pan, and put the mixture in so that it is no more than a finger deep; cook it in the oven or on the fire as is directed for the other tortes; when almost cooked, get wafers, crumble them over the Tart - those wafers should be made with good sugar; when cooked, garnish with sugar and rosewater. (Italy, 15th C)


124 To make a very good apple tart

Peel the apples, and remove the cores, and them be afterwards be finely chopped. After that put a half pound of sugar and a half ounce of finely ground cinnamon thereon and make a dough for a tart and spread it on top.(German, 16th C)

There are also several other recipes from around Europe on the same theme. Given that this apple pie is for Lent, I used the following recipe.

Given this, I used the following:

For the Crust:

2 cups flour
Generous 1/2 cup of light brown sugar
1 tablespoon olive oil
1 teaspoon salt
1/2 cup of water with a pinch of saffron

I mixed the following together to get a basic dough. I kept adding more sugar to make it sweet so I'm not entirely sure how much really went in. I split the dough in half after kneading it for a few minutes - one pile for the bottom crust and the other for the top. I smoothed out the bottom crust and finger pinched it into the pie pan. I set the oven to 375f and baked it for 10 minutes.

For the filling:

4-5 apples
1 tablespoon of cinnamon
3/4 a cup or so of brown sugar
1 teaspoon ginger

After slicing and peeling the apples, I put them in a pot to boil. Once they boiled for about ten minutes, I drained the water and placed them in the bottom crust. On top of this, I sprinkled the sugar/ginger/cinnamon mixture. I placed the top crust on the pie and baked it at 375F for a half hour.

Fritters (The link will take you back to an older post on how I came to this recipe. There is also this post from when I first started playing with the idea of eating the medieval diet during Lent)

Fritters should be warm but that probably is not possible given the travel necessary to compete. Hopefully, they shall still be good.

XXIV Apple fritters for lent.
Take apples and peel them, then cut in the way of the host (thin circular slices). Make a batter of flour with saffron (and presumably water), and add currants, and put the apples in this batter; then fry them in sufficient oil for each. Powder with sugar when they are cooked, etc. (Italy, 15th C)

My recipe:
For the batter:

1 cup of almond milk
1 cup of flour
1 tablespoon sugar
1 teaspoon cinnamon (although not in the original recipe, it is a period spice that was known to be used with other apple recipes and it tastes good!)

Mix it together. Peel the apples (2) and cut them into thin slices. Once you have a nice thick batter, coat the apple slices. Heat up a pretty thick amount of olive oil in a frying pan. Enough to cover any slice almost half way. Cook the apple slices covered in batter about five minutes, each side on medium high heat. Basically, the batter will turn a nice brown. If you don't cook them well enough it will taste doughy

Sprinkle a good amount of powder sugar on the fritters once they've been cooked both size and taken out of the pan.

Please, if you have any questions, feel free to ask or visit my blog at isabelladangelo.blogspot.com where I have a LOT more information on food practice during fast or fish days.