Monday, December 2, 2019

The 15th Century "Wrap" Hat

Detail of the Weyden Triptych
Many years ago when I first started the SCA, I learned about the above painting of Mary Magdalene.  Like many others, I fell in love with her kirtle (note: Mary Magdalene is almost always shown in the latest fashions of the day).  However, very early on, I was told the hat was considered allegorical and probably not what was really worn. 

A bit later in my SCA career, I found a lot of the wrap style hat from the 15th C and did a post on it in the livejournal years.  I had long since forgotten about any controversy over it because it's not my normal geographic area or time period (a couple decades too early for me!).  However, thanks to a post on reddit, a lady asked about the hat and it's a good time to write up the research for it.

Detail from van der Weyden's "The Presentation in the Temple"
This was one of the first other examples I saw, thanks to Hope Greenberg's page on 15th C dress.  It's clearly an example of the wrap hat however, it's also clearly the same model.   Same hair color, same nose, and now, the same artist is painting the same hat.  While it helps slightly to say the hat probably existed, it also means that it's only one person wearing it - which doesn't help.  There is also a sketch of the Magdalene that Weyden did.   Again, the model existed and probably loved her wrap hat but that doesn't mean that it was a fashion statement for everyone.

Detail from the Starck Triptych (photo taken by me at the NGA)
Here we have Saint Veronica with...the wrap hat!   Now could it be the same model?  Probably not.  This Triptych was painted around about the 1480's and Weyden's are from 1452 and 1455, respectively.  Also, this Triptych is from Nuremberg in Germany and Weyden was Flemish.  He died in the 1464, so for the wrap hat to appear about 20 years later over 300 miles away is a little weird.  It could be that someone was just a fan of Weyden's work and copied it but that is unlikely given additional evidence for the wrap hat.

A Sibyl, 1470s
The sketch above is currently housed at the National Gallery of Art in Washington DC.  It's said to be from the 1470s and also from Nuremberg.  Her wrap hat is a bit different but still pretty clearly fabric wrapped around the head to form a brim.   

Right Wing of the Deposition Triptych by Van der Goes
The above detail from a painting by Hugo Van der Goes shows a lady in the upper center with a black veil over the back of a wrap hat.  Not only is this clearly a very different model, this is from the 1480s and back in the Flemish territories.   Now, we have three different painters all showing the hat in the second half of the 15th C with different models wearing it.

Circumcision of Christ (detail from the Twelve Apostle Altarpiece) Friedrich Herlin - circa 1466
And we are back to Germany with another artist and the Virgin Mary this time wearing the wrap hat.  With four different artists showing it, it's most likely that the wrap hat was very much a fashion during the second half of the 15th Century.   

1480s (?) Lamentation detail, painted by tot Sint Jans
Yes, it looks like she has an air filter wrapped around her head or layered on too many coffee filters.   However, this is yet another example of the wrap hat - this time back in the Flemish territory.   

I saw there are many more up on pinterest but these are the few where I could verify to some degree the source and previously knew about.   The fun thing about the wrap hat is that it's very simple to make - it looks to be nothing more than a very long roll of 5" wide linen.  That's about what I end up having to cut off the edge of the fabric when I do skirts!   So, grab some scrap fabric, sew up one edge, and wrap it around your head snuggly.  It's period correct!


Sunday, November 17, 2019

New Winter Coat!


Sorry for the covered face but I took this picture at 6:30 in the morning and it was not pretty.  However, the picture showcases my new winter coat really well so....

The pale blue is a wool poly blend I got from Fabric Mart in one of their many wool sales.  It was $10.50 a yard and I ended up with three yards.   The pink wool is a strip of wool I got from Tricot Cafe which is down the street from where I live.  I think I paid $10 for the entire strip but I don't remember.  I bought this all last year when I thought I'd make the new coat.

I last made a winter coat back in 2013.  I've been wanting a new one for the past couple of years but decided, this year, I would really get to work on it.  :-)

The pattern:

Simplicity 8298 from 1977.   I bought the pattern along with a bunch of others from a lady in Idaho.  My copy is a women's size 14 so I didn't have to play with the size on it much.  Going from a jacket to a winter coat that would need to accommodate bulky sweaters means that I want the jacket pattern a bit on the big side.

Some edits I did:

The original jacket is unlined so I had to create a lining pattern. Really, most of it was just cutting one of the fashion fabric and one out of the lining but the front "flap" had a facing.  So I traced the front pattern piece on to some Christmas wrapping paper that I don't like anymore and then I traced the facing on top of that.  The piece that was "left", I added a 1/2" seam allowance and cut that out as the front lining piece.


The various wrapping paper lining pieces and the sleeve lining
I also lengthened the jacket pattern by about 3" so it would be more of a winter coat.  Since I wanted a hint of pink in the coat, the side front already came in three pieces - I just added the pink wool by cutting out the middle side front from it.  I also took the rest of the wool to make a belt that ends in a big ole butt bow in the back.  Because.  

Construction:


Overall, the construction was fairly basic.  Side front to front.  Side back to back.  Ect.   I did add hem lace to the inside of the coat because I didn't want the flannel backed poly satin to unravel like the hellish material it can be.   I also didn't want to double roll it so...hem tape it is!
Close up of the hem tape

Overall lining of the coat
So far, so good.  I might add a hook or another button because the top of the coat fits slightly off.  It's not a big deal and the coat is quite warm.   Hopefully, I won't have to make another coat for a while!


Monday, September 30, 2019

HSM2019Sep:Katina's Pretty New Green 16th Century Italian Dress


Having fun at the Castle

Back of the dress

The Challenge: September: Everyday: It’s not all special occasion frocks. Make something that would have been worn or used for everyday.

Material: Avocado green linen, orange linen, cotton canvas (inner lining), cotton muslin (lining).

Pattern: Very heavily modified McCalls 2806 which is out of print. I used the bodice pieces only and drafted the darts out. I also changed the neckline and the width to fit Katina better.

Year: 1570s/1580s

Painting by Federico Zuccaro dated to 1579

Attributed to Pietro Ronzelli, date unknown


Notions:  The shoelace to lace the bodice up, thread, and my old green apron

How historically accurate is it? I machine sewed the insides but all the trim and the eyelets were done by hand so about 90%?

Hours to complete: I'm honestly not sure.  I know I started on it in September but I can't recall how long this one took - maybe five or six hours total?

First worn: September 28th, 2019

Total cost:  The avocado linen was $10 a yard and I had three yards to play with.  The orange linen was $7.50 a yard and I also had 3 yards of that.  I'm not sure how much I paid for the cotton canvas originally - maybe $4 a yard?   I only used a half yard for the project.   The muslin was $4 a yard but 90" wide so I only used 1/4 of that. 

I made two gowns like this - one orange with green trim which I started on back in August- and one green with orange trim - which I started on in September.   They are exactly the same in style - the colors are just reversed. 

Katina wanted a dress similar to my old dresses so this is one of the three I made for her.   The orange isn't as bright as in the picture but, well, bright orange is documentable (saffron with madder gets you safety cone orange).  I think she had fun wearing the dresses this weekend.

Friday, September 20, 2019

Painting for my sewing room!


Long story short: I'm in recovery mode right now. I got out of the hospital on Wednesday after having my gallbladder removed. Before going in the hospital, I stopped by one of my local Thrift stores. This one isn't open on Fridays, Saturdays, or Sundays. However, what they do do is put out items that they believe, for whatever reason, won't sell out on the front curb. I've been badly in need of picture frames and snagged a couple for free. I also found this lovely hanging canvas of a giraffe that was meant for a nursery. I figured with a coat of paint, it might not look too shabby.


Today is the first day since surgery that I've felt "myself" again - and, really, the first time I've felt normal in probably a good month, to be honest. I mean, yeah, my incisions still hurt, but the rest of me feels normal. Trying not to stress it too much but, at the same time, unable to sit around and just be a couch potato, I decided to paint over the poor old giraffe and make him into something more appropriate for a sewing room.


Every idea I had involved a dress form so I decided to paint my good old dress form I got at the same thrift store for $5. (It doesn't have a stand but, eh, whatever. It's mostly just to pin and display anyway.) You can see it in the upper right most corner of the picture if you look closely. :-)


It's not a great painting but I'm pretty happy with it. I used an entire tube of gray paint, most of the way too peachy to be flesh tone, and a lot of the green to get this painted and get the giraffe completely covered.


Sunday, September 8, 2019

Colors the Peasantry wore in the Middle Ages and Renaissance Part Two

In part one, we looked at various paintings that show the poor were anything but monochrome. Now, we'll look at writings and archaeological evidence that further proves the poor had dyed clothing.

I'm going to go with the most obvious first.  Why and how could the poor have access to dyes to have colorful clothing?  The easiest way was to get hand me downs.   Just like now, giving clothing to the poor was very much a thing in the middle ages and renaissance.  Works of Mercy included giving away clothing to the poor. 

There were also second hand shops; basically pawn or thrift stores, in the middle ages.  Again, it wouldn't be the latest fashion but it would be a way for someone with a few extra pennies to get a nice dyed garment that is a season or three too old to be fashionable.  Second hand clothes shops were essential to medieval life.

However, probably the most compelling evidence that the peasantry wasn't monochrome comes from the archaeological evidence itself.  In a study of textiles from both bog and grave digs in Northern Europe, all time periods, including 8th-10th C, showed indications of blue dye being used.  Sometimes, the blue dyes were found in conjection with a yellow dye - meaning that green was a probable color.  In fact, red appears to only show up in the wealthier graves but both blue and green are in the archaeological remains.

More fun is a test of textiles found in the waste layers from Medieval Prague.  172 samples were taken for dye analysis based on a dig site that dates from between the 14th and 15th Centuries.  The entire paper is here and is a fascinating read on it's own.  The 172 samples are broken down into (34 silk and 138 wool samples - which is slightly disproportionate to the overall finds.  Only 4% of the textiles found were silk.  However, some of the textiles were also items such as rope or other non-clothing piece as well as the silk pieces possibly being larger or more easy to test for dyes than some of the wool fragments.

Taken from a presentation by Helena Březinová
Of the 172 pieces tests, only 27 or 15% of all the samples had no dyes detected.  85% of the samples had at least one dye at this medieval dump site.  The dump site would have pieces from across the classes; however, those with estates would dump items on the estate.  (I've been to one too many archaeological field schools where you are digging in the trash pit for the kitchen of some sort of manor/plantation house.)  So, for this dump site in the "New Town" area of Prague, it's pretty safe to assume you are mostly looking at the lower and middle classes with only a few upper class textiles involved in the dump.

The coccid is most likely polish cochineal which makes for a nice variety of orange, pinks, and reds depending on the dye bath and mordant used.  Madder is more oranges and reds.  Cochineal is brighter and more pinkish in it's hue while madder is more the color of a natural Ginger's hair.  :-)  Brazilwood is another red; this one is most likely the east Indian stuff and not from the New World.

Woad gives you a beautiful range of blues.  Tannin dyes, most likely walnuts, gives an array of browns; from khaki to almost black.  Weld will give you primary color yellow. Persian berries is the one outlier and also gives you a neat yellow.

Basically, in this pit, you have a range of reds, woad for blue, some browns, and two different ways to get yellow.  You have your primary colors so any color, pretty much, is possible.  Again, this is the waste layers of a city - you'd expect to find a high amount of items from a variety of classes but mostly the lower and middle classes.  Only 15% has no dye.  Everything else comes in a wide variety of color.

Want purple?  According to this archaeological report, madder (red) and woad (blue) together (purple!) account for 19 of the 60 double combinations; it's one of the most popular.  The tannis were most likely used to give the dye a darker overall hue so the 2 pieces that show woad (blue), weld (yellow), and tannis (brownish) probably came out to a lovely forest green.

Granted, this is just one archaeological report but it does show that the lower classes had color.  How popular that color was, based on the other archaeological paper focusing on digs further north and a few centuries older, depended on both time and location - just like everything else in the SCA period.  So wear that pink tunic with purple trousers as a serf, it's completely period.  :-)


Monday, August 12, 2019

Modern Sewing!


This is a very shaggy Abigail hiding where I had already taken off one cuff of the blue jeans.  :-)  I bought the jeans on sale for $3.49 at the store.   They were/are having a ridiculous sale because the entire store is about to undergo a remodel and they need to move EVERYTHING.  So, I saw these were my size and decided that, although I hate bell bottoms, I can just take the cuff off and put something else on the bottom.  Or make them into shorts if I royally screw up.  Either way, it's $3.49.  I can play with these without crying.  


I added some heavy blue knit to the bottom with a pink trim at the seam.  The blue knit has a lovely constellation pattern.  

Close up of the pattern on the fabric.  The jeans aren't perfect but they are wearable and make great Saturday laze around the house jeans.  I might take the trim off and replace it with a stretchy lace because the trim does not stretch and I have fat calves, unfortunately.  

My other recent modern sewing project was a pair of trousers for work.

I cannibalized the 1972 Simplicity Printed Pattern 5357 and made it into one single pattern cut rather than a front and back.  I also made it a bit bigger because the original pattern called for a knit.  The cut became more straight than curved towards the ankle because I really do not like bell bottoms.  I wore these to a meeting at work and then a work dinner.  :-)

Some 1510's and 1580's pieces will be coming shortly!   I'm working on a few Renaissance outfits and then my dirndl in the next couple of weeks.   

Saturday, July 20, 2019

Little Shrug Jacket for Summer


The fabric! I bought some lovely constellation print heavy cotton knit from Fabric Mart a couple of months ago. It was in their as-is section. All the fabrics there do have issues, but, normally, you can work around them depending on the project. I just really liked the print and wasn't passing up $2 a yard knit. I needed knit at the time to enhance my work wardrobe.

I used out of print Simplicity 4334. I found out they re-released it at some point but this one is well over a decade old. Although I've used the skirt pattern before, I hadn't made the shurg, view D, and had to cut it out. Really, the pattern is a great wardrobe builder if you need a decent work wardrobe but are either a)lazy like me or b) new to sewing. None of the patterns are complicated and you get some nice pieces out of it.

The shrug! All the pattern is is the back on the fold, two front pieces, and two sleeve pieces. It took maybe a half hour to cut it out and sew it up. I didn't bother with directions - I just sewed the sleeves seam, hemmed the sleeve edge, sewed the front pieces to the back piece, hemmed that all the way around, and then attached the sleeves. For seams, I used a zigzag stitch but, for the hem, I just used a regular straight stitch. This was partly because the knit doesn't unravel but, also, because I'm lazy and only had a bobbin of light blue thread that I didn't want to show on the "fashion" side.


The back of the shrug! All perfect for the 50th Anniversary of the moon landing. :-) I didn't want to have the day pass without wearing something astronomical.

16th Century Style Italian Camica


Handsewn Late 16th Century Italian Style Chemise
By Lady Isabella D'Angelo


Figure 1 Close up of Chemise sleeves and embroidery

The chemise or camica was an undergarment worn by both men and women from the middle ages until fairly recently, historically.  It was made of either linen or cotton, with most extant garments being made of linen.[i]  The purpose of the garment was meant to have an undyed undershirt of sorts that could aborb the sweat and body oils, leaving the over garments clean.  No one wanted to clean their heavy wool or, if you were rich, heavy velvet garments every day; just as we today do not wash our winter coats every day.
The garments could be embroidered, typically using silk or linen thread.  Silk was domestically produced right here in Veneto between Vicenza and Verona.[ii]  Linen was common everywhere in the Old World.  The embroidery could be dyed or done with undyed silk – the latter called whitework.  Lace, which was only first developed in the 15th century, could also be added.[iii]

Extant examples
There are several extant examples of chemises from Italy located around the world.  Some of these are embroidered, some to these are not.  Both women and men would have their sleeves embroidered but, typically, only women had the bodies of the chemise with any decoration, if they wished. 


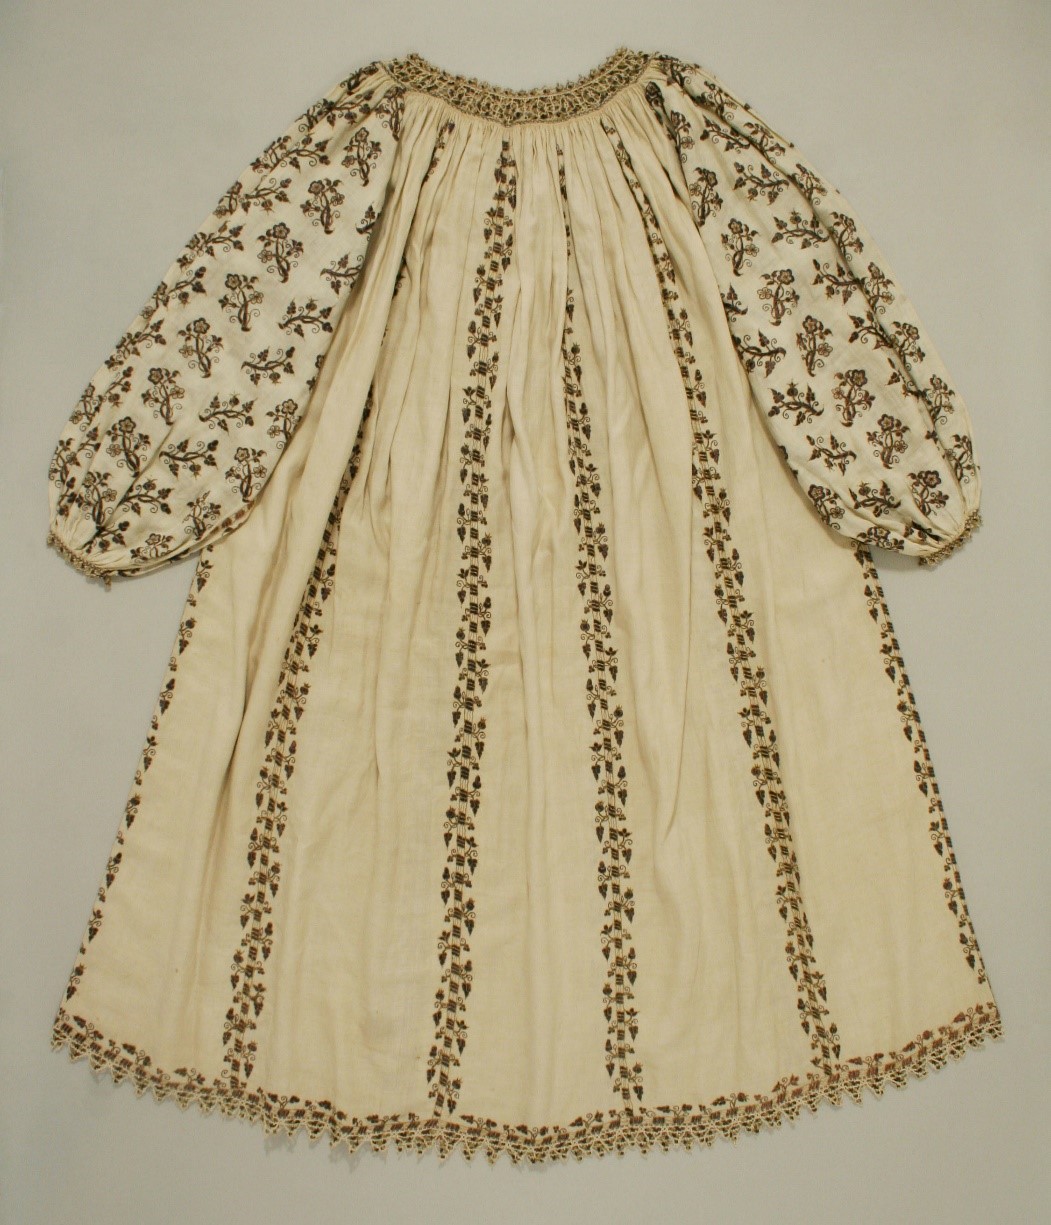
 Late 16th Century chemise at the Metropolitian Museum of Art in NYC[iv]
Figure 2 is one example of a late 16th Century Italian styled chemise.  The sleeves are heavily embroidered in purple silk and the body of the chemise is made up of thin panels that are then sewn together and the seams are embroidered over.   Because of the time it would take to make such a piece and the cost of the materials, this most likely belonged to an aristocrat.

Figure 3 Detail of a chemise with lace insertion, showing the upper part of the sleeve[v]

Figure 3 shows the underarm and the sleevehead to a late 16th Century style chemise.  Various laces are inserted between panels as well as around the neckline.  This is similar to what I attempted to do with the chemise on display.  The location of this extant chemise is currently unknown.


Figure 4 16th Century chemise close up showing needlework lace[vi]

Figure 4 is not a true lace as we would know it today but a very specific type of embroidery called drawnwork.   The embroiderer would cut out some of the threads from the base fabric and wrap the remaining threads to create designs.  
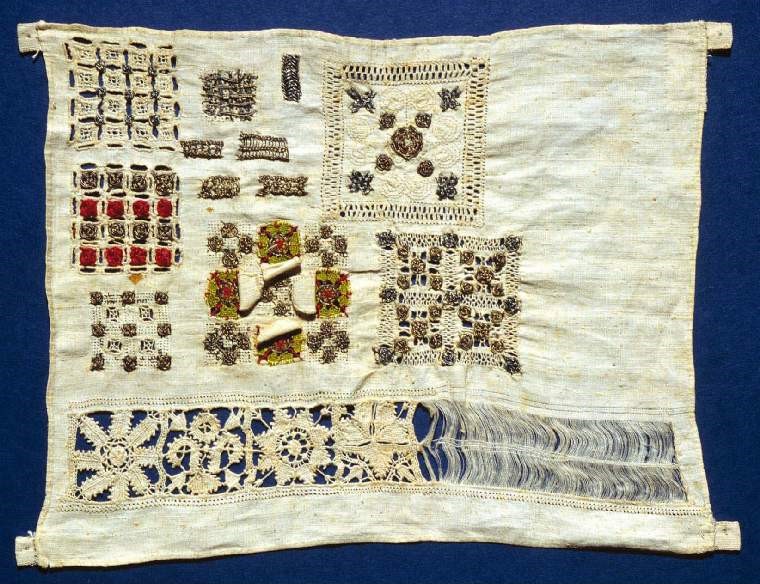
Figure 5 shows and example of needle work where it is half finished. 
Figure 5 Sampler from the late 16th C/ Early 17th C showing various types of embroidery[vii]

The mix of blue silk hippocampus and white bobbin lace I chose for the chemise comes from a few different embroidery examples.
Figure 6 Strip of blue embroidery with drawnwork, 16th C Italy[viii]
Figure 6 is from the Metropolitan Museum of Art in New York City.  It shows a mix of light blue embroidered flowers with cutwork or drawnwork. 
Figure 7 16th C textile showing lace insertion and dark blue silk embroidery

Figure 7 is closer to the techniques I used and shows both lace insertion and dark blue embroidery.  The base is linen with the blue thread embroidery being silk.  It is unknown what the textile itself was used for but most likely a table or alter cloth.
Figure 8 Seahorse or hippocampus, most likely done by Mary Queen of Scots
The hippocampus, or a mythical type of seahorse, was a popular motif throughout Europe in the late 16th C.  Not only does is show up in various drawings of the time, but, in Figure 8, there is an extant embroidery of one.  The embroidery is attributed to either Mary Queen of Scots or Elizabeth Talbot, Countess of Shrewsbury.[ix]

Technical Details

The main base of the chemise is linen.  The embroidered bands in the sleeves are older – I did them almost a decade ago- which is why the color of the linen is slightly different.  The bobbin lace is out of cotton.  Both linen thread and silk thread were used to sew everything together.

Italian Chemise Pattern

Placement Guide

The above patterns aren't the best but it is pretty much what I used.  (Ignore the orange pattern, it really is rectangular and not with a small bit cut out).  The green is what I used for casing along the gathered neckline. 

The Art Show where the finished chemise was first on exhibit

Close up of the full exhibit


Another close up of the embroidery


[i] http://costumedabbler.ca/cotton
[ii] https://www.luigi-bevilacqua.com/en/silk-and-venetian-fabrics-renaissance/
[iii] https://owlcation.com/humanities/History-of-Lace-Making
[iv] https://www.metmuseum.org/art/collection/search/83860?&searchField=All&sortBy=Relevance&when=A.D.+1400-1600&what=Costume%7cLinen&ft=linen+embroidery+italian&offset=20&rpp=20&pos=29
[v] http://realmofvenus.renaissanceitaly.net/workbox/extcam6.htm
[vi] http://realmofvenus.renaissanceitaly.net/workbox/extcam5.htm
[vii] https://webapps.fitzmuseum.cam.ac.uk/explorer/index.php?qu=Name:sampler&oid=110905
[viii] https://www.metmuseum.org/art/collection/search/215421
[ix] http://collections.vam.ac.uk/item/O138524/the-oxburgh-hangings-panel-mary-queen-of/

Thursday, April 25, 2019

Elephant Skirt!


I saw this curtain at one of the thrift stores a few weeks ago and fell in love with it.  I'm a sucker for anything with an elephant print.  However, I thought it was a bit too much at €12 and let it slide.  I kept thinking about it for the next week.  When I went back, it was still there!  Yay!

This picture is really just to show the elephant print and that yes, it was a curtain and not a tapestry.  I mean, it's made out of the same type of cloth but the curtain was a bit longer.   

So, I took the border on all three edges and cut that off, cut it up slightly, and sewed it into one long strip.  It ended up being about 16.5" wide.  The center part of the curtain, I cut into two ~24" rectangles, making sure to get the max amount of elephants, and put the rest of the fabric to the side.  I ended up with two 36" by 24" wide rectangles.  This was a bit too wide at the waist for me so I cut it down by making them into trapezoids instead.  The top part of the trapezoid was 24" with the bottom staying 26".   

I sewed the trapezoids together at the sides, gathered the long border print and sewed that to the bottom of the skirt, and I folded the top of the skirt over a piece of elastic.  I sewed the elastic down to one of the seams but didn't sew it down to the fabric length ways.  I wanted the fabric to move irregardless of where the elastic was.  


The finished skirt!   It will be perfect for summer.   There is a ton of yardage in the border print and the fabric is a nice heavy cotton.  

Sunday, April 21, 2019

Easter Dress!


For my Easter dress this year, I used McCall's 7804 with a linen cotton blend I bought at Fabric Mart.  The dress is actually even nicer than the photos and a LOT of fun to wear.  It's a pull over so it's a bit loose but very, very comfortable.

The pattern pieces were straight forward and I didn't bother with directions.  The only real change I made was I forgot to cut out the back facing piece so I just zigzagged the back neck hem.  No biggie.   
The bib front can be a bit tricky but I just ironed everything in the middle of putting the dress together and it came out fine.  I also used a frixon marker to mark where the neck opening should be and sewed around that before cutting.  That seemed to help a lot.

The lace at the bottom hem is a vintage lace I had in my stash.  I wanted a bit of lace added to the dress but nothing too overly frilly.  

Overall, I'm going to use this pattern again.  The dress is comfy and looks nice on.  I might try the longer version of the pattern - I almost did with this fabric but I didn't feel like cutting out three curved flounces, each on a fold, and then gathering that up when I already had to gather the skirt itself to the waist.  Too much gathering.  

Sunday, April 14, 2019

Mega Big Post of Random Things I've Sewn Lately

So, I have been sewing.  I just haven't been posting.  Once my sewing/computer/guest room is better organized, I'll post what that looks like and be able to work on more projects.

I finally found my sewing mojo again.  I've been sewing modern stuff lately but will get back into the historical stuff next week (I need a dress for the Mayday Renn Fest!!!).  I think I've just been overwhelmed by the amazingness that is Italy.

This is a simple tiered corduroy skirt I made back in February, I think.  I used Simplicity 4334 which is OOP.


I think I got the corduroy off of ebay and the guy said it was velvet.  It clearly wasn't when I got it.  It's a lovely teal corduroy that doesn't show well in the photos.  I've worn the skirt a few times to work - it's a nice spring/fall skirt.


Next are the trousers I made for Saint Patrick's day!   I ordered one of the 6 yard bundles from Fabric Mart when they were having one of their "free bundles if you spend over X amount!" sales.  This tight, heavy green knit came as part of the bundle.  It looks like twill until you have it in your hands, practically.  

I used an old pattern I recently acquired from a lady who was selling a whole bunch of patterns dating from the 1960's until the 1980's.   It's Simplicity 5357 from 1972!   I narrowed the leg at the ankle because I did not want bell bottoms.  Other than that, I pretty much followed the pattern.   

The next up is a lavender skirt I didn't make but I did make a minor adjustment to.  


The skirt is a linen cotton blend that I got from the thrift store for €4.50!  I immediately fell in love with it when I saw it and noticed the waistline would fit.  Yay! Right?  Nope.  Turns out the zipper only went down a few inches on the side.  I couldn't get it up past my bum.  


Ignore the fading henna on my hand.  I was holding the zipper open as far as it would go to show how bad it was.


Luckily, there was a good amount of zipper left on the inside!  So, all I had to do is rip open the seam and resew the zipper down, right?

Sort of.  The way the skirt was sewn, I had to open it up a bit in order to get rid of this "ridge" and make the seam open for the zipper.

Before I sewed the zipper down with the fully open seam.

The lovely lavender skirt once the zipper was redone.  It's not a perfect job but it fits!   Yay!

I've also made a black cardigan sweater out of some sweater knit I bought years ago.  I need to post that one was well.  

My Easter Dress will be done soon.  It's a linen cotton black background floral that I love.  I've cut out the pattern; I'm using McCall's M7804.  We'll see how that comes out.