Showing posts with label costuming. Show all posts

Monday, September 30, 2019

HSM2019Sep:Katina's Pretty New Green 16th Century Italian Dress


Having fun at the Castle

Back of the dress

The Challenge: September: Everyday: It’s not all special occasion frocks. Make something that would have been worn or used for everyday.

Material: Avocado green linen, orange linen, cotton canvas (inner lining), cotton muslin (lining).

Pattern: Very heavily modified McCalls 2806 which is out of print. I used the bodice pieces only and drafted the darts out. I also changed the neckline and the width to fit Katina better.

Year: 1570s/1580s

Painting by Federico Zuccaro dated to 1579

Attributed to Pietro Ronzelli, date unknown


Notions:  The shoelace to lace the bodice up, thread, and my old green apron

How historically accurate is it? I machine sewed the insides but all the trim and the eyelets were done by hand so about 90%?

Hours to complete: I'm honestly not sure.  I know I started on it in September but I can't recall how long this one took - maybe five or six hours total?

First worn: September 28th, 2019

Total cost:  The avocado linen was $10 a yard and I had three yards to play with.  The orange linen was $7.50 a yard and I also had 3 yards of that.  I'm not sure how much I paid for the cotton canvas originally - maybe $4 a yard?   I only used a half yard for the project.   The muslin was $4 a yard but 90" wide so I only used 1/4 of that. 

I made two gowns like this - one orange with green trim which I started on back in August- and one green with orange trim - which I started on in September.   They are exactly the same in style - the colors are just reversed. 

Katina wanted a dress similar to my old dresses so this is one of the three I made for her.   The orange isn't as bright as in the picture but, well, bright orange is documentable (saffron with madder gets you safety cone orange).  I think she had fun wearing the dresses this weekend.

Sunday, September 8, 2019

Colors the Peasantry wore in the Middle Ages and Renaissance Part Two

In part one, we looked at various paintings that show the poor were anything but monochrome. Now, we'll look at writings and archaeological evidence that further proves the poor had dyed clothing.

I'm going to go with the most obvious first.  Why and how could the poor have access to dyes to have colorful clothing?  The easiest way was to get hand me downs.   Just like now, giving clothing to the poor was very much a thing in the middle ages and renaissance.  Works of Mercy included giving away clothing to the poor. 

There were also second hand shops; basically pawn or thrift stores, in the middle ages.  Again, it wouldn't be the latest fashion but it would be a way for someone with a few extra pennies to get a nice dyed garment that is a season or three too old to be fashionable.  Second hand clothes shops were essential to medieval life.

However, probably the most compelling evidence that the peasantry wasn't monochrome comes from the archaeological evidence itself.  In a study of textiles from both bog and grave digs in Northern Europe, all time periods, including 8th-10th C, showed indications of blue dye being used.  Sometimes, the blue dyes were found in conjection with a yellow dye - meaning that green was a probable color.  In fact, red appears to only show up in the wealthier graves but both blue and green are in the archaeological remains.

More fun is a test of textiles found in the waste layers from Medieval Prague.  172 samples were taken for dye analysis based on a dig site that dates from between the 14th and 15th Centuries.  The entire paper is here and is a fascinating read on it's own.  The 172 samples are broken down into (34 silk and 138 wool samples - which is slightly disproportionate to the overall finds.  Only 4% of the textiles found were silk.  However, some of the textiles were also items such as rope or other non-clothing piece as well as the silk pieces possibly being larger or more easy to test for dyes than some of the wool fragments.

Taken from a presentation by Helena Březinová
Of the 172 pieces tests, only 27 or 15% of all the samples had no dyes detected.  85% of the samples had at least one dye at this medieval dump site.  The dump site would have pieces from across the classes; however, those with estates would dump items on the estate.  (I've been to one too many archaeological field schools where you are digging in the trash pit for the kitchen of some sort of manor/plantation house.)  So, for this dump site in the "New Town" area of Prague, it's pretty safe to assume you are mostly looking at the lower and middle classes with only a few upper class textiles involved in the dump.

The coccid is most likely polish cochineal which makes for a nice variety of orange, pinks, and reds depending on the dye bath and mordant used.  Madder is more oranges and reds.  Cochineal is brighter and more pinkish in it's hue while madder is more the color of a natural Ginger's hair.  :-)  Brazilwood is another red; this one is most likely the east Indian stuff and not from the New World.

Woad gives you a beautiful range of blues.  Tannin dyes, most likely walnuts, gives an array of browns; from khaki to almost black.  Weld will give you primary color yellow. Persian berries is the one outlier and also gives you a neat yellow.

Basically, in this pit, you have a range of reds, woad for blue, some browns, and two different ways to get yellow.  You have your primary colors so any color, pretty much, is possible.  Again, this is the waste layers of a city - you'd expect to find a high amount of items from a variety of classes but mostly the lower and middle classes.  Only 15% has no dye.  Everything else comes in a wide variety of color.

Want purple?  According to this archaeological report, madder (red) and woad (blue) together (purple!) account for 19 of the 60 double combinations; it's one of the most popular.  The tannis were most likely used to give the dye a darker overall hue so the 2 pieces that show woad (blue), weld (yellow), and tannis (brownish) probably came out to a lovely forest green.

Granted, this is just one archaeological report but it does show that the lower classes had color.  How popular that color was, based on the other archaeological paper focusing on digs further north and a few centuries older, depended on both time and location - just like everything else in the SCA period.  So wear that pink tunic with purple trousers as a serf, it's completely period.  :-)


Friday, October 26, 2018

Halloween: Vannozza Cattanei's gray/green archery dress in the Borgias Part 1

The problem - because there is always a problem before the start of a project: I wanted something Venetian for Halloween - living here in Veneto- but I didn't want to do the 1550's/1560's thing because I'm trying to lose weight again. I wanted a dress that will fit for a while - which are typically the higher waisted gowns. However, I have a TON of the early 16th C gowns and didn't want to add another to my already bloated collection. Solution?


This.

I saw the gown and was immediately in love. It's very similar to many 1520's/1530's styles. Also, I happened to have a nice five yards of a lighter gray silk stashed away that was perfect for this gown. I'm not coping it exactly - mainly because I'm trying to go with mostly stash fabric - but I'm trying to copy most of the lines. So, the back...


The sleeves are detachable. There is a seam at the back sides but it looks like it has a zipper (not very Renaissance...) up the center back. Because I want to wear this to SCA events later on, I'm just doing lacing at the back sides. Also, it helps with losing/gaining weight that way. The skirt is gathered around and appears to really be just the typical rectangles with maybe some extra in the back. Again, SCA events, I'm just doing rectangles because trains and SCA events do not mix. Ever.

To start, I'm using a base I made from McCall's pattern 2806:


Really, the only thing you need to do to the above pattern to make it perfect for 1490s/1500s is take out the darts in the bodice. That's really it. The skirt is already just three rectangles put together.

I modified it slightly more than that - the shoulder straps are a bit long and the neckline is umm...more early 1520s and not sensible for anyone more than an A cup? So I raised the neckline, cut the straps slightly, also made the width a bit tighter, and I drafted out the darts so I could use this as a base.


The base!   I knew I had to add an inch or two to lengthen the bodice; I also wanted to move the side seam a bit and square out the neckline.  So, first, I drew around the existing base in brown marker.
Then, I took a red frixion (the kind you can erase!) marker and matched up the existing base back with the brown outline I just did.  I wanted to mark where I was moving the seem on both pieces and make sure the curve of the armscye was preserved.  
I only moved it over an inch, really.  You can see the new "red" outline for where I moved the seam over too.  
Inversely, on the back piece outline, I drew a red line to mark the new back side seam.
This picture is a bit hard to see but I squared off the back neckline.  I ended up doing the neckline in the back even deeper than this once I tried the mock up on.  However, the red lines mark the new template.
Front side bodice piece!   It has the new squared neckline and is lengthened.   
However, I realized when I tried to draw the correct length for the back piece that I didn't have enough room.  I ended up erasing the back piece and redrawing it all a lot higher on the paper.  
New back piece as well!!!
Comparison to the original bodice front, with the dart pinched and the new bodice front for the 1530's dress.  It's a lot longer and the neckline is higher.  Still, I realized I had a couple more issues that needed fixing still.  The underbust/rib cage waistline was 2" smaller than my actual rib cage.  My ribs do not shrink like my waist will.  They just don't.  So I ended up adding a bit to the bottom of the bodice so I can breathe.   Also, I didn't like the shoulder strap angle on the front bodice piece so I changed that as well.
The lining fabric!   I'm using teal silk dupioni for the lining.  The actual dress is out of the fabric pictured below.
This is going to be the skirt front.  It's just a 45" cut of the fabric.  The pink silk is silk I had on hand that I thought went well with the lighter gray/silver silk.  The dark lines are hunter green velvet trim.
This is the fabric for the upper sleeve as well as some trim ideas for it.  I like the idea of the pink with the silver trim.  I ordered some light green trim but it's not good for anything more than knitting or crocheting - it's recycled sari ribbon that was sewn together hastily.  I might check out the trim store here in town but, this is the direction I'm going so far.  

Friday, May 27, 2016

Pink Cape For a Little Girl


It's rather simple but I wanted to post this because it's the first thing I've completed on my old sewing machine that I've started to use again.  My singer finally gave up the ghost (I've had it for five years of near constant use) and I realized that five years ago my sewing machine expertise weren't quite what they are now.  So, I took out my old sewing machine, a EuroPro, to see if I could fix the problem.

Five years ago, I was very frustrated with it and was going to take it in but realized that just buying a new machine would be cheaper so...the EuroPro went to sit in the corner like a bad machine.  I never went to get it fixed because the Singer worked so well for so long!   However, after the bad, impossible to fix, issues the Singer gave me, I dug the EuroPro back out.  The problem?  The tension was off.  Within a minute I had it working good as gold.  /facepalm.  Oh well, good thing I never got rid of it!

So this pink and green cape was sewn on the EuroPro.  I'm doing the Reddit Santa thing again and the lady I got said she has two pups and a 6 year old girl.  Both Mom and Daughter's favorite colors are pink and green.  I went to Joanns and picked up some pink cotton flannel and basic green broadcloth.  I only got a yard of each.  The cape is just three panels - one cut on the fold.  the hood is two rectangles.  The straps are just scrap pink flannel that I folded over and stitched down.

I pleated the hood to the neckline of the cape, leaving a few inches on either side of the opening free.  I bag lined most of the rest of the cape - just pulling the hood through the very bottom back of the cape and then sewing that shut.   It's simple but I think it's cute.   I'm hoping the 6 year old Daughter likes it.   I think every kid needs at least one good cape growing up - whether to play superheros or fairy tale characters.

Tuesday, February 16, 2016

New 18th Century Stays


18th Century Stays at the MET


I've looked at the above stays for a while. I really, really like them and wanted to make a similar pair for at least a couple of years. Once my beat up old ones finally became completely unwearable and popped a seam, I got off my duff to make ones similar to the above.


Front of my new stays


Side View

Back View
Mine aren't perfect by a long stretch but I'm really happy with them.  First, the fit.  The dress dummy they are on is a size 8.  I used a cotton twill flocked with black velvet I got at Joanns fr the fashion fabric.  The bias tape is black silk taffeta scraps I had lying around in the scrap pile.  I used linen for the lining and cotton duck from Ikea for the inner lining.  The boning is a combo of both cable and duct ties - some of the channels were too thin for the larger duct ties so I doubled up the cable ties instead.

My point on the stays is much broader than the extant pair.  The front upper edge is curved - it's just hard to tell on this dress dummy.   Like the original, I spiral laced the back.

I wore the stays this past weekend - although I hadn't finished binding the bottom edge fully- and they fit!   I just really, really need to go get longer laces!

Saturday, April 25, 2015

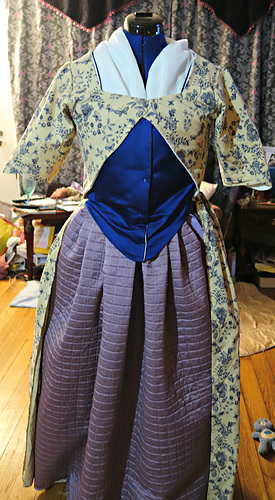
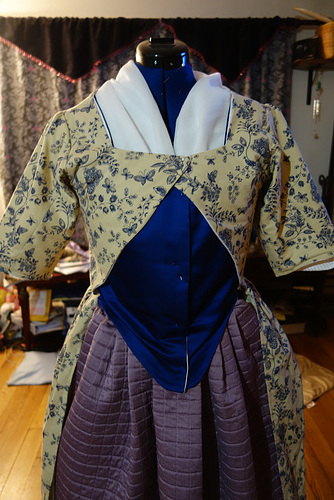
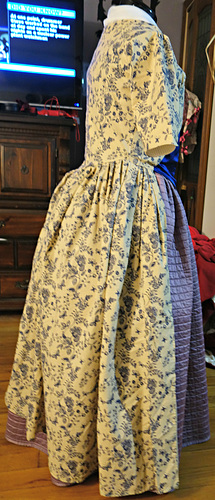
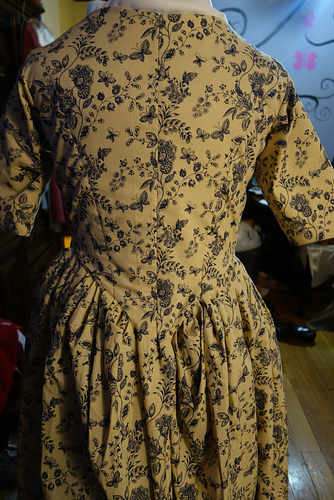
New Zone Front Dress

Front of Zone Front Dress


Close up of the Zone Front


Side of Dress


Back of Dress


Close up of the piecing


So the last photo is showing where I had to piece the skirt together for this Zone Front style dress because, unfortuantely, I didn't have quite enough fabric.

The full story: The amazing thrift store I go to had this blue and cream cotton for $3.90 for the entire length of it. It ended up being roughly 3 yards although it was hard to tell because it was someone's remnant and they had cut what looked like another dress out of it. I knew I had enough fabric to eek out a dress if I tried.

I used the Pegee of Williamsburg anglaise pattern as a base and worked out from there. I made the back into three piece (center back, two side backs) and had the center back still attached to the skirt back. I used my own sleeve pattern - the same one I created last year for my 18th Century jacket. The front of the pattern I cut out normally for the blue silk satin stomacher part and I flipped it up to created the angle for the zone front out of the cotton.

The bodice is lined in linen but the sleeves are lined in a stripped cotton (which you can see a bit because of the elbow flap).

While sewing the dress, I decided to come up with a new term - Visually accurate. Basically visually accurate pieces are ones that fall into the old SCA 10 foot rule - if it looks accurate from 10 feet away, it's good. It differs from historically accurate as you might be using a sewing machine or the fabric isn't exactly correct for that time period (who doesn't use silk dupioni?) or something else of that nature. If someone of the time period saw you from 10 feet away (sightly over 3 meters away) and wouldn't bat an eyelash about what you were wearing - ie, it would look normal from that distance to them- then it's visually accurate.

I did a lot of the interior seams of this dress on the machine. However, any visible seams (ie, the hem!) are hand sewn. Really, the only things machine sewn are the sleeves, the side skirt seams, the front line of the bodice and...that's it. The back seams? I sewed them using a historical method. I used cotton thread on the cotton dress - the pattern is accurate for the last quarter of the 18th century. Because I used the sewing machine, I'm calling this highly visually accurate.

The petticoat is another matter. It was once a bedspread. I cut a pocket slit, bound that with purple bias tape, cut out the batting from the top 2" of the petticoat, pleated it, attached silk waistbands to the front and back and...instant quilted petticoat! The hem was already bound because it had been the edge of the bedspread. This is more necessary garb low visually accurate. The lavender went well with the blue (much better than the orange!) but none of the materials are accurate. They did have quilted petticoats in the 18th century just not out of poly satin. ;-)

Overally, I'm happy with the dress. I'm going to add buttons down the front - I bought bone roundels to make fabric buttons for the dress. I just didn't have the time yesterday nor the proper materials to make them. I think the petticoat might need some work though. I pleated it wrong- not a big deal for today since both the dress and the cape hid anything. I also don't like the ties I cut out four months ago for it (did I mention the petticoat was a UFO...for the past two years?).

Friday, March 27, 2015

Historical Sew Fortnightly March Stashbusting Challenge

The Challenge:March – Stashbusting: Make something using only fabric, patterns, trims & notions that you already have in stash.


Fabric: A I'm-not-sure-what-it-is-but-it-has-silk lampas like drapery fabric probably circa 1976. I also used dark green silk dupioni and sand colored linen in the dress. Oh, and muslin...

Pattern: My own! :-)

Year: 1750's/1760's more or less

Notions: Silk thread, cotton thread, ribbon trim

How historically accurate is it? It looks much better than it actually is. The fabric is too heavy for the period but the design is pretty well in keeping with the later half of the 18th century styles (mix of floral and stripes). All the visible stitching is done by hand as are the stitches holding the skirt pleats to the back bodice.

Hours to complete: If it weren't for the sleeves, I'd guess only 16 hours or so. Because of the sleeves, it took 22, I think...

First worn: Hopefully, this Saturday!

Total cost: All stash! Every last thing. The linen I used for the hem was one of those Joann's remnants I hoard. It was a half yard and 50% off so, maybe $4.50 USD? The green dupioni was also a Joann's remnant. Probably another $3 or $4 USD there. The main dress fabric I bought back in November off of ebay for $17.99 USD with another $16 for shipping (did I mention it's heavy?). The silk thread I got on sale for $2 sometime last year (I just remember there was a sale on silk thread so I gobbled up a few different colors). The trim....I don't remember where I got it or how much it was. I *think* it was one my NYC trips but I really don't know. Knowing me, I doubt I paid more the $2 a yard.


I draped the patten using an old bedsheet.  I've mentioned before how much I hated these sheets.  They used to be in my room at my family's beach home.  When Mom said she got them from my room, I thought she meant the lovely blue and white ones....  

Anyway, I originally cut it to do a closed front anglaise but I didn't like that idea and went with the stomacher front instead.

The back pleats are all very pinned into place.  Only the right side is draped and drafted for the final pattern in this photo.  


This is what my animals were doing while I was draping fabric.
Eventually, Abby decided to investigate why I was taking pictures of things other than her.  This is the final pattern for the back, front, and sleeves of the dress.

I cut out and pleated the back as well as I could.  It's still a little wonky at the top but if it really bugs me later, I can always patch it over with more fabric.  

I had to cut the fabric long ways and make sure the floral pattern was running down the dress correctly. More on the fabric itself later.


To do the front robing, I just made the fashion fabric 2" longer width wise towards the front.  I then sewed it to the lining along the front edge.  Once I matched the side edges together, this created a small overlap in the fashion fabric towards the front.  I stitched along the channel (where the fashion fabric met the lining at the front) by hand and used this as a guide to fold the robings.  


This is where I folded it and hopefully the photos make more sense.  I then ironed it down before attaching it to the back bodice section.  


The full finished dress!!


Close up detail of the sleeve.  I added the ribbon trim to the cuff edges as well as the front of the stomacher.  Despite having five yards, just doing the cuffs and the stomacher used every last inch of trim I had.

The back of the dress.  It looks more wonky that it really is because the dress dummy doesn't have arms.

The lining of the cuffs.  I wanted something that would go well with the dress.  I was going to cannibalize a UFO that had spring green silk when I saw this dark green remnant in my stash that went a lot better.  (okay, I compared the spring green to the fabric and...no.  Just no.  So I ran back and got the dark green.  It looked way better) 


The stomacher front.  I took what was left of the trim and ran it down the center stripe.  I had just enough left.

And this is what is left of the fabric I used for the dress.  It's maybe a half yard.  It's enough to do the sleeves over if I wanted to.  

Evil sleeves.   Okay, so the first time I put them in, it was totally my fault.  I matched the seams wrong and had to rip them out.  Fine.  Then the right sleeve kept giving me trouble.  It would bunch up at odd points or it wouldn't line up correctly.  It took 3 1/2 tries (the last time it bunched up , I just ripped out that section and redid it) before the sleeve looked okay.   

The fabric:  Well, truth be told - you are looking at only 4 yards of fabric.  With most 18th C dresses, you do need 9 yards - and even that doesn't feel like enough- because you need the matching petticoat, the dress, the self trims....tons and tons of fabric.   This fabric is over 52" wide (I'm not sure by how much, I measured the skirt and its 104" around so...not sure how much got eaten up into the seams).  This helped a lot for the skirts.   The front skirt is just a rectangular panel - 41" long- that I pleated to a strip of the fabric (3" wide strip that folded over).   The back of the dress isn't much different (just the back panel of the bodice plus a 41" long skirt).  Because of this,  I cut out the front from the excess above the back panel skirt, next to the back bodice.   

The sleeves and cuffs were cut out from the remaining fabric and the stomacher was cut out even more scrap (from next to the front bodice piece).  I used a little less than 4 yards to make the dress.  

Inspiration:

Dress at the Met circa 1760
This was the main inspiration for my dress.  I was going to do the self trim along the opening but the fabric really is just too heavy to do that well.  That, and I didn't have any of the ribbon trim left. ;-)
Other inspiration pieces included this early 1770's dress at the Met, this pink and green dress recently sold at Christies (probably early 18th C based on the robings), and this one at the Met as well.  

Because of the yardage issue, I liked the idea of a closed front dress.  I liked the overall style as well because none of them are overly trimmed - it's more about letting the patterned fabric speak for itself.   

Sunday, September 21, 2014

1920's Outfit!

I've done some 1920's before and I really love the decade.  It might not look the best on everyone, but gosh darn it, it's simple to make!  For a Downton Abbey party, I made an early (I was going for 1923) dress, evening gown, and coat.  Even though it's still pretty decently warm during the day here on the east coast, the temps drop about 10 degrees F the second that sun goes down.  I'm SO very glad I did make the coat.
I got a flat and had to wait, at night, for AAA to arrive.  Since the dress I wore itself was sleeveless, the coat was very, very welcome.

 The coat was inspired by this extant one.  I wanted a cocoon coat but I couldn't figure out exactly how it was made until I saw the extant one.  They are so ridiculously simple.  It's a big rectangle.  You fold over the fabric, sew up the sides to about 4" from the top, cut a line in the dead center of the top layer (ie, don't cut both the front and back), and cut both layers about 4" from the folded edge in that dead center.  That's it. I had some stretch white velvet (that is of a much higher quality than I remembered) in my stash.  I bought the brown feather trim on sale for $1.60 a yard.  The lining only happens to be brown as well (seriously, it was leftover from my brother's cape lining) and is a brown flannel backed stain.  The entire coat, minus the trim, takes 10 minutes.  The trim was hand sewn on and still only took an hour.
 The overgown is a pink orgnaza dupatta that happened to be wide enough for the style I wanted.  Normally, dupattas are only a yard or so wide - this one was a good 45".  I used the borders as the neckline and hem trim.


 The belt is just some silver panne velvet.  I couldn't find anything else that went well with the color scheme.   I'm not happy with the belt but it will do until I find some silver silk I like.  The brooch is vintage, but probably only from the 1950's.  Still, I liked it with the rest of the outfit.
You can't see it well in photos but the underdress is a blue/pink iridescent dupioni silk I've had in the stash for years.  When I saw the dupatta and the silk together, I literally ran into the other room and draped them together to see how they looked.  It was too cool looking!  

I know some ladies at the mansion got a few photos of me wearing the dress.  I'll post them as soon as I find them.