Showing posts with label 1920s. Show all posts

Sunday, January 1, 2017

Last Sewing Project of 2016!


I went to a FABULOUS New Year's Eve party this year and had a blast.   Because the theme of the party was Spies & Masquerade, I wanted a 1920's evening gown to wear.   For my gown, I used sequined black lace and irredentist silk dupioni.  The dress was very simple to make - I just used the same pattern as I used for my Christmas tea dress- and the dress was very fun to wear.

Inspiration:

Callot Soeurs, 1929-1931 The Goldstein Museum of Design

I am absolutely in love with the dress above.  It still has that lovely 1920's dropped waist but look at how full that skirt is!   And the high - low that is oh so popular now?  Love!

Making the Dress:

I bought only 2 meters of 58" wide sequined black lace.   It was enough to do almost any 1920's dress, but not to do the skirt exactly as it is in the original dress.  Instead, I first cut out the top.  I then measured out the remaining yardage so I could cut the front panel for the skirt short in the front, but long at the sides.  For the back panel, I did the exact opposite.   The fabric was 58" so I just cut the fabric in half pretty much for the two panels.   I ended up with about 3 yards in the skirt.

The original dress appears to have a silver trim along the neckline.  I went with black velvet instead.   I used the black velvet to encase the edges around the neckline and arms.  This was mainly to prevent the fabric from unraveling over time.  It also adds just a nice detail to those areas.  

I didn't have to hem the skirt since I used the selvage for the hem.   The selvage of the lace had a lovely design.  

The underdress was a bit more of a problem.  I wanted something colorful for New Year's.   However, I also wanted something a bit heavy since it is...New Year's.  In DC.  It was sleeting when I went to get my Uber ride.  All my bright silks are pretty thin or were in colors that I already had made into 1920's dresses.  

I looked into using an older dress for underneath but I really needed something that would do the high low thing as well or, at least, matched the front length.   I ended up using my old Lord of the Rings dress that I made years ago and just re-cut it into something more 1920's than vaguely medieval.


I took part of the gown apart a very long time ago because ...it was terrible.  No, really.   It was a waste of perfectly good fabric.  The sleeves have been recycled into other projects and I think I still have the overdress upstairs somewhere - it should probably be made into something else- but I had this heavy silk dupioni tunic body that was pretty much begging to be used again.

I cut the top part off at the dropped waistline and then took the sides out.  I recut the sides and then cut the bottom half of the skirt so it would do the "high low" thing without me having to re-hem the entire thing.  

The fun part about doing all of this?  Seeing how crazy my sewing was 12 or so years ago when I made this outfit.   I had French seamed the tunic and used basting stitches through the entire thing.   I took out said French seams - which gave me a good inch of silk back- and just did normal zig zags this time.  

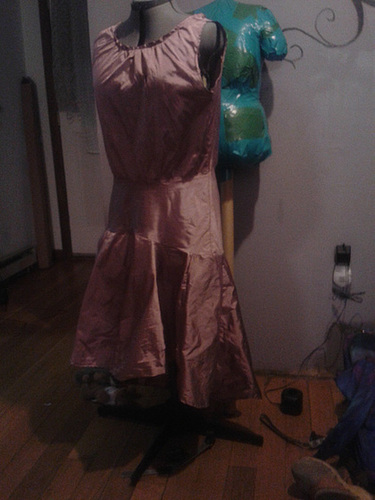
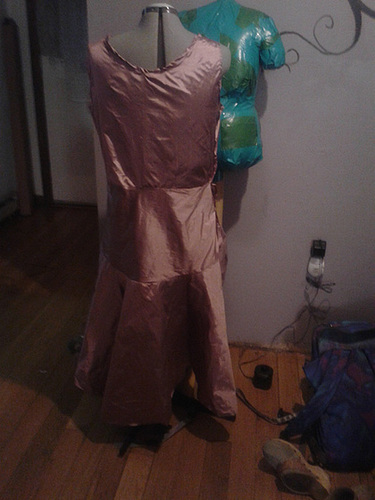
This is how the former Lord of the Rings underdress looks now.  It's still an underdress but it's much, much better in terms of fit and wearability.   The skirt isn't super full - there are just a couple of pleats on either side- but it's plenty for the underdress.  Plus, the color is beautiful with the black lace overlay.


See?  Much better!  


This is the picture I took right after I finished making it.   I'm really in love with this dress because it fits so well!

This was my attempt at taking a back picture of it, while wearing the dress, in the mirror after the party.   You can see Jasper the cat near the Christmas Tree.

I had a lot of fun at the party and will go again next year if I get the chance!   Happy New Year everyone!

Sunday, December 4, 2016

1920's Dress for Christmas Tea


Although the dress came out a little short, I absolutely love it.   This year, for the Christmas Tea, we went to Cairnwood Estate which is absolutely beautiful. Since it's 3 hours away from my house, I decided to take up Jess' suggestion of 1920's because, yes, driving in corsets is not easy. (Even when you now have a fabulous seat heater).

Materials:

  • Cream/Light Gold Dupioni Silk
  • Small amounts of dusty pink silk as backing
  • A small square of burnout velvet 
  • Pale Pink lace
  • Two pale pink buttons


A few weeks ago at Stephanie's Pumpkin tea, there was a wonderful fabric destash. Carolyn added a very lovely piece of burn out velvet that looked wonderfully art deco to my eyes. It was about a square foot, maybe slightly bigger, but enough to make into a something. When I brought it home and was about to put it away, I realized it went perfectly with this pale pink lace I had out for another project and with some of the creamy light gold silk I got from the big Prism Silks/Golden Silks sale earlier this year (I think? Or was it last year?). I knew it had to be made into a 1920's dress.

Some of the inspiration:

1920's Dress on Etsy


I LOVED the diamonds down the front of this dress. I've seen this in a few others and wanted to replicate it. I only had enough for one diamond at the neckline with the burn out velvet accent, however.

1920s Day Dress

The orange dress had a keyhole accent at the neckline which made me feel comfortable of the idea of having only an accent at the neckline and not down the front of the dress.

The green dress on the pattern here has some trim at about the 3/4 sleeve level.  I saw variations on this in a lot of fashion plates.  I liked the idea of using the lace there and then also using the lace I had on hand at the hem.  


What I did:
I made my own pattern.  1920's is very easy - it's a t-tunic with a small nip at the waist.  I added material at the hip line and...pattern!   Yay!   I drafted my own sleeves as well.

The hard part was getting the diamond to sit properly.  I sewed it down but there was still a "pinch" at the upper neckline.  I covered this with a very thin bow that made the dress.  

It's all machine sewn.  The sides are pleated (think a t-tunic on top of a rectangle but no seam, that was the pattern) and I covered the pleat line with more of the burn out velvet to bring the dress together.

The shoes are a fabulous pair I got on Amazon for about $35.   They fit perfectly (I wear an 8) and they do come in different colors.  I just wanted the black and white for versatility.


The coat is one I made a couple of years ago out of velvet (no idea what the fabric content is on it but I think a bit of silk and rayon?) and marabou feathers.

Tuesday, November 1, 2016

1920's Halloween

First, the inspiration:


I've been on a 1920's kick lately.   All I've wanted to do is make a 1920's style dress.  I was supposed to go to a party where the theme was fancy dress in monochrome but my truck decided to break down.  Instead, I finished the dress for Halloween.

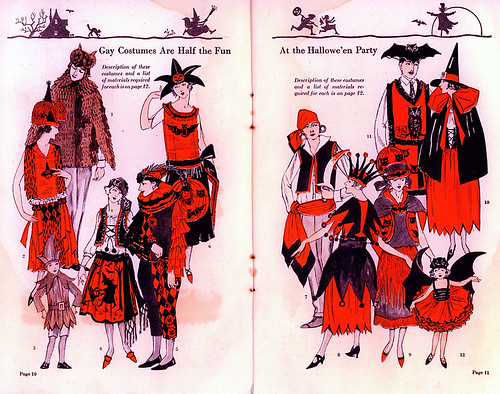
1922 Halloween Costumes
From this catalog page above, I really liked the idea of having just Halloween shapes cut out and adding them to the hem of a normal 1920's dress.  I took the crescent moon idea from the lady in the bottom left and the stars from the guy in the upper right.


1920's Celestial Fancy Dress
I couldn't track this one down to the source but I wanted to show another example of stars being used in Halloween costumes in the 1920's.

Gay Costumes are half the fun at the Halloween Party
This was not the original inspiration for the owl cut outs but I can't find the dress I saw that originally inspired it.  All I recall is that the dress was in the lower left hand side of the catalog page and had owls around the hem similar to the owls on the lower part of the upper right hand guy's tabard.  For a better idea:


1920's Owl Decoration

The cut outs for the hem of the dress are very similar to the head of the paper owl here. The eyebrows don't meet because these are fabric cut outs (black velvet) and the eyes also have to be somewhat more restrained.


Since I wanted to make a new dress for the 1920's, I had to make new undies as well.  Although my original 1920's bra was serviceable, I wanted something cuter and more attuned to my skills now.

1927 Bra

1927 undies

1920's Bra off of Etsy


Second,  making the outfit:


I don't have any pictures of making the bra and panties.  Basically, the underwear itself was pretty simple.  For the undies, I took two rectangles for the front and back, a small rectangle for the crotch out of both silk and cotton, and gores out of both the silk and lace for the sides.  Once I sewed it up, I added elastic to the waistband.

For the bra, it wasn't much more difficult.  I started with a band that was 3" bigger than my bust measurement at it's fullest by about 7".   I marked out where the darts should go - one bust dart on either side, darts for across the bust but under the arms, and one dart on either side directly under the arms.  The dart under the arms  is to straighten the band once you make the bust dart so the silk band will go around your back in a straight line.   I also added straps and lace to the front to make it pretty.

The hooks and eyes on the back of the bra are actually hook and eye tape.  I used that by folding the silk over the tape to hide it and add strength to the hooks and eyes.  This is also partly why I made the bad bigger - you'll lose a lot of fabric by folding the eyes into the fabric.

The dress - the dress is my own pattern as well.


I drew out each of these designs on just plain computer printer paper.  Using a box cutter, I cut four of each design from the scrap black velvet.  I glued each design exactly one foot apart on the hem of the dress - the skirt was made out of two 2 yard panels of silk.

Once the designs were glued on, I let them dry overnight.  This meant laying the entire four yards across my living room.  I had newspaper underneath to prevent the glue getting to the hardwood floors.

The tunic part of the dress was pretty simple.  I drew it out, cut it out, sewed the shoulders and sides, tried it on, and redrew where I wanted the neckline and underarms to be.   I then cut those pieces out better, and sewed down the rolled edges.

I realized I had cut the tunic a bit too short so I added a belt of black velvet.  I think it actually helps the dress a lot.


Third, the actual dress:


Materials: Silk, velvet, rayon lace, and a small amount of cotton
Notions: Thread, Glue
Cost: The white silk was $3 a yard at a closeout sale. The velvet and orange silk were stash as was the cotton. The was a Joann's remnant for $3, I think.  The pink silk was a joann's remnant that I bought years ago - I have no idea how much but I'm guessing $5 for the pink silk.   Since I only used under 3 yards for the dress, I don't think the dress cost much more than $20 to make.

Fourth, the critique:


My biggest complaints are as follows: I made the undies too short and the skirt of the dress too long.  The dress is pretty easy to fix - rip the skirt off the dress, chop six inches off from the waist,  and resew.  There isn't any help for the undies other than to make the rectangles more square like next time.

The coat I'm wearing in the photo is one I made a couple of years ago that works well for late teens and into the 1920's.

Sunday, September 21, 2014

1920's Outfit!

I've done some 1920's before and I really love the decade.  It might not look the best on everyone, but gosh darn it, it's simple to make!  For a Downton Abbey party, I made an early (I was going for 1923) dress, evening gown, and coat.  Even though it's still pretty decently warm during the day here on the east coast, the temps drop about 10 degrees F the second that sun goes down.  I'm SO very glad I did make the coat.
I got a flat and had to wait, at night, for AAA to arrive.  Since the dress I wore itself was sleeveless, the coat was very, very welcome.

 The coat was inspired by this extant one.  I wanted a cocoon coat but I couldn't figure out exactly how it was made until I saw the extant one.  They are so ridiculously simple.  It's a big rectangle.  You fold over the fabric, sew up the sides to about 4" from the top, cut a line in the dead center of the top layer (ie, don't cut both the front and back), and cut both layers about 4" from the folded edge in that dead center.  That's it. I had some stretch white velvet (that is of a much higher quality than I remembered) in my stash.  I bought the brown feather trim on sale for $1.60 a yard.  The lining only happens to be brown as well (seriously, it was leftover from my brother's cape lining) and is a brown flannel backed stain.  The entire coat, minus the trim, takes 10 minutes.  The trim was hand sewn on and still only took an hour.
 The overgown is a pink orgnaza dupatta that happened to be wide enough for the style I wanted.  Normally, dupattas are only a yard or so wide - this one was a good 45".  I used the borders as the neckline and hem trim.


 The belt is just some silver panne velvet.  I couldn't find anything else that went well with the color scheme.   I'm not happy with the belt but it will do until I find some silver silk I like.  The brooch is vintage, but probably only from the 1950's.  Still, I liked it with the rest of the outfit.
You can't see it well in photos but the underdress is a blue/pink iridescent dupioni silk I've had in the stash for years.  When I saw the dupatta and the silk together, I literally ran into the other room and draped them together to see how they looked.  It was too cool looking!  

I know some ladies at the mansion got a few photos of me wearing the dress.  I'll post them as soon as I find them.  

Saturday, May 17, 2014

Getting to wear the blue and white 1920's Dress


Thank you so much for all the comments everyone previously gave on this dress! I figured that, given the amount of comments, you might actually want to see what the dress looks like on. :-)

I really like the way it wears. It's comfy and fun. I can MOVE (no corset! Yay!) but I still feel like I'm wearing something *different*. The only thing I might change is the neckline. I think a less open neckline with maybe a more T-tunic keyhole style might work better. The dress kept wanting to slip off the shoulder a bit because the neckline was so open. Still, it's fine as is and I'll definitely wear this one again.

The beaded cap is actually an item I've had for a few years. A friend in the SCA got a bag of "stuff". The stuff turned out to be various garb pieces. Two ladies who were members of my household at that point, found this in the bag, ran it out to me, and declared that it mine. :-) It's perfect for Italian Renn as well as 1920's.

My hair is done up in the same style as I did last year with only a bit more "wave". Since I've gotten bangs since the last time I tried this, I just got a couple of bobby pins and pinched the bangs under the beaded cap. I'm trying to grow them out again anyway.

The shoes are ones I found a few years ago at Old Pueblo Traders. The clothing is all "old lady" but the shoes look nicely vintage and fit my feet! Even though I wear a perfectly normal 8 or 8 1/2, depending on the shoe company, most shoe companies have decided that my feet are too short. The back of many shoes come up too high (a few have been as much as a half inch past where a shoe should hit on my foot!) I end up with mules a lot for that reason. However, the shoes the old lady clothing store sells are fine. I guess I just have old lady feet? I figured that's the one part of the body that really wouldn't change drastically with time!

The car is from 1927. :-) No Branson to drive me around, unfortunately. We think he was drinking in a corner somewhere....

Tuesday, May 13, 2014

My New 1920's Dress!


I should be working on my orange Teens Era dress but this little guy just wanted to actually be made!   I refound the fabric in my stash last week and realized it would be perfect for a sweet 1920's day dress.  The fabric is a blue cotton knit with white velvet emboss in an embroidered floral looking pattern.  The white lace band across the middle is real lace from the stash. 

The pattern is the same as I've used previously with only a very minor couple of changes.  The first is, rather than cut out a curved armsyce, I made the straps longer and cut it a bit more square to give "cap" sleeves.  This makes it a bit more like the yellow dress in this 1925 Fashion Plate:

The band was added to give more length to the dress as well as add a bit of contrast.  The belted style, like this, was popular through out the 1920's.  

I might add some purple or pink flowers to the dress just for a bit more contrast.   I'm pretty happy with it.  It only took an hour to make (including taking out the hem of one sleeve and putting it back in so that my arm could fit through it without it being snug!).   I think the blue knit was $10 or so - I don't remember because I bought it a few years ago thinking it was real embroidered cotton and not velvet embossed knit! 

Now, maybe, I can work on the Teens Era dress!


Friday, September 27, 2013

1920's Brassiere

Page 171 if you do a click through


See the brassiere on the left hand side, the second one down? That's the one I ended up making. It's a bit small length wise but fits *perfectly* width wise, which is what matters.


Me in my pj's still. :-) I wanted the photo to be somewhat decent and non scandalous even if it is a post about a bra.

The idea of cup sizes didn't come about until the 1930's. Before that, this is what our grandma's (and great grandma's) wore. Honestly, it's comfortable. It fits sort of like a modern sports bra. The pattern is very basic - typical non darted bodice back with attached straps, a curvy rectangle (the left and right edges are oval shaped) for the front, a small piece of elastic, and some antique lace I had lying around to make it pretty. It laces up the back (makes it easier to adjust) and fits pretty well. I gathered the front piece to the elastic, and then sewed the front piece into the back pieces (the back pieces are doubled for added strength). Add the bit of lace and then sew down the straps. Very simple but gives a proper 1920's look. :-)

Monday, May 20, 2013

Historical Fortnightly: #10: Literature

front of dress


back of dress


The Challenge: Literature - I decided to be a lemming and do the Great Gatsby like everyone else
Fabric: Silk!
Pattern: My own!

A few weeks ago, this dress came up on ebay and I HAD to have it. I LOVE it. It's now in my collection and it truly is stunning in person.

The extant dress is very interesting in terms of shapes. I took a lot of detailed measurements and examined the seamlines. The front of the skirt is a normal circle skirt front. It measures 42" from end to end. The back of the skirt has a "pedal" hem. There are four pedals, each are 16" from high amp to high amp, 6" vertical, and have 9" of null space between them at the widest point.

I didn't bother with the silk tulle much because it is mostly gone. There were probably 8 triangles hanging down at one point but not anymore.

The front of the skirt is lightly gathered.

The cummerbund waist is 9 1/4" long on the angled sides, 7" down the center where the flowers are. Across the top of the cummerbund waist is 16", the middle is 17", and the lower edge is 18 1/4".

The back of the cummerbund waist is straight across at the top but curved at the bottom edges; the front of the cummerbund waist is "bow tied" shape.

The top on the extant looks to be a straight tank top style top. The front of the top is straight across the bottom edge, which helps to give the bodice area shaping. It's only 9" from the underarm to the top of the cummerbund waist.

I'm still working on the tank top top for my dress because I haven't perfected it yet, but I think the issue I'm having with it isn't "pattern" as much as I need to move the gathers to the edges and not the center bottom of the top.
Year: Probably about 1927.
Notions:Thread. I do have some flowers for the center of the dress but I got mad at the flowers (I had put them on slightly off center) and they are sitting in the bad craft pile for now.
How historically accurate is it? Very. Dupioni silk was popular in the 1920's and they had sewing machines!
Hours to complete: Roughly five?
First worn: May 18th. It was too cold to wear by itself so I had a long white sweater over it. Still, it looked cute and the skirt is completely awesome on this dress.
Total cost: Mom bought the silk as a birthday present so none!

I know the pictures aren't the best but this really is a fun dress. I think I might tweek it a bit more and wear it to opening reception at Dress U.