Friday, August 28, 2015

Edwardian Skirt

Since the shirtwaist got it's own post, the skirt should too.  :-)

Simplicity 8375
I've had this pattern for years and didn't think to use it recently until Gina over at Beauty from the ashes used part of it to make her fabulous sailor dress.  I finally took a hard look at it and realized the skirt actually is pretty good for what I wanted with only minor edits.  The blouse I used mostly because I loathe trying to draft/drape collars.

The pattern uses five panels total - which is fine based on patterns from 1906.  There are a couple of five piece/gored skirts from 1906.   However, I had to figure out what Aunt Maggie was wearing.

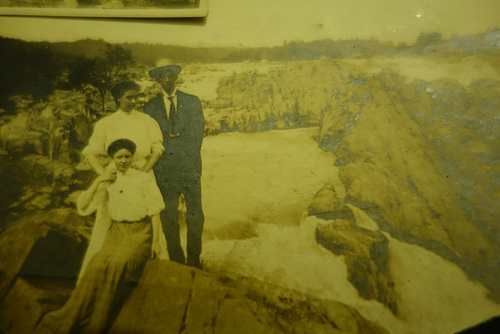
In the photo of her looking down towards the photographer, you can pretty clearly see a pleated kick pleat on one side.  The pleat is angled slightly, going up towards the hip.  However, there doesn't appear to be much more in terms of any decoration.

My guess is the skirt was similar to this one from 1909:

1909 Historical Pattern


But fuller and with the gore angled the other way.

For the fabric, I chose a lightweight wool blend I had on hand.  It's simply what looked the most correct visually for this style of skirt.   I cut out the pattern pieces - using only the skirt panel pieces.  The waistband is just a strip of the same material.  The kick pleated gores I cut from what was left of the material.

After sewing the back, I pinned the front of the skirt up to see where to place the gore.  I cut the side panel of the skirt back and at an angle to fit the pleated gore.  

 The finished skirt!  


Close up of the gore.

It's not the most interesting of skirts but it is practical for everyday wear with just a hint of interest.  I really liked wearing it.  I think it balances well with the pintucked shirtwaist.  


Historical Sew Monthly: Heirlooms & Heritage


The Challenge:

August – Heirlooms & Heritage: Re-create a garment one of your ancestors wore or would have worn, or use an heirloom sewing supply to create a new heirloom to pass down to the next generations.
I chose to recreate an outfit from a photograph of my Aunt Nan and Aunt Maggie (my Papa's Aunts) from about ~1907 based on what they are wearing.  I did use vintage lace to recreate the shirt

Fabric:  A wool blend for the skirt, a linen cotton blend for the shirtwaist

Pattern:  As a sloper, I used Simplicity 8375.   I also used this pattern from 1906 to get an idea of what the pattern shape should be for the shirtwaist.   I edited the skirt pattern as well, adding gores and making a different waistband.

Year: 1906/1907

Notions: Thread, the belt, vintage deadstock lace, a small sewing kit that hangs from the belt in the pictures, a locket, hooks and eyes, buttons!

How historically accurate is it?  If it weren't for the wool/acrylic blend I used for the skirt, it would be nearly perfect.

Hours to complete:  Two weeks of research, maybe two days of actual sewing?

First worn: August 27, 2015

Total cost:  The linen cotton blend is the stuff I get at Joanns so maybe $10 for the couple of yards I used?  The lace was stuff I had in the stash - I got a huge hull years ago from someone clearing out their grandma's sewing closet.  The laces were all antique and they were often wrapped around pieces of cardboard -never used.   The wool for the skirt I got at the thrift store for $3.90 for the entire yardage.   The belt was maybe $1 at the thrift store as well.  The locket I think was Aunt Maggie's and the sewing kit was Aunt Nan's...I'm have gotten the reversed.  I'm not sure.  Either way, it belonged to the people in the original photograph.

So for those who haven't been following along with the research and shirtwaist progress, here's the short, short version.  (There's also a post now on the skirt itself since I couldn't let the shirtwaist steal all the fun.)


DSC08865


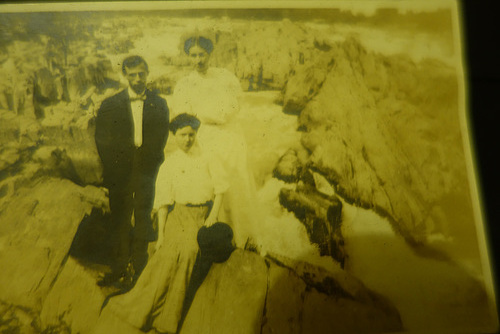
The above is a photograph I found in my parents' attic of my Mom's Dad's Aunt's - Aunt Maggie with the dark colored skirt and Aunt Nan behind her. They are at Great Falls, VA (in the background) and I can tell because of this:

Taken by this guy in 2009


The only thing that changes is the water levels. I swear.  Anyway, I decided to recreate Aunt Maggie's outfit.  Here's a slightly better view of her skirt:


DSC08871

Notice the pleated kick gore? Yeah, had to recreate that.  You can see she has something small hanging from her belt.  You'll see the sewing egg I used soon enough.  She also wears some sort of locket looking necklace, so I used one that I think belonged to Aunt Nan, her sister.  Because I have yet to find any sisters anywhere in the world that don't "borrow" each others stuff.  Ever.

 The difference between 1906 and now (or even really a few years ago), is they've built a wall.  You can still see where Aunt Maggie sat down, but it's about two yards past the railing.  I remember the outcry a few years back when yet another person fell and drowned in the rapids.  They built the wall in response...not that really stops a lot of people.  The water level is also lower than normal.  We haven't had a good rain since early July.

 Where they took the rock picture has a bit of a tree in the way - you can see it to the right of me. I did see it and try to recreate it a bit but it was very shadowy.  This spot looked better - even if I am trying to control Abby.  You can just see the kick pleat in the bottom part of the picture.


 The back of the skirt.  I made sure to keep the back pleated and not follow the directions Simplicity gives about pleating all the way around.  It's actually a pretty nice full skirt.  The petticoat helped with that a bit.  :-)

All and all, I'm extremely pleased with the outfit.  I love the shirtwaist/blouse and had fun wearing the outfit at the same spot Aunt Maggie wore something similar over a hundred years ago.


Tuesday, August 25, 2015

Shirtwaist Progress!

I posted yesterday about how I'm trying to recreate my Aunt Maggie's outfit she wore to Great Falls around the time my Papa (grandfather) was born.   So far, so good!  The shirtwaist is almost done.   I used Simplicity 8375 as a base.  From that, I stretched out the shirt so I could add pintucks, lengthed it, and switched the sleeve around so that rather than a bell curve sleeve like in the Simplicity pattern, I had a sleeve more like the one in the pattern from 1906 below:

Ladies Home Journal Pattern 1906


Really, I just folded part of the sleeve pattern back and redrew that part on the other side. It takes all of a minute.

One of the big things was making all the tiny pintucks. I went with 20 of them.

 This is Abby plus the fronts and backs of the shirtwaist, sewn at the shoulders, and the 20 pintucks.  I also added pleats to the back, as per the extant pattern, which honestly add a nice detail once the blouse is completed.


 After making all the pintucks, I wanted to add the antique lace.  It's deadstock lace - never used- so no one took apart any dresses to get it.   Not that I'm completely against that - I just don't like seeing one little tear and the next week seeing all the appliques up for sale - the dress gone and thrown in the trash.  We need these items to learn from and you can't learn from what isn't there anymore.

Anyway, I pinned the lace to each of the pintucks and sewed it down.  It was a bit worried about the lace but it turned out fine.
 The shirtwaist without sleeves!   I added lace to the collar since it needed something.

 
 The pinned back pleats.  I kept playing with these.  Eventually, I sewed them down to give a puffy impression in the back so that the pleats would stay put.

 The almost finished shirtwaist!   It still needs buttons and to be gathered more at the waistline but it's clearly a blouse now.  :-)   I didn't have a lot of lace left so I used what I did have to make a small detail on the sleeve head.


 Just a touch of lace continuing on to the sleeve.   It helps to get rid of that plain look, I think.

 Detail of the sewing patterned lace.   It came out well, I think.  I'm at least happy with it.


The finished back minus the buttons yet.   I only sewed the pleats to the waist - this way, the hip area is still free.  

Next up, the skirt!

Recreating the Past from a Photograph

As many of you know, the Historical Sew Monthly challenge this month is "Heirlooms & Heritage". The description for it is thus:

Re-create a garment one of your ancestors wore or would have worn, or use an heirloom sewing supply to create a new heirloom to pass down to the next generations.

There is a LOT of interpretation in this one.  I decided I wanted to go with recreating a garment an ancestor would have worn - and hit the attic at my parents house. My Goodness! Did I find a treasure trove! I found a TON of photos of my Mom's paternal family. I only ever knew my Papa (Mom's Dad) and my Aunt Elva (technically a cousin by marriage as I found out!) from that side of the family. Most of the others passed away long before I was born. However, thanks to my Mom, I have heard a lot of stories.

Mom has always told me I'd get along great with Aunt Nan. Aunt Nan was one of my Papa's aunts. She apparently had an affinity for anything turquoise or pink as well and always had a ton of fashionable accessories. Over the years, I've inherited some of both hers and Aunt Maggie's (her sister) jewelry and gloves. I've been wearing some of her gloves from the 50's and 60's to various events over the past couple of years. I'm just glad I have the same size hands as she did!

A group of photos stood out when I was going through the ones in the attic.
DSC08865

DSC08872

DSC08871


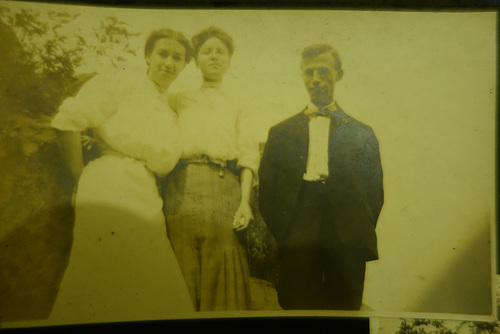
These photos stood out for a couple of reasons - I love Aunt Nan's and Aunt Maggie's outfits (Aunt Nan is wearing the lighter colored skirt and Aunt Maggie has the darker one - plus she always has her glasses) but also I KNOW THAT PLACE!!!!!!

Great Falls, from the Virginia side
Notice, that "seat" in the rock is still there.   It's Great Falls.  My parents' home is maybe 10 or 15 minutes from there on the Maryland side.   I've been there a ton of times and recognized it immediately.   So, for fun, I decided that I have to recreate one of either Aunt Nan's or Aunt Maggie's outfits and go to Great Falls to partially recreate the photo.

Based on what I have in the sewing stash, I decided on Aunt Maggie's outfit.  I have a light weight red wool that would work for the skirt and a nice off white linen for the blouse.  As for the corset and undergarments, I'm cheating and using my Teen's era stuff.  The photos are probably from about 1906/1907 based on what they are wearing.

Going off that, I did a LOT of research and hemmed and hawed about what I wanted to do exactly.  It's hard to tell what is going on in terms of details with Aunt Maggie's blouse and her skirt.  I can see a bit more with the photo of them looking down at us, but still it's hard to say what is really going on.

So, for a base, I'm using Simplicity 8375. I've already edited it a lot for the blouse as I really just used it as a sloper. I have no doubt that the skirt will need some editing too - but it's something I can work with to get the correct shape if nothing else. The skirt is a three gore one which I know they were still using in the mid Edwardian period.


The above is what I eventually decided I wanted the blouse to look like. It's from The Ladies Home Journal 1906 via Real Historical Patterns on Tumblr. If you don't know about Real Historical patterns yet, you can thank me later. It's a fabulous resource for pre-1929 patterns.  For this shirtwaist, I love the pintucks and I like the idea of adding lace over the pintucks.  No only does the pattern show that as an option (the tiny blouse between the ladies heads) but there's this extant one over at my other blog that shows black lace over fabric rather than the insertion we are used to seeing during this time period.

So, using Simplicity as the base to get the armscye straight really (and keeping the math to the minimum since it was just increasing the neckline and shoulder rather than measuring everything out), I came up with this:

 I'll sew up the pintucks and the shirtwaist tomorrow to see how it goes.  I'm hoping this will turn out well and look just as cute as Aunt Maggie's original blouse.   For the lace, I happen to have a lot of vintage deadstock lace that will work well.  The one I'm using might actually be Edwardian.

It looks very similar to the lace that is on the extant gown I've linked to above.  I think it will add a nice frilly touch to the blouse.

For the skirt, I'm working on that tomorrow as well.  More progress photos and the final product over the next few days!

Tuesday, July 21, 2015

Historical Sew Monthly: Accessorize


The Challenge: July – Accessorize: The final touch of the right accessory creates the perfect period look. Bring an outfit together by creating an accessory to go with your historical wardrobe.

Fabric: Wool, linen

Pattern: Based off this Norse hood

Year: roughly 1100 AD give or take 100 years

Notions:Just the green wool thread

How historically accurate is it? It's completely visually accurate. The stitches I used are seen in several digs, including Birka. However, I did use the sewing machine to bag line the various pieces so that's no historically accurate - not that anyone would ever see the machine stitches the way I sewed it up!

Hours to complete: About four hours

First worn: I hope either of their majesties will be able to wear it at least one night at Pennsic.

Total Cost:  The white wool was a remnant at Joanns that was 50% so $8.16.  The red linen was left over from another outfit.  The green wool thread I think was about $4.00 but I really can't remember.  It's been in the stash thread for a very long time.

This is what the hood looks like lying perfectly flat.  It really is just two gussets and a long rectangle.
Close up of the decorative stitching.

This is really for the Pennsic gift basket.  The kingdom Atlantia is giving a basket to has a King and Queen who are very into Norse.  Luckily, I had some lovely white wool, red linen, and green wool thread on hand to make up something that is both Norse but easy to carry back home to Utah.  :-)

I bag lined each of the pieces individually and then used the decorative stitching to bind the pieces together.  So the gussets are just squares with the square lining attached to them.  If you cut the decorative stitching, the hood would fall apart.

I did try the hood on to make sure it fits.  It fits.  I know, I look like death warmed over right now.  Oh well.

The entire edge of the hood is done in a simple running stitch.  The pieces are bound in a herringbone stitch - which is a very simple way to add a bit of decoration.

Overall, I'm pretty pleased with it and I hope their majesties are as well.

Tuesday, July 14, 2015

Late 16th Century Dutch Cloak


Sorry for the bad picture. My Dutch Cloak is finished!

First, the inspiration:

Taken from Katerina's Webpage


http://www.kostuemforschung.de/1207.html


These are just a few of the examples I found. This style was worn pretty much everywhere in Europe in the late 16th Century. I liked the trim layout of the purple extant one so I loosely based my trim layout on that.

Making the darn thing:


I decided on epaulettes, full sleeves (rather than hanging sleeves because that got complicated), and I used red wool for the fashion fabric. I purchased the red wool at a local thrift store for $3.90.


See? As for the yellow tag regarding cleaning, I'm 99.9% sure this was a thick wool blanket at one point in it's life and that it had been left in someone's mothball filled hope chest. It still faintly smelled of mothballs. Not so faintly when I ironed and steamed the jacket.

Anyway, I also used what had been blue silk curtains for the lining also from the thrift store and also just as inexpensive. The trim is the same trim I used on the German gown last week. I still have some more... It was originally 35 yards and I have no clue how much is left but it's still a lot.

I have no clue what else to use it on...

I'll figure out something.

Anyway, the Dutch cloak!

The cut is just a generic sleeve pattern I've developed over the years, a trapezoid shape for the body, cut on the fold so I didn't have to sew the shoulders, and the semi curve of the epaulets.  Originally, I was going to have cuffs and a collar but those got thrown out.  I ended up not needing the cuffs, I just folding it all in and whipstitched the edge.  The collar...yeah.  Not fun.

Altogether, this is a pretty easy pattern to make.   I really love the cloak and it's WARM.  I wanted a short cloak for Pennsic since it's a muddy year, again.  No sense dragging a cloak through the mud when I can just put on an extra petticoat or say screw it and put on leggings (not like anyone will see!   My skirts are all to my ankle at least.).  


Wednesday, July 8, 2015

Pickles!


This year, I decided to grow some herbs and see if any veggies would grow. Although the carrots appear to be a dud as well as the lettuce, I have a bumper crop of cucumbers. I'm not a huge fan of cucumbers - I like cucumber water- but I love dill pickles. Consequently, I also planted a lot of dill. :-)

Currently in my garden, I have strawberries, two different types of basil, oregano, thyme, sage, rosemary, mint, dill, and cucumbers growing in my yard. At first, it was just a couple of cute leaves for the cucumbers so I didn't think much of it. Then, last month, it seemed the cucumbers took over the garden. So much so, I had to move the rosemary, sage, and oregano! Everyday, I have to go outside and redirect the vines - which are still growing and still have new yellow flowers on them.

This week, two cucumbers, pictured above, were ready to be picked. As you can tell, these are pretty fat cucumbers (maybe all the rain we've been getting? I haven't had to water the garden in about two months now...). I decided to pickle them because I really just don't like plain cucumbers. I'll eat them but they aren't a fav.

So, to pickle them, I ended up needing two pickle jars and two batches of the below recipe. I used a combination of the recipe from Instructables on how to make dill pickles and The Kitchen.

  1. First, I washed and cut the cucumbers into quarters and then in half.  This made them small enough to fit in the jars.   Barely.  
  2. I then soaked the cut pieces of cucumber in water in a bowl in the fridge for a couple of hours.  This makes for some excellent cucumber water later on.   
  3. I boiled the jars I was going to use in my soup pot because I really don't have anything else.   They are just leftover pickle jars.
  4. I then got some fresh dill and four garlic cloves; pressing the cloves and putting all of that in the jars.
  5. Taking the cucumbers out of the fridge, I placed them in the jars.


The brine:
  • 1 cup water
  • 1 cup cider vinegar
  • 1 1/2 tablespoons of salt


The above is what I used as the pickle juice. I brought it to a boil on the stove and then, while it was still hot, poured it over the cucumbers (remember, the dill and garlic are already in there), sealed up the jars, and stuffed them in the fridge. You'll need a towel or pot holder because it will all be hot as you put it in the fridge.


Now, to wait! I'm hoping to take a jar to Pennsic. They should be well and soaked by next week. We'll see!