Showing posts with label skirt. Show all posts
Tuesday, July 28, 2020
Pistachio tiered twirly maxi skirt! No pattern!
Just a simple skirt for work! It's out of some of the $2 mystery fabric sale stuff from Fabric Mart. The solid green is a crinkle poly fabric. The patterned is a mystery knit. I just cut a bunch of strips of each fabric, sewed them together, gathered it on the machine and then sewed the tiers. The lining is a crinkle cotton. I added a elastic waistband and a ribbon drawstring.
It's pretty basic but it's nice twirly. It works well as a summer office skirt.
Sunday, May 3, 2020
Jeans Recycle!
Another modern outfit but I used an old pair of black jeans. The jeans had thinned and were slightly ripped on the inseam at the crotch so they had to be put in the "to be used as fabric" pile. I loved all the jean skirts out of jeans ideas but wanted something a bit more flirty. When I made the black and magenta knit dress, I really fell in love with that skirt and decided to make a jean skirt similar to that style.
The top of the jeans stayed the same. I just cut off the legs and use one pant leg for the front and back of the skirt and then took out all the seams from the other and used that for the sides.
The back of the skirt isn't perfect but it honestly looks better in person. I just always loved the embroidery on the pockets of these jeans and couldn't bear to just thrown these out. I had to make something out of them!
The skirt from the side. You can see the original "cuff" of the pant leg here in the front. For the back, I took the "upper" edge of the pant leg, flipped it, and made the upper edge the hem. This gives the back a bit more width at the bottom hem in the back. I did piece the skirt slightly in the back as well but I had enough to piece the skirt and it isn't super noticeable where the piecing is.
I'm going back and forth on adding lace to the bottom edge but I think I might keep it as is. The skirt is just the right length for me and I don't think lace would look right with a lot of my generic t-shirts I'll wear with it.
Thursday, April 25, 2019
Elephant Skirt!
I saw this curtain at one of the thrift stores a few weeks ago and fell in love with it. I'm a sucker for anything with an elephant print. However, I thought it was a bit too much at €12 and let it slide. I kept thinking about it for the next week. When I went back, it was still there! Yay!
This picture is really just to show the elephant print and that yes, it was a curtain and not a tapestry. I mean, it's made out of the same type of cloth but the curtain was a bit longer.
So, I took the border on all three edges and cut that off, cut it up slightly, and sewed it into one long strip. It ended up being about 16.5" wide. The center part of the curtain, I cut into two ~24" rectangles, making sure to get the max amount of elephants, and put the rest of the fabric to the side. I ended up with two 36" by 24" wide rectangles. This was a bit too wide at the waist for me so I cut it down by making them into trapezoids instead. The top part of the trapezoid was 24" with the bottom staying 26".
I sewed the trapezoids together at the sides, gathered the long border print and sewed that to the bottom of the skirt, and I folded the top of the skirt over a piece of elastic. I sewed the elastic down to one of the seams but didn't sew it down to the fabric length ways. I wanted the fabric to move irregardless of where the elastic was.
The finished skirt! It will be perfect for summer. There is a ton of yardage in the border print and the fabric is a nice heavy cotton.
Friday, August 28, 2015
Edwardian Skirt
Since the shirtwaist got it's own post, the skirt should too. :-)
I've had this pattern for years and didn't think to use it recently until Gina over at Beauty from the ashes used part of it to make her fabulous sailor dress. I finally took a hard look at it and realized the skirt actually is pretty good for what I wanted with only minor edits. The blouse I used mostly because I loathe trying to draft/drape collars.
The pattern uses five panels total - which is fine based on patterns from 1906. There are a couple of five piece/gored skirts from 1906. However, I had to figure out what Aunt Maggie was wearing.
In the photo of her looking down towards the photographer, you can pretty clearly see a pleated kick pleat on one side. The pleat is angled slightly, going up towards the hip. However, there doesn't appear to be much more in terms of any decoration.
My guess is the skirt was similar to this one from 1909:
But fuller and with the gore angled the other way.
For the fabric, I chose a lightweight wool blend I had on hand. It's simply what looked the most correct visually for this style of skirt. I cut out the pattern pieces - using only the skirt panel pieces. The waistband is just a strip of the same material. The kick pleated gores I cut from what was left of the material.
After sewing the back, I pinned the front of the skirt up to see where to place the gore. I cut the side panel of the skirt back and at an angle to fit the pleated gore.
The finished skirt!
Close up of the gore.
It's not the most interesting of skirts but it is practical for everyday wear with just a hint of interest. I really liked wearing it. I think it balances well with the pintucked shirtwaist.
![]() |
| Simplicity 8375 |
The pattern uses five panels total - which is fine based on patterns from 1906. There are a couple of five piece/gored skirts from 1906. However, I had to figure out what Aunt Maggie was wearing.
My guess is the skirt was similar to this one from 1909:
![]() |
| 1909 Historical Pattern |
But fuller and with the gore angled the other way.
For the fabric, I chose a lightweight wool blend I had on hand. It's simply what looked the most correct visually for this style of skirt. I cut out the pattern pieces - using only the skirt panel pieces. The waistband is just a strip of the same material. The kick pleated gores I cut from what was left of the material.
After sewing the back, I pinned the front of the skirt up to see where to place the gore. I cut the side panel of the skirt back and at an angle to fit the pleated gore.
The finished skirt!
Close up of the gore.
It's not the most interesting of skirts but it is practical for everyday wear with just a hint of interest. I really liked wearing it. I think it balances well with the pintucked shirtwaist.
Historical Sew Monthly: Heirlooms & Heritage
The Challenge:
August – Heirlooms & Heritage: Re-create a garment one of your ancestors wore or would have worn, or use an heirloom sewing supply to create a new heirloom to pass down to the next generations.
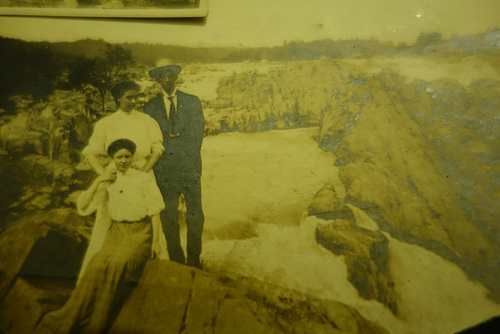
I chose to recreate an outfit from a photograph of my Aunt Nan and Aunt Maggie (my Papa's Aunts) from about ~1907 based on what they are wearing. I did use vintage lace to recreate the shirt
Fabric: A wool blend for the skirt, a linen cotton blend for the shirtwaist
Pattern: As a sloper, I used Simplicity 8375. I also used this pattern from 1906 to get an idea of what the pattern shape should be for the shirtwaist. I edited the skirt pattern as well, adding gores and making a different waistband.
Year: 1906/1907
Notions: Thread, the belt, vintage deadstock lace, a small sewing kit that hangs from the belt in the pictures, a locket, hooks and eyes, buttons!
How historically accurate is it? If it weren't for the wool/acrylic blend I used for the skirt, it would be nearly perfect.
Hours to complete: Two weeks of research, maybe two days of actual sewing?
First worn: August 27, 2015
Total cost: The linen cotton blend is the stuff I get at Joanns so maybe $10 for the couple of yards I used? The lace was stuff I had in the stash - I got a huge hull years ago from someone clearing out their grandma's sewing closet. The laces were all antique and they were often wrapped around pieces of cardboard -never used. The wool for the skirt I got at the thrift store for $3.90 for the entire yardage. The belt was maybe $1 at the thrift store as well. The locket I think was Aunt Maggie's and the sewing kit was Aunt Nan's...I'm have gotten the reversed. I'm not sure. Either way, it belonged to the people in the original photograph.
So for those who haven't been following along with the research and shirtwaist progress, here's the short, short version. (There's also a post now on the skirt itself since I couldn't let the shirtwaist steal all the fun.)
The above is a photograph I found in my parents' attic of my Mom's Dad's Aunt's - Aunt Maggie with the dark colored skirt and Aunt Nan behind her. They are at Great Falls, VA (in the background) and I can tell because of this:
![]() |
| Taken by this guy in 2009 |
The only thing that changes is the water levels. I swear. Anyway, I decided to recreate Aunt Maggie's outfit. Here's a slightly better view of her skirt:
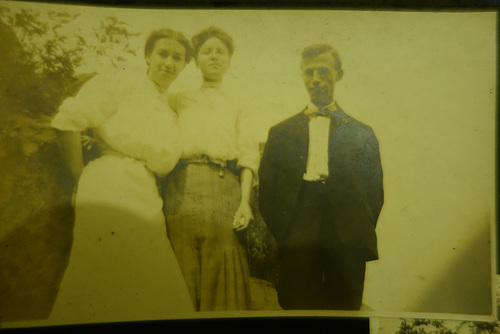
Notice the pleated kick gore? Yeah, had to recreate that. You can see she has something small hanging from her belt. You'll see the sewing egg I used soon enough. She also wears some sort of locket looking necklace, so I used one that I think belonged to Aunt Nan, her sister. Because I have yet to find any sisters anywhere in the world that don't "borrow" each others stuff. Ever.
The difference between 1906 and now (or even really a few years ago), is they've built a wall. You can still see where Aunt Maggie sat down, but it's about two yards past the railing. I remember the outcry a few years back when yet another person fell and drowned in the rapids. They built the wall in response...not that really stops a lot of people. The water level is also lower than normal. We haven't had a good rain since early July.
Where they took the rock picture has a bit of a tree in the way - you can see it to the right of me. I did see it and try to recreate it a bit but it was very shadowy. This spot looked better - even if I am trying to control Abby. You can just see the kick pleat in the bottom part of the picture.
The back of the skirt. I made sure to keep the back pleated and not follow the directions Simplicity gives about pleating all the way around. It's actually a pretty nice full skirt. The petticoat helped with that a bit. :-)
All and all, I'm extremely pleased with the outfit. I love the shirtwaist/blouse and had fun wearing the outfit at the same spot Aunt Maggie wore something similar over a hundred years ago.
Labels:
1900s,
20th Century,
dress,
Edwardian,
outfit,
shirtwaist,
skirt
Thursday, August 8, 2013
Day 10 Update!
Sorry for going quiet the past couple of days. I have been working on the embroidery, see?
The collar is done (yay!) and I've starting working on one of the cuffs. Hopefully, this cuff will go quickly and I can start on the other cuff tomorrow. We'll see. I'd like to have all the embroidery done before 5pm EST or so Saturday. Sunday, I can put together the chemise. I've done handsewn smocks before and it's actually not that bad - just a lot of straight lines to sew up. So, movie marathon have Church!!!!
You might notice that I have traced the pattern on to both cuffs to go over. I took a picture of how I do that thinking it's probably something and least a few people might be curious about. I don't use tracing paper.
Instead, I printed out the pattern from this page done by Aelia Apollonia from the West Kingdom (SCA). I edited it using photoshop to get straight lines and to change up the size so it would be easier to trace.
After printing out the pattern, I place the linen fabric over the piece and center the fabric. I then taped the paper and the linen down together to give me a slightly more stable working surface, but also to pull the fabric tightly over the paper pattern. In the picture above, you can tell the left of center rose is only halfway traced. The black lines on the left of that rose are actually the pattern showing through the fabric. (I'm sure there a ton of political jokes in here somewhere).
To trace, I used a simple light blue colored pencil. Once I'm done tracing, I start sewing!
Close up of the cuff I'm currently working on.
And to show I'm not just working on a high neck smock and a Regency gown that is finally out of the bad corner (pictures tomorrow), took a picture of the skirt I decided to wear today...after I made it this morning. My old, very worn, but fit perfectly jeans deserved a new life. The pink shiny fabric isn't really that shiny - it's a left over piece of sari I used last year for my Titanic Ghost costume at Dress U. The piece was roughly 2+ yards - enough to do something with. I made it into a tube, cut out a piece of muslin for an attached slip, made a tube of that, cut the legs off the jeans and gathered the tube of fabrics. Attach the gathered tube to the bottom of the jeans and you have a new skirt! It takes all of 15 minutes and makes for a fabulous summer skirt - plus giving those very worn jeans a new life.
The collar is done (yay!) and I've starting working on one of the cuffs. Hopefully, this cuff will go quickly and I can start on the other cuff tomorrow. We'll see. I'd like to have all the embroidery done before 5pm EST or so Saturday. Sunday, I can put together the chemise. I've done handsewn smocks before and it's actually not that bad - just a lot of straight lines to sew up. So, movie marathon have Church!!!!
You might notice that I have traced the pattern on to both cuffs to go over. I took a picture of how I do that thinking it's probably something and least a few people might be curious about. I don't use tracing paper.
Instead, I printed out the pattern from this page done by Aelia Apollonia from the West Kingdom (SCA). I edited it using photoshop to get straight lines and to change up the size so it would be easier to trace.
After printing out the pattern, I place the linen fabric over the piece and center the fabric. I then taped the paper and the linen down together to give me a slightly more stable working surface, but also to pull the fabric tightly over the paper pattern. In the picture above, you can tell the left of center rose is only halfway traced. The black lines on the left of that rose are actually the pattern showing through the fabric. (I'm sure there a ton of political jokes in here somewhere).
To trace, I used a simple light blue colored pencil. Once I'm done tracing, I start sewing!
Close up of the cuff I'm currently working on.
And to show I'm not just working on a high neck smock and a Regency gown that is finally out of the bad corner (pictures tomorrow), took a picture of the skirt I decided to wear today...after I made it this morning. My old, very worn, but fit perfectly jeans deserved a new life. The pink shiny fabric isn't really that shiny - it's a left over piece of sari I used last year for my Titanic Ghost costume at Dress U. The piece was roughly 2+ yards - enough to do something with. I made it into a tube, cut out a piece of muslin for an attached slip, made a tube of that, cut the legs off the jeans and gathered the tube of fabrics. Attach the gathered tube to the bottom of the jeans and you have a new skirt! It takes all of 15 minutes and makes for a fabulous summer skirt - plus giving those very worn jeans a new life.
Labels:
16th Century,
18th century,
Dress U,
embroidery,
sewing,
skirt
Thursday, March 24, 2011
How to make a very simple circle skirt
This involves...math. Eek! I know, I know. But, I swear, it's simple math and you can use a calculator if you want. This is how I made my black velvet skirt and many of my other skirts in the past if I didn't want to just pleat a piece of fabric and go.
First, get an accurate measurement for where you want the skirt waistband to hit. This may or may not be your true waist. Think of this as the circumfrance of a circle.
Now, remember C=2╥r. If you are making a circle skirt, you'll need the radius. If you are making a half circle skirt, you need the diameter. Given that you have C (let's just make it 28" for the sake of going through the calculations), the equation becomes 28/╥=D; which is about 8.97" or there about. If you are making a half circle skirt, you have the length you need to start drawing your waistline on the muslin. If not, simply divide by 2 to get the radius of 4.45".
For the sake of seam allowances, add a small amount to your D or R making them 9" and 4.5" respectively. (You can make them bigger than that but I've discovered that the waistlines tend to stretch a bit)
Using either the D or R, this is your measurement from the top corner of your muslin down to where your waistline will be. So, if you are making a half circle skirt, pull out your measuring tape or rule and mark, in a circular pattern, from the top corner of the muslin, down 9". For the full circle, only mark 4.5". Your muslin can be a quarter pattern (half the half circle) which tends to be a 45" square for me.
Once you've marked off the circular waistband of your pattern, mark off the hem. Figure out where you want the skirt to fall and measure from where you want the waistline of the skirt to be, down. Add this measurement (let's make it 22") to your D or R to get the hem drawn. So, for a 22" long skirt, you'd hold the measuring tape to that top corner of your muslin, and measure out 31" for a half circle skirt or 26.5" for a full circle skirt. Measure out in a circular pattern again. (Think of your measuring tape and your pencil or pins that you are marking with as a giant compass)
Once you have that done, you can cut out your pattern! For an actual waistband, cut a piece of scrap that is at least 1" longer than your waistline measurement (so, in this case, 29") on the bias so it will fit the waistband properly. Sew up the one seam to about 7" from the waist down and hem. Add a zipper or button or some other type of closure and you are done!
First, get an accurate measurement for where you want the skirt waistband to hit. This may or may not be your true waist. Think of this as the circumfrance of a circle.
Now, remember C=2╥r. If you are making a circle skirt, you'll need the radius. If you are making a half circle skirt, you need the diameter. Given that you have C (let's just make it 28" for the sake of going through the calculations), the equation becomes 28/╥=D; which is about 8.97" or there about. If you are making a half circle skirt, you have the length you need to start drawing your waistline on the muslin. If not, simply divide by 2 to get the radius of 4.45".
For the sake of seam allowances, add a small amount to your D or R making them 9" and 4.5" respectively. (You can make them bigger than that but I've discovered that the waistlines tend to stretch a bit)
Using either the D or R, this is your measurement from the top corner of your muslin down to where your waistline will be. So, if you are making a half circle skirt, pull out your measuring tape or rule and mark, in a circular pattern, from the top corner of the muslin, down 9". For the full circle, only mark 4.5". Your muslin can be a quarter pattern (half the half circle) which tends to be a 45" square for me.
Once you've marked off the circular waistband of your pattern, mark off the hem. Figure out where you want the skirt to fall and measure from where you want the waistline of the skirt to be, down. Add this measurement (let's make it 22") to your D or R to get the hem drawn. So, for a 22" long skirt, you'd hold the measuring tape to that top corner of your muslin, and measure out 31" for a half circle skirt or 26.5" for a full circle skirt. Measure out in a circular pattern again. (Think of your measuring tape and your pencil or pins that you are marking with as a giant compass)
Once you have that done, you can cut out your pattern! For an actual waistband, cut a piece of scrap that is at least 1" longer than your waistline measurement (so, in this case, 29") on the bias so it will fit the waistband properly. Sew up the one seam to about 7" from the waist down and hem. Add a zipper or button or some other type of closure and you are done!
Subscribe to:
Posts (Atom)