Monday, May 11, 2015

Butterick B5232 Jacket

http://butterick.mccall.com/b5232-products-7494.php?page_id=385
I was going through my patterns and came across this one that I bought a couple of years ago.  I was looking for a short summer jacket that I could wear to work.  Even though this is a "historical" pattern, view D is pretty much exactly what I was looking for.

It's a bit big on the dress dummy but that's because I have it at "corseted" measurements and not actual right now.  It fits me perfectly.  Although this is meant to be a late 1890's/early 1900's pattern, the fit of the jacket is really 1930's/1940's in look.  It's really cute and I can't wait to wear it tomorrow.

Some notes on the pattern:  If you do view D like I did, the lower sleeve and the side back are very similar in shape.  Make sure you keep those separate so you don't end up sewing the sleeve where the side back should be like I did.  Luckily, I caught it and it was only on the peachy/coral cotton - not on the silk lining.   The shoulders on the pattern were pretty clearly designed for a linebacker - you'll have to cut the armscye along the top and back to get it to fit correctly.

I didn't bother to read the directions - the pattern is pretty straightforward.  There are darts in the front and I just bag lined the jacket.  

The coral/peachy fabric is a really neat looking cotton (it almost looks like linen) that I got at Wally World (Walmart) for $3 a yard.  The lining is leftover silk from a project last year.  I plan on wearing this with a black dress tomorrow for work.  

Saturday, May 9, 2015

Historical Sew Monthly: Practicality

DSC07954


DSC07953


The Challenge: May – Practicality: Fancy party frocks are all very well, but everyone, even princesses, sometimes needs a practical garment that you can DO things in. Create the jeans-and-T-Shirt-get-the-house-clean-and-garden-sorted outfit of your chosen period.

Fabric: Linen, cotton duck and linen blend for the linings

Pattern: My own!

Year: Mid 16th Century

Notions: Thread - I already had the apron and the chemise as well

How historically accurate is it? It's pretty visually accurate. It is machine sewn but the thread is so close to the color of the linen, you have to be a foot away to see it along the hem. The rest of the stitches are hidden. The front is hand sewn as are the eyelets. The colors are correct for the time period. Linen was a well known material used by the lower classes for everyday work.

Hours to complete: 5. It would have been two or three if I hadn't made it too big originally.

First worn: May 9th, Virginia Renaissance Faire

Total cost: The lining was a remnant that I had already used in another project. The duck cloth is stash. I have no idea how much I paid for the not-red, not-orange linen that the dress is made out of. I *think* it was a Fabric.com sale fabric but I really don't recall.


I was loosely basing it off of this dress:

http://www.wga.hu/html_m/a/aertsen/
I didn't have time to make a partlet before I wore it so I wore a high necked chemise instead.  My apron is also more Italian in style.  I didn't use rings for the lacing - I made eyelets.

For this challenge, I knew I wanted to make something good for Pennsic.  I wanted a lightweight linen dress but, this time, I didn't want to make yet another early 16th C Venetian.  Instead, I wanted something later so I wouldn't feel out of place at the Virginia Renaissance Festival...and I didn't.  Actually, it was a lot of fun because the cast would come up and talk to me about my "new dress" in character.   The dress is simple but it is also great for running around in.  I didn't feel like I had to "protect the dress" - I could sit on the grass if I wanted to.  Given how warm it got at the faire, I'm really happy I wore this.  The official temperature recording is 83F, however, my car read 94F when I got back to it.  I know the sun can cause the truck's thermometer to go a bit off, but I think it was more like the high 80's in the sun at the Renaissance festival.  Perfect weather to try the new linen dress out in!

Thursday, April 30, 2015

Historical Sew Monthly: War and Peace


My World War I outfit. I admit, the blouse front is pinned in the photo - I still can't decide if I want to add lace to the placket or not. However, the sleeves, shoulders, sides - everything else, is shown on the bodice. I just need to add a hook and eye to the skirt for that to be completely done as well.


The Challenge: War and Peace

Fabric: The pink of the skirt is cotton twill (Minna at Ikea), the black is black linen from Joanns, the blouse is out of embroidered cotton at joanns.

Pattern: My own! The skirt pattern and an explanation of it is below.

Year: 1915~

Notions: Lace collar, buttons, hook and eye, thread.

How historically accurate is it? They had cotton. They had linen. They had sewing machines. Really, from a visually accurate perspective, it's spot on.

Hours to complete: Maybe 10?

First worn: This Saturday! Better pictures then.

Total cost: The minna fabric was on sale for $3.49 a yard and I got 4 yards of that. I *think* the embroidered cotton was about $10 a yard, on sale, and I only got a yard and a half of that. The black linen was stash but it was a remnant I apparently paid $10 for. So...$38.96? The lace collar was in the stash.

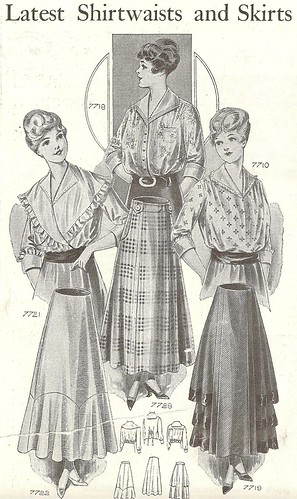
The inspiration for the skirt:

Patterns from 1916
On the lower right hand side, you'll see the tiered side skirt. This fashion plate is from 1916 but this style was popular as early as 1915. I *love* mid teens era styles. I adore those full skirts and blouses. They are just fabulous.

Below is the pattern I used for the skirt.


I know, the above drawing (done on paint!) is terrible, but I wanted to give an idea of what the pattern pieces were. From left to right: The first piece is the front and back. The front is cut on the fold and the back is cut with the selvage down the middle - this makes it easy to make it a back fastening skirt.

The middle two pieces are the sides.  The longer one is the middle tier and the shorter one is the top tier.  The waist for both is the same as the bottom tier (far right), but the overall width is "fatter" than the bottom tier.  This gives the skirt the "puffy" affect that I needed.   The bottom tier:  the bottom 8" are a couple of inches wider than the rest of the piece.   I cut along the dotted line and gathered the piece to the rest of the tier.  This seam is hidden by the middle tier but gives the hem width I needed while still being narrow enough further up to give the puffy affect.

The waistband, not shown, was just a strip of the pink fabric with a double forked edge, and about 2" longer than the corseted waist measurement.   I folded it over, sewed the two points (forks) together, to get a pointed waistband.

The black bands are just the bottom four inches of each of the tiers.  I sewed those along the bottom edge of the wrong side, flipped them, ironed them, and then folded the top edge down, sewing the bands down on the right side of the fabric.

This ended up being a lot of material to sew through.  The cotton twill is pretty heavy duty fabric (I got a blister on my finger just from cutting it out!) and sewing through the three tiers and the side and then adding in the waistband?   Luckily, my sewing machine is awesome and went through all of this like it was butter.

The blouse is a pretty basic pattern. The big thing about the blouse isn't it's shape, it's how I achieved the color of it. Originally, it was a bright white but I really liked the embroidery pattern on the fabric and it's a nice 100% cotton semi-sheer - perfect for spring! The color didn't match a single one of my lace trims - it was just too white. So, I "aged" it using tea. I boiled a pot of tea in my soup pan. I used 8 bags of lipton tea and a bit of salt. Once the tea was dark enough, I turned the stove off, took out the tea bags, and put the fabric in, making sure it was completely submerged. I waited ten minutes, took it out and it was just the right shade. So, I hung it up to dry in the shower and then ironed it once it was completely dry. The color should stay.

As for the whole outfit, I'll probably wear a black belt of some sort around the waist to complete the look.  We'll see Saturday!


Edit: Turns out the event was on Sunday, not Saturday. Still, it was a lot of fun!

One of the photos of Kat, myself, and Judy:

http://www.nsixty.com/video/display/view_key/1430680355


Taken by Kat

I really love this outfit. It was so much fun (and so comfortable!) to wear. Even though I was wearing a corset (I didn't tie it very tight), I felt relaxed in this outfit. Just a nice long twill skirt with a simple blouse...over a corset cover, petticoat, corset, chemise, and drawers. ;-) Oh, and I had the black belt sash as well...and the hat I got at the thrift store. The hat was $6.90 and I added a feather. It came with the roses which matched the skirt perfectly. I was pleased. ;-)

Saturday, April 25, 2015

New Zone Front Dress

Front of Zone Front Dress


Close up of the Zone Front


Side of Dress


Back of Dress


Close up of the piecing


So the last photo is showing where I had to piece the skirt together for this Zone Front style dress because, unfortuantely, I didn't have quite enough fabric.

The full story: The amazing thrift store I go to had this blue and cream cotton for $3.90 for the entire length of it. It ended up being roughly 3 yards although it was hard to tell because it was someone's remnant and they had cut what looked like another dress out of it. I knew I had enough fabric to eek out a dress if I tried.

I used the Pegee of Williamsburg anglaise pattern as a base and worked out from there. I made the back into three piece (center back, two side backs) and had the center back still attached to the skirt back. I used my own sleeve pattern - the same one I created last year for my 18th Century jacket. The front of the pattern I cut out normally for the blue silk satin stomacher part and I flipped it up to created the angle for the zone front out of the cotton.

The bodice is lined in linen but the sleeves are lined in a stripped cotton (which you can see a bit because of the elbow flap).

While sewing the dress, I decided to come up with a new term - Visually accurate. Basically visually accurate pieces are ones that fall into the old SCA 10 foot rule - if it looks accurate from 10 feet away, it's good. It differs from historically accurate as you might be using a sewing machine or the fabric isn't exactly correct for that time period (who doesn't use silk dupioni?) or something else of that nature. If someone of the time period saw you from 10 feet away (sightly over 3 meters away) and wouldn't bat an eyelash about what you were wearing - ie, it would look normal from that distance to them- then it's visually accurate.

I did a lot of the interior seams of this dress on the machine. However, any visible seams (ie, the hem!) are hand sewn. Really, the only things machine sewn are the sleeves, the side skirt seams, the front line of the bodice and...that's it. The back seams? I sewed them using a historical method. I used cotton thread on the cotton dress - the pattern is accurate for the last quarter of the 18th century. Because I used the sewing machine, I'm calling this highly visually accurate.

The petticoat is another matter. It was once a bedspread. I cut a pocket slit, bound that with purple bias tape, cut out the batting from the top 2" of the petticoat, pleated it, attached silk waistbands to the front and back and...instant quilted petticoat! The hem was already bound because it had been the edge of the bedspread. This is more necessary garb low visually accurate. The lavender went well with the blue (much better than the orange!) but none of the materials are accurate. They did have quilted petticoats in the 18th century just not out of poly satin. ;-)

Overally, I'm happy with the dress. I'm going to add buttons down the front - I bought bone roundels to make fabric buttons for the dress. I just didn't have the time yesterday nor the proper materials to make them. I think the petticoat might need some work though. I pleated it wrong- not a big deal for today since both the dress and the cape hid anything. I also don't like the ties I cut out four months ago for it (did I mention the petticoat was a UFO...for the past two years?).

Monday, April 20, 2015

So that I can remember for next time

I've been playing with making up some new recipes for the Spring/Summer.   Tonight, I made this one up and it's delicious as well as pretty healthy.

Ingredients:

1 boneless skinless chicken breast with all the fatty stuff cut out
2 heritage carrots (regular carrots would work but I like the purple ones!)
2 stalks of celery
4 or 5 fresh chives
1/2 a lemon
1 tablespoon olive oil
1 tablespoon salt or to taste
1/2 tablespoon of lemon pepper seasoning

I cooked the chicken in the olive oil and fresh lemon juice from said lemon.   The chives were from my yard, the celery was left over from the potato salad I made over the weekend.  The carrots...I almost always have carrots in my fridge because they make a great snack food.   Really, this dish was about using what I had on hand.

I chopped up the carrots, chives, and celery.  Once the chicken was brown on one side, I coated the uncooked side with the lemon pepper, turned it, and added the veggies. I also added the salt at this point. Then, I just waited until it was all cooked.  I served this over a bed of rice.  I had cooked the rice the other day so I just heated it up in the microwave with a soaking wet paper towel over the rice so that it wouldn't dry out in said microwave.  

It's surprisingly good.  I wasn't sure how tasty it would be since I'm not normally a celery fan but this turned out really well.   It has a nice tang to it thanks to the chives and lemon but it's not overpoweringly sour.  

My Second Empire 1890's Dress


I didn't take pictures of the finished Second Empire stays, but here is the pattern:


I drafted it out first and then put it on the dress dummy for some final finishing.  After wearing the stays all day, they do need some small improvements.  One of the biggest ones would be to make the armsyce smaller - it was cutting into my chest around my arms.   Another would be to either make them one inch longer or one inch shorter - where they were, every time I bent over, the bones would cut into my upper belly and that was not fun.   However, overall, they were actually pretty good.  I could move!  I could drive!  Once I fix the really pretty minor issues (shorten the existing ones will fix one issue and maybe adding a patch on either side will fix the other), they will be perfect.

I didn't take any pictures of the dress while I was making it - it was a bit of a rush job since I had been so ill the previous week.   Really, the pattern for the Second Empire dress was easy since I used a modern pattern.  Simplicity 3777  has very similar lines to the 1890's dresses.  I just had to draft a new sleeve and lengthen the skirt.  Easy.   I used bodice pattern C/D for the lining and then added 3 1/2" to the front of that pattern, while drafting out the darts, for the front gathers.  The sleeve is just my normal trapezoid with a bell curve up top except this bell curve went up at least 8" than I normally do - the sleeve was also a bit wider but only by 3", I think.   The lining for the sleeve was a more traditional sleeve shape.

Another thing about the sleeves - in order to keep them "puffy", I added tulle to the inside upper bell curve edge of the sleeve.  It was about 6" wide and ran along the top of the sleeve.  When I gathered it to the sleeve lining, this allowed for something "stiff" but lightweight to help the sleeve keep it's shape.  Horsehair would have been the accurate way to do this but I had tulle on hand.  


Sleeves of doom!!!!!!!!  You can see the pink sleeves and gray wool dress (ie me!) as the only one without a parasol up.  It was wedge at my feet and you might be able to make out the handle of the parasol in this picture. (All photos courtesy of Kat!)


Kat was trying to steal my necklace which is why you see a hand in the photo below. However, you get a pretty good view of the dress. I used pink dupioni silk for the sleeves - which is what I had on hand- and gray wool for the dress. It needs trim, badly, but I'll do that next time. This time, I was in a rush to finish the dress. Thank goodness visible machine sewn hems are perfectly period for this era!

Okay, so in this photo you can really see the sleeves of doom. They are bigger than my head. :-)

This photo is courtesy of Danabren on LJ.


Overall, I'm pleased with the dress. Like I said, it needs trim. Badly. However, that's an easy fix. If you'd like to read about the Second Empire fashions, I have the original sewing plans, part one of Second Empire research, and part two. In those links, you'll see my inspiration for this outfit.

Tuesday, April 14, 2015

Historical Food Fortnightly 23 Sweet Sips and Potent Potables

This one is probably cheating because although it is a medieval recipe, it's one I've used for a few years now. I make it all the time now because it's that good. I don't bother buying sodas much anymore - I make this syrup called Sekanjibin and add it to some carbonated water (courtesy of my sodastream). The fun thing about Sekanjibin is you can flavor it however you please.

The Challenge: 23. Sweet Sips and Potent Potables April 5 - April 18
Whether it’s hard or soft, we all enjoy a refreshing beverage! Pick a historic beverage to recreate - remember to sip responsibly!

The Recipe: (where did you find it, link to it if possible)Sekanjubin Simple Take a ratl of strong vinegar and mix it with two ratls of sugar, and cook all this until it takes the form of a syrup. Drink an ûqiya of this with three of hot water when fasting: it is beneficial for fevers of jaundice, and calms jaundice and cuts the thirst, since sikanjabîn syrup is beneficial in phlegmatic fevers: make it with six ûqiyas of sour vinegar for a ratl of honey and it is admirable.
...[gap: top third of this page has been cut off]...
... and a ratl of sugar; cook all this until it takes the consistency of syrup. Its benefit is to relax the bowels and cut the thirst and vomiting, and it is beneficial in bilious fevers.


The Date/Year and Region:
13th Century, Andalusia (Southern Spain)


How Did You Make It: (a brief synopsis of the process of creation) First, I gathered my ingredients. Actually, I probably should point out that the above recipe is simply one of many for sekanjibin. According to this website it was first mentioned in the 10th century. I'm told there are other period recipes (in languages I don't even begin to know a word of) that allow for flavorings. Since ginger is a period correct spice, I've added ginger as my flavoring.


The above are my ingredients. Sugar, honey ginger infused balsamic vinegar, and ginger root. I also add water at the end. So my full redaction:

2 cups sugar
1 cup infused vinegar
1 piece of the root (about the size of my thumb) sliced into chunks
1/2 cup water

All you do is boil everything except the water together. I wait until the mixture "doubles" in size and then I take it away from the heat immediately. After stirring it a bit, I put it into the container shown below with the water. The reason for this is because it can be a very gooey syrup and you need it to be something that will easily mix without stirring in water. I then just shove it in the fridge and wait about a half hour before I can have a drink. Although in period you would mix it with water, I normally mix it with carbonated water. I only use a tablespoon or two of the syrup to flavor a large glass of water - put the syrup in first so that the water will easily mix it when poured.


Time to Complete:
15 minutes or so? Not long to have the mixture. It's waiting for it to cool down - an extra half hour- that really takes time.


Total Cost:
Because I love the infused vinegars, it brings up the price a lot. Sugar is maybe $1. Ginger was about the same if not less. The vinegar? $15 a bottle. You can use regular apple vinegar as well - but that tastes best if you mix it with some water that apples were recently boiled in.


How Successful Was It?: (How did it taste? How did it look? Did it turn out like you thought it would?) I can't get anyone else to try it! I've offered and no one else will try it. I love it though.

How Accurate Is It?: (fess up to your modifications and make-dos here) Although ginger isn't in the original recipe, it's a well known medieval spice so I don't think that's too much of a modification. I cooked it on my electric oven.