Showing posts with label sewing. Show all posts

Monday, January 27, 2025

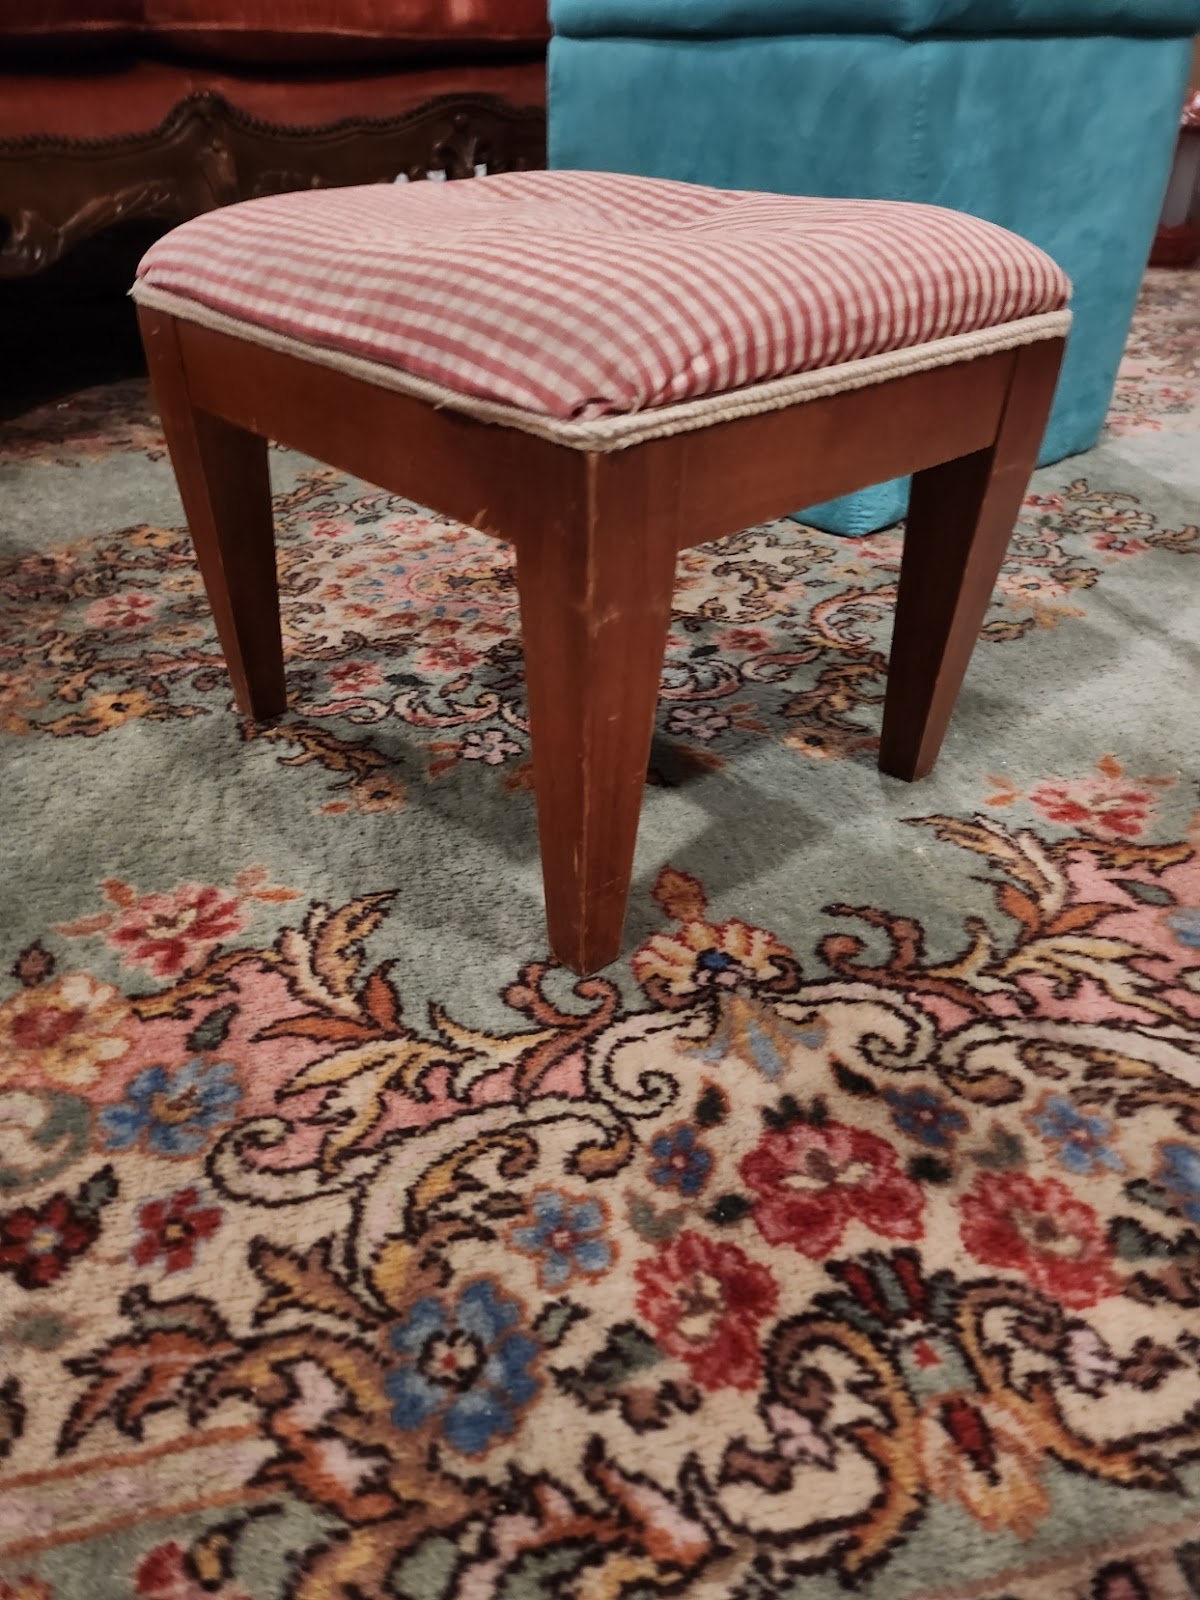
Reupholstering an old footstool

 Not my normal type of post but I am working on stuff.  :-)  I have had this old footstool for a few years and keep it at work, normally.   


I bought it for €5 in Italy and wasn't too concerned about how kitschy it looked.  It's clearly 1990s and well, it needed a refresh.   First, I took the rope trim off the footstool.  I realized after taking the rope trim off that the rope trim and the fabric were pretty well glued down.  I decided to keep the fabric on it footstool, mostly, and just use it to help keep the new stuffing in place rather than mostly sew down the new fabric and stuff it that way.  


It became very, very stuffed.  

I then stapled on a rather nice golden tan cotton velvet I had on hand.  I just folded the edges under and used an upholster staple gun - which I found out are pretty cheap.  In order to make the footstool fancy, I gathered a blue lace I had in the stash and wanted to add it as a skirt.  The plan was to add another trim on top of that and I found a fabulous fringe that went perfectly.


The finished footstool!   I sewed the fringe trim and the gathered lace to the velvet.  The corners are far from perfect but this is for work so my ability to care too much is gone.  I just wanted it to look fancy.  :-)


Thursday, August 10, 2023

New sheer handsewn linen camica


The camica laid out on my bed at Pennsic.   It's too sheer to model as it's out of 2.5oz linen I bought from Fabric Store.   


Close up of the neckline.  I used linen thread I would run through beeswax to sew the entire camica.   Each of the edges are rolled or are wrapped in what is essentially linen bias tape.   


Close up of one of the cuffs.  I still need to add twill tape or some sort of fastener to the cuffs.  

Overall, it took me maybe three days, on and off, to sew the camica up while at Pennsic?  This included cutting out the garment and going to classes or walking around.   It really didn't take too terribly long.

The pattern is very simple.  One yard of linen for the front.  One yard of linen for the back.  30" of  the linen, cut in half for the sleeves (so the "top" of the yard is one sleeve and the "bottom" is the other).  5"ish to make squares.  I cut the bottom of the front and back to make binding for the neckline and cuffs.  Overall:  3 yards of fabric used.  

It's very lightweight and perfect for summer.   I'll probably wear it to the North Carolina Renaissance Festival in a few weeks.  :-) 

Saturday, May 6, 2023

Late 16th Century Venetian Style Peasant Dress


Materials

3 1/2 yards of red linen/cotton blend from Fabric Mart

1/2 yard of cotton duck cloth

1/2 yard of white cotton

1/2 yard of linen rayon blend stripes from Fabric Mart

DMC thread because no one carries red linen and I thought the event originally was a weekend ago

White linen thread from Thimble and Plume

A boot lace

3 ish yards of trim I bought from Lace & Trims on ebay

Pattern

I used McCalls M7763 for the bodice but with edits. I upped the neckline by at least a good inch. I took two inches off the front shoulder strap and redesigned them to be more narrow at the top. I took some off the upper inside of the front side seam as well.

The skirt is just pleated yardage that I then attached to the bodice. The apron is well, a rectangle with a long, thin strap of material to make the ties.

First Wearing

I didn't get the chemise I wanted to wear with the outfit done in time.  I ended up just wearing a blouse I found at Goodwill that looked close enough.   


The bodice probably could have been laced a bit tighter but, overall, it was pretty comfy to wear.  I love the length of it and will probably make a couple more dresses from the pattern.


It was also the correct outfit to wear as it was pretty warm in the sun at the event.  Unfortunately, I had to leave early because the pup wasn't used to the heat.  She's fine - she cooled down quickly on the car ride home- but I just didn't want her to get sick.   


Research


It was pretty much based on the same images as I used for my friend's dress a couple of years ago.  This one in particular:


Pietro Ronzelli: Nativita di Maria, Chiesa del Carmine, Bergamo


I just did the inverse colors - primarily because I didn't have a bright red Venetian dress.  Now that I do, I think I'll work on making more chemises to wear with my dresses and gowns.  I'll need them come Pennsic!   Who else is going?


Friday, June 4, 2021

New Hawaiian Shirt Dress

 For the summer, Friday's at work are now Hawaiian Shirt days!   The problem:  I don't have a Hawaiian Shirt.  Eek!    

The solution:  I happened to have a lovely Hawaiian print cotton I planned to make into a dress anyway.  

With Sew Magazine, I fairly recently received a copy of New Look 6449.


I only had 3 yards of the cotton print and that's all the shirt dress calls for.  Easy!


I think it came out pretty cute.  I did place the shirt pocket a bit too high.  Mea Culpa.  The back yoke ended up being a bit tricky.  The collar wouldn't fit unless I pleated and stitched down the center back of the yoke.  The problem is when I did that, I didn't cut down the neckline itself to force the new lines of the yoke to fit better in the back.  The shoulder "scrunch up" a bit because of that but it's not a huge issue.   

I do like the deep pockets on the dress and the overall fit is good.  I also added a bit more at the skirt (maybe an extra 4" on either side of the front and back pieces) because I wanted a bit more of an a-line look going on.  I wore the dress today with leggings from April Cornell.  It ended up being very comfortable and I'm definitely going to wear the dress again.  

Probably should point out that my favorite aspect of the dress is really the sleeves.  Those little tabs are amazing.  :-)

Sunday, March 28, 2021

Modern Clothing: New Look Pattern 6529/ Red cotton leggings and gray fleece hoodie

Front View
Back View

Hello! Finally mostly settled in my new house and I can start sewing again. Because we are still sort of in Lockdown (we can do day trips tomorrow!!!!), I wanted to make a comfy lazy day outfit. That, and I really need more cotton leggings. :-)

For this outfit, I used New Look 6529. The leggings came out a bit on the loose side but that's fine. I might make them a tiny bit slimmer next time. The tunic neck with the hood is a bit tricky and I messed it up but, well, this is a lazy day outfit and my ability to care is sort of out the window.


Pattern: New Look 6529

Materials: A gray "mystery knit" from last year's Fabric Mart mystery sales.  It turned out to be a lightweight stretch fleece that is just perfect for spring.  

The leggings are out of a red 100% cotton knit.  

Notions: A slight bit of trim to hide the seams in the hood (maybe a yard and a half?), red thread, gray thread, and enough 1 1/2" elastic to go around my waist.  :-)

Time: The leggings were super quick - maybe an hour?  The hard part was waiting for the red thread to come in when I discovered I did not have any red thread.  Blues, greens, pinks, but no red.  All the pattern is is the two legs and, for the waistband, you sew the elastic to the upper outside waistline then fold it in and sew it down.  It's a good "I need leggings now" pattern if you have a lot of knit on hand.

The hoodie took a bit longer.  Maybe two and a half hours?  I'm not sure partly because I had trouble with the hood.  First, I sewed it in the wrong way and then I couldn't get the edges to meet correctly in the front.  I gave up a bit and what you see in the photo is sort of the end state.  Again, this is a lazy day outfit so I'm not trying to make this look perfect - just comfy.  And it is comfy.  :-)

Recommend Pattern?  Yes!!  I'm going to try a couple of the other tunic views and make a few more leggings in different colors.  

Wednesday, September 16, 2020

12th C Linen Dress

I had a lot of fun with this one. The material is 100% linen I got from Fabric Mart. Orginally, I wanted a nice Norse outfit with it. However, after seeing the material, it demanded to be more a 12th C Bliaut than anything else. Inspiration:
Both the above were taken from here. They are both middle of the 12th Century and I just love the dropped neckline to show the undergown. Patterns: Really, the teal undergown is your basic A-line tunic. The pink overgown, is pretty much a a-line gown with self drafted sleeves. There wasn't much that was complicated about this outfit which is why I love it. I've been wearing it during the online training I've been taking for work because why the heck not? Materials: Linen and thread. That's it! More stuffs: I wish I did have more to say other than it is so terribly comfortable and fun to wear. It's an easy dress up/dress down type of outfit which I love. I might add trim to it but I think it works as is.

Tuesday, July 28, 2020

Pistachio tiered twirly maxi skirt! No pattern!


Just a simple skirt for work!  It's out of some of the $2 mystery fabric sale stuff from Fabric Mart.  The solid green is a crinkle poly fabric.  The patterned is a mystery knit.  I just cut a bunch of strips of each fabric, sewed them together, gathered it on the machine and then sewed the tiers.  The lining is a crinkle cotton.  I added a elastic waistband and a ribbon drawstring. 

It's pretty basic but it's nice twirly.  It works well as a summer office skirt.

Sunday, May 3, 2020

Jeans Recycle!


Another modern outfit but I used an old pair of black jeans.  The jeans had thinned and were slightly ripped on the inseam at the crotch so they had to be put in the "to be used as fabric" pile.  I loved all the jean skirts out of jeans ideas but wanted something a bit more flirty.  When I made the black and magenta knit dress, I really fell in love with that skirt and decided to make a jean skirt similar to that style. 

The top of the jeans stayed the same.  I just cut off the legs and use one pant leg for the front and back of the skirt and then took out all the seams from the other and used that for the sides.  


The back of the skirt isn't perfect but it honestly looks better in person.  I just always loved the embroidery on the pockets of these jeans and couldn't bear to just thrown these out.  I had to make something out of them!

The skirt from the side.  You can see the original "cuff" of the pant leg here in the front.  For the back, I took the "upper" edge of the pant leg, flipped it, and made the upper edge the hem.  This gives the back a bit more width at the bottom hem in the back.  I did piece the skirt slightly in the back as well but I had enough to piece the skirt and it isn't super noticeable where the piecing is.  

I'm going back and forth on adding lace to the bottom edge but I think I might keep it as is.  The skirt is just the right length for me and I don't think lace would look right with a lot of my generic t-shirts I'll wear with it.  

Sunday, April 5, 2020

I'm having too much fun making these...

This one:

The base is out of black cotton and more of the tropical weight tan wool.  The wool serves only as an inner layer to the actual mask.  The veil is out of some semi sheer silk dupioni I've probably had for years (the tag on it was Hancock fabrics!).  The coin trim I think I got from Joanns a few years ago as well.  The black bias trim is thanks to an Amazon purchase in which I ordered 50 yards

The pattern:

Same one!  The masks all full cover your face and are comfortable. Even without the veil, these are pretty coverall masks and will allow you to get into the grocery store.  I love that this is the only time in history that you have to wear a mask into a store or bank!   No mask, no gloves, no service!   :-)

New Facemask!

Because there is no reason to not be fashionable during the plague!


I used the same pattern I used here.  The differences are that I have the bias trim so that the ties cross under the chin now to wrap around the lower part of the skull and tie at the base of the skull.   Also, the lovely black lace is a bit different.  :-)

I had some left over black lace from an 1860's Ball gown that I apparently never published here.  I made the gown a long time ago and really loved the look of the lace.  The piece left over was only long enough for one 18th C cuff but I couldn't part with it.   Luckily, it's now the perfect fit for a facemask!  I stay stitched it to the top of the facemask, matching centers, and then added the upper bias trim.

It was fun to wear this while grocery shopping.  I plan on making a few more like this - including one with my beaded coin trim because when else will I get to wear crazy stuff like this and no one think anything of it?  :-)

Sunday, March 22, 2020

The Latest in Italian Fashion....

The face mask! I designed my own using just some scraps and a bit of bias tape. I hope the pattern process that I'll try to explain below makes sense.


The lines represent where you should measure.

Measurements:

  1. The Red line is from the bridge of your nose to just under your chin, where you want the mask to cover.
  2. The Yellow line is from top of your cheekbone, under the nose, to the other side of your face.
  3. The Orange line is from the top of your cheekbone, under the chin, to the other side of your face.

These are the only measurements you'll really need.


The Pattern


I tried to do a video and well, I'll try again tomorrow to show how to really draw this pattern out. The red line is the same as the measurement above. Just draw that on your piece of paper, marking off about 1" below the top of that line. Now, draw the yellow horizontal line there using your undernose measurement. Using your measuring tape, as best you can, draw the underchin measurement - this will not be perfect and you'll notice it will not reach the bottom of the red line, that's okay.


Now for the slightly tricky part. Draw a curve from the end of the yellow line to the long end of the red line - this is the green line in the pattern picture above.  It doesn't have to be perfect.  I like using the Frixon markers for this because they are erasable!   Now, measure the difference between the end of the orange line to the bottom (chin) of the red line.  It's typically around 2", give or take an inch.  Whatever that measurement is, half it.  Now, from the red (Center) line find where that measurement hits the "green" line outer edge.  This is the start point for the bottom purple line.

Draw the curved purple line to just an inch or less above the orange line, hitting the red line.  Hopefully the picture makes that make a whole bunch more sense.


The blue line is nothing more than a very fat bell curve.  Again, it doesn't have to be perfect - you'll fix any issue with the mock up.  The top purple line starts along the blue line, about 1 cm or so from the red line and curves down towards the red line right where the undernose yellow line is.

If you want a decent curve, add the gray line - it's really a hand drawn very slight curve joining the two purple lines.  The inside of the two purple lines, the gray line, the green line and the top blue line becomes the outline for your mask.  (Shown in black above.)

The Materials


I used two layers of quilting cotton and one layer of wool. Wool is known to be antimicrobial, making it an excellent inner layer. You can absolutely use just three layers of cotton. I just prefer the wool.


  1. 1/4 of quilting cotton - you probably will not use all of this and can just use scraps from the scrap pile like I did
  2. Fat quarter of wool - again, scrap pile; I used an 8" strip of wool I had
  3. 2 yards of double folded wide bias tape
  4. Cotton thread
  5. Fabric scissors
  6. Sewing pins

Trace around the pattern on to the fabric.  You'll want to cut four piece of the quilting cotton and two pieces of the wool.  Mark, for your own sanity, what the inner seam is.

Once you cut out the fabric, using the wool - or whatever you have for the inner layer- sew up the center seam.  I used a small zigzag stitch but any will do.  Now, unfold it with the unfinished seam out, and hold it to your face.

Look in a mirror and see where you need to make adjustments.  Mark those, recut the wool, if necessary, and then make sure you also recut the cotton and, using paper scissors, recut your pattern as well to the "better" fit.

Once that is done, sew up the center seams, right sides together, of the cotton pieces as well.  You should have two quilting cotton layers and the one wool layer.  Sandwich them.  Have the "fashion fabric" or finished sides of the quilting cotton out (it doesn't really matter which way you have the wool).  Pin the edges, particularly at the chin, the bridge of the nose, and the "corners".  Stay stitch all around.

Now, the bias tape.  Start with a tail of the bais tape about 14"~16".  This will be one of the ties.  Sew the bias tape around the top edge of the mask.  Leave a similar tail on the other side.   For the bottom part of the mask, you'll need your seam ripper.

About 14"~16" into the bias tape, make a small hole with your seam ripper, right in the middle of the fold of the bias tape.  The hole only needs to be big enough to fit the upper tail through.  Once you've done that, sew the bias tape around the bottom edge until you are sure where to make the next hole to pull the other top edge tail/tie through.  Leave another 14"~16" tail.

That's it!  It sounds way more complicated than it really is.  I made this in about a half hour this morning and will make another one tomorrow.  These are 100% washable which is fabulous.  It also uses up some of  those scraps you have been hoarding in the corner.  :-)  Do NOT use silk, polyester, velvet, tapestry, a heavy twill, or any other materials other than quilting cotton, linen, and tropical weight wool.  You need to be able to breathe.


Sunday, November 17, 2019

New Winter Coat!


Sorry for the covered face but I took this picture at 6:30 in the morning and it was not pretty.  However, the picture showcases my new winter coat really well so....

The pale blue is a wool poly blend I got from Fabric Mart in one of their many wool sales.  It was $10.50 a yard and I ended up with three yards.   The pink wool is a strip of wool I got from Tricot Cafe which is down the street from where I live.  I think I paid $10 for the entire strip but I don't remember.  I bought this all last year when I thought I'd make the new coat.

I last made a winter coat back in 2013.  I've been wanting a new one for the past couple of years but decided, this year, I would really get to work on it.  :-)

The pattern:

Simplicity 8298 from 1977.   I bought the pattern along with a bunch of others from a lady in Idaho.  My copy is a women's size 14 so I didn't have to play with the size on it much.  Going from a jacket to a winter coat that would need to accommodate bulky sweaters means that I want the jacket pattern a bit on the big side.

Some edits I did:

The original jacket is unlined so I had to create a lining pattern. Really, most of it was just cutting one of the fashion fabric and one out of the lining but the front "flap" had a facing.  So I traced the front pattern piece on to some Christmas wrapping paper that I don't like anymore and then I traced the facing on top of that.  The piece that was "left", I added a 1/2" seam allowance and cut that out as the front lining piece.


The various wrapping paper lining pieces and the sleeve lining
I also lengthened the jacket pattern by about 3" so it would be more of a winter coat.  Since I wanted a hint of pink in the coat, the side front already came in three pieces - I just added the pink wool by cutting out the middle side front from it.  I also took the rest of the wool to make a belt that ends in a big ole butt bow in the back.  Because.  

Construction:


Overall, the construction was fairly basic.  Side front to front.  Side back to back.  Ect.   I did add hem lace to the inside of the coat because I didn't want the flannel backed poly satin to unravel like the hellish material it can be.   I also didn't want to double roll it so...hem tape it is!
Close up of the hem tape

Overall lining of the coat
So far, so good.  I might add a hook or another button because the top of the coat fits slightly off.  It's not a big deal and the coat is quite warm.   Hopefully, I won't have to make another coat for a while!


Friday, September 20, 2019

Painting for my sewing room!


Long story short: I'm in recovery mode right now. I got out of the hospital on Wednesday after having my gallbladder removed. Before going in the hospital, I stopped by one of my local Thrift stores. This one isn't open on Fridays, Saturdays, or Sundays. However, what they do do is put out items that they believe, for whatever reason, won't sell out on the front curb. I've been badly in need of picture frames and snagged a couple for free. I also found this lovely hanging canvas of a giraffe that was meant for a nursery. I figured with a coat of paint, it might not look too shabby.


Today is the first day since surgery that I've felt "myself" again - and, really, the first time I've felt normal in probably a good month, to be honest. I mean, yeah, my incisions still hurt, but the rest of me feels normal. Trying not to stress it too much but, at the same time, unable to sit around and just be a couch potato, I decided to paint over the poor old giraffe and make him into something more appropriate for a sewing room.


Every idea I had involved a dress form so I decided to paint my good old dress form I got at the same thrift store for $5. (It doesn't have a stand but, eh, whatever. It's mostly just to pin and display anyway.) You can see it in the upper right most corner of the picture if you look closely. :-)


It's not a great painting but I'm pretty happy with it. I used an entire tube of gray paint, most of the way too peachy to be flesh tone, and a lot of the green to get this painted and get the giraffe completely covered.


Monday, August 12, 2019

Modern Sewing!


This is a very shaggy Abigail hiding where I had already taken off one cuff of the blue jeans.  :-)  I bought the jeans on sale for $3.49 at the store.   They were/are having a ridiculous sale because the entire store is about to undergo a remodel and they need to move EVERYTHING.  So, I saw these were my size and decided that, although I hate bell bottoms, I can just take the cuff off and put something else on the bottom.  Or make them into shorts if I royally screw up.  Either way, it's $3.49.  I can play with these without crying.  


I added some heavy blue knit to the bottom with a pink trim at the seam.  The blue knit has a lovely constellation pattern.  

Close up of the pattern on the fabric.  The jeans aren't perfect but they are wearable and make great Saturday laze around the house jeans.  I might take the trim off and replace it with a stretchy lace because the trim does not stretch and I have fat calves, unfortunately.  

My other recent modern sewing project was a pair of trousers for work.

I cannibalized the 1972 Simplicity Printed Pattern 5357 and made it into one single pattern cut rather than a front and back.  I also made it a bit bigger because the original pattern called for a knit.  The cut became more straight than curved towards the ankle because I really do not like bell bottoms.  I wore these to a meeting at work and then a work dinner.  :-)

Some 1510's and 1580's pieces will be coming shortly!   I'm working on a few Renaissance outfits and then my dirndl in the next couple of weeks.   

Saturday, July 20, 2019

Little Shrug Jacket for Summer


The fabric! I bought some lovely constellation print heavy cotton knit from Fabric Mart a couple of months ago. It was in their as-is section. All the fabrics there do have issues, but, normally, you can work around them depending on the project. I just really liked the print and wasn't passing up $2 a yard knit. I needed knit at the time to enhance my work wardrobe.

I used out of print Simplicity 4334. I found out they re-released it at some point but this one is well over a decade old. Although I've used the skirt pattern before, I hadn't made the shurg, view D, and had to cut it out. Really, the pattern is a great wardrobe builder if you need a decent work wardrobe but are either a)lazy like me or b) new to sewing. None of the patterns are complicated and you get some nice pieces out of it.

The shrug! All the pattern is is the back on the fold, two front pieces, and two sleeve pieces. It took maybe a half hour to cut it out and sew it up. I didn't bother with directions - I just sewed the sleeves seam, hemmed the sleeve edge, sewed the front pieces to the back piece, hemmed that all the way around, and then attached the sleeves. For seams, I used a zigzag stitch but, for the hem, I just used a regular straight stitch. This was partly because the knit doesn't unravel but, also, because I'm lazy and only had a bobbin of light blue thread that I didn't want to show on the "fashion" side.


The back of the shrug! All perfect for the 50th Anniversary of the moon landing. :-) I didn't want to have the day pass without wearing something astronomical.

16th Century Style Italian Camica


Handsewn Late 16th Century Italian Style Chemise
By Lady Isabella D'Angelo


Figure 1 Close up of Chemise sleeves and embroidery

The chemise or camica was an undergarment worn by both men and women from the middle ages until fairly recently, historically.  It was made of either linen or cotton, with most extant garments being made of linen.[i]  The purpose of the garment was meant to have an undyed undershirt of sorts that could aborb the sweat and body oils, leaving the over garments clean.  No one wanted to clean their heavy wool or, if you were rich, heavy velvet garments every day; just as we today do not wash our winter coats every day.
The garments could be embroidered, typically using silk or linen thread.  Silk was domestically produced right here in Veneto between Vicenza and Verona.[ii]  Linen was common everywhere in the Old World.  The embroidery could be dyed or done with undyed silk – the latter called whitework.  Lace, which was only first developed in the 15th century, could also be added.[iii]

Extant examples
There are several extant examples of chemises from Italy located around the world.  Some of these are embroidered, some to these are not.  Both women and men would have their sleeves embroidered but, typically, only women had the bodies of the chemise with any decoration, if they wished. 


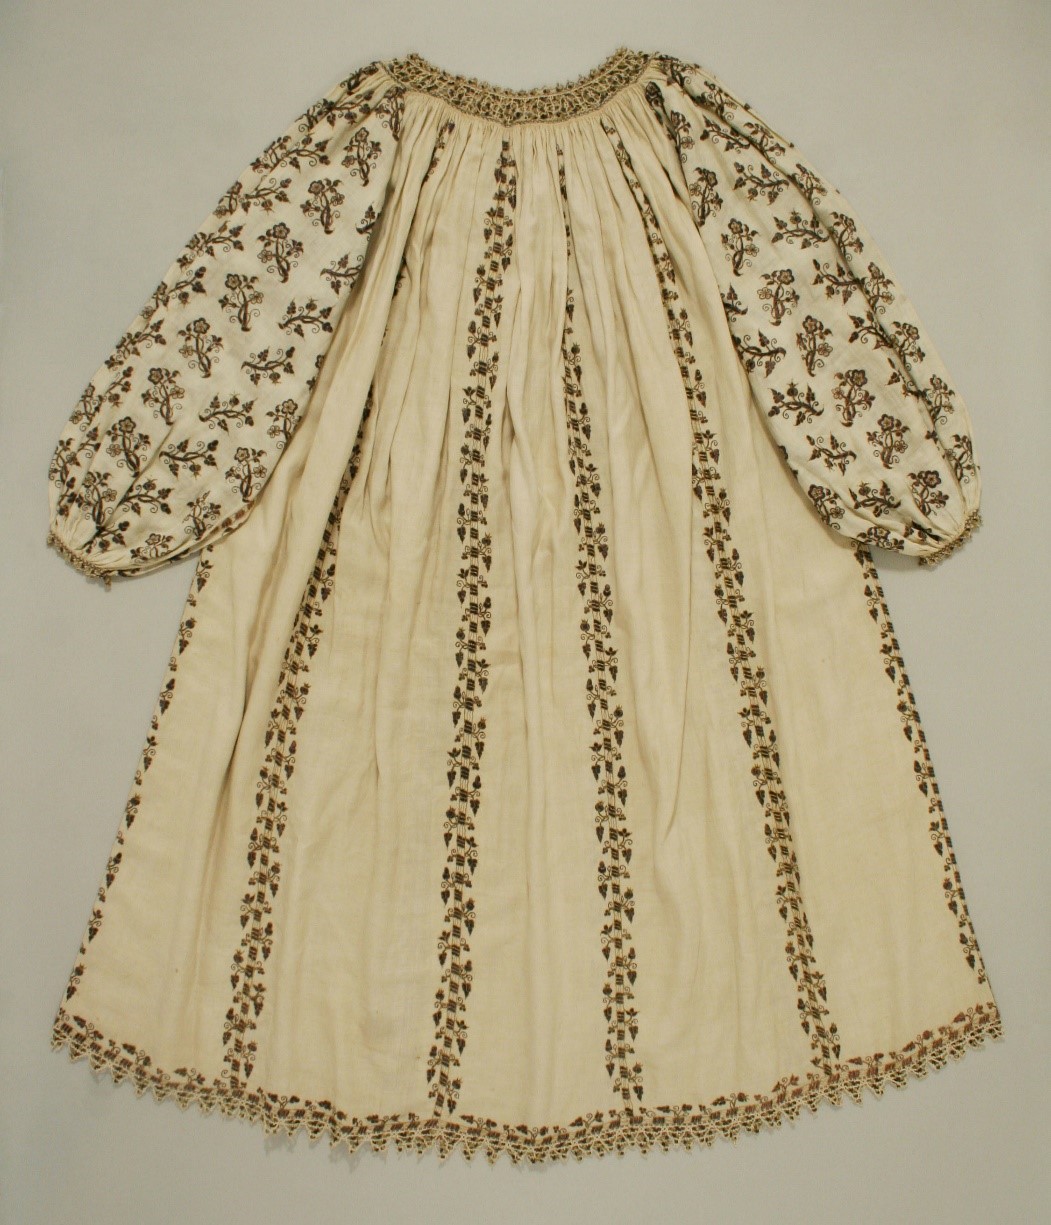
 Late 16th Century chemise at the Metropolitian Museum of Art in NYC[iv]
Figure 2 is one example of a late 16th Century Italian styled chemise.  The sleeves are heavily embroidered in purple silk and the body of the chemise is made up of thin panels that are then sewn together and the seams are embroidered over.   Because of the time it would take to make such a piece and the cost of the materials, this most likely belonged to an aristocrat.

Figure 3 Detail of a chemise with lace insertion, showing the upper part of the sleeve[v]

Figure 3 shows the underarm and the sleevehead to a late 16th Century style chemise.  Various laces are inserted between panels as well as around the neckline.  This is similar to what I attempted to do with the chemise on display.  The location of this extant chemise is currently unknown.


Figure 4 16th Century chemise close up showing needlework lace[vi]

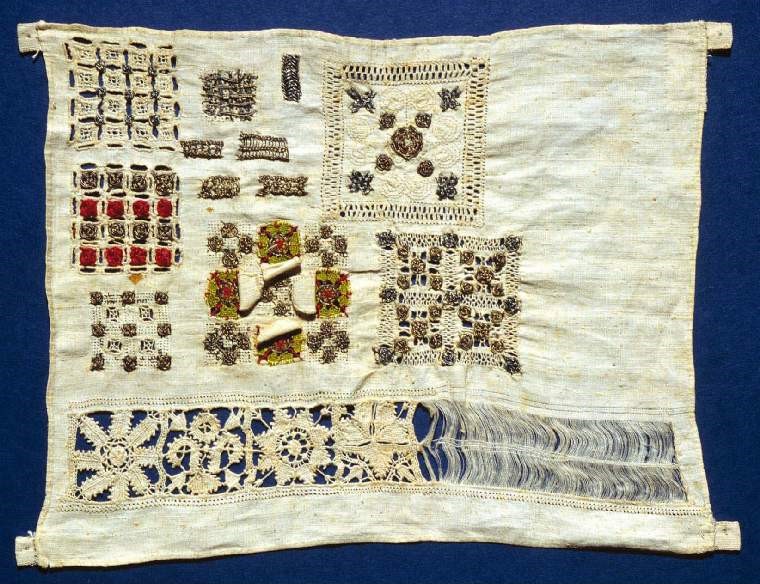
Figure 4 is not a true lace as we would know it today but a very specific type of embroidery called drawnwork.   The embroiderer would cut out some of the threads from the base fabric and wrap the remaining threads to create designs.  Figure 5 shows and example of needle work where it is half finished. 
Figure 5 Sampler from the late 16th C/ Early 17th C showing various types of embroidery[vii]

The mix of blue silk hippocampus and white bobbin lace I chose for the chemise comes from a few different embroidery examples.
Figure 6 Strip of blue embroidery with drawnwork, 16th C Italy[viii]
Figure 6 is from the Metropolitan Museum of Art in New York City.  It shows a mix of light blue embroidered flowers with cutwork or drawnwork. 
Figure 7 16th C textile showing lace insertion and dark blue silk embroidery

Figure 7 is closer to the techniques I used and shows both lace insertion and dark blue embroidery.  The base is linen with the blue thread embroidery being silk.  It is unknown what the textile itself was used for but most likely a table or alter cloth.
Figure 8 Seahorse or hippocampus, most likely done by Mary Queen of Scots
The hippocampus, or a mythical type of seahorse, was a popular motif throughout Europe in the late 16th C.  Not only does is show up in various drawings of the time, but, in Figure 8, there is an extant embroidery of one.  The embroidery is attributed to either Mary Queen of Scots or Elizabeth Talbot, Countess of Shrewsbury.[ix]

Technical Details

The main base of the chemise is linen.  The embroidered bands in the sleeves are older – I did them almost a decade ago- which is why the color of the linen is slightly different.  The bobbin lace is out of cotton.  Both linen thread and silk thread were used to sew everything together.

Italian Chemise Pattern

Placement Guide

The above patterns aren't the best but it is pretty much what I used.  (Ignore the orange pattern, it really is rectangular and not with a small bit cut out).  The green is what I used for casing along the gathered neckline. 

The Art Show where the finished chemise was first on exhibit

Close up of the full exhibit


Another close up of the embroidery


[i] http://costumedabbler.ca/cotton
[ii] https://www.luigi-bevilacqua.com/en/silk-and-venetian-fabrics-renaissance/
[iii] https://owlcation.com/humanities/History-of-Lace-Making
[iv] https://www.metmuseum.org/art/collection/search/83860?&searchField=All&sortBy=Relevance&when=A.D.+1400-1600&what=Costume%7cLinen&ft=linen+embroidery+italian&offset=20&rpp=20&pos=29
[v] http://realmofvenus.renaissanceitaly.net/workbox/extcam6.htm
[vi] http://realmofvenus.renaissanceitaly.net/workbox/extcam5.htm
[vii] https://webapps.fitzmuseum.cam.ac.uk/explorer/index.php?qu=Name:sampler&oid=110905
[viii] https://www.metmuseum.org/art/collection/search/215421
[ix] http://collections.vam.ac.uk/item/O138524/the-oxburgh-hangings-panel-mary-queen-of/