Showing posts with label halloween. Show all posts

Friday, October 26, 2018

Halloween: Vannozza Cattanei's gray/green archery dress in the Borgias Part 1

The problem - because there is always a problem before the start of a project: I wanted something Venetian for Halloween - living here in Veneto- but I didn't want to do the 1550's/1560's thing because I'm trying to lose weight again. I wanted a dress that will fit for a while - which are typically the higher waisted gowns. However, I have a TON of the early 16th C gowns and didn't want to add another to my already bloated collection. Solution?


This.

I saw the gown and was immediately in love. It's very similar to many 1520's/1530's styles. Also, I happened to have a nice five yards of a lighter gray silk stashed away that was perfect for this gown. I'm not coping it exactly - mainly because I'm trying to go with mostly stash fabric - but I'm trying to copy most of the lines. So, the back...


The sleeves are detachable. There is a seam at the back sides but it looks like it has a zipper (not very Renaissance...) up the center back. Because I want to wear this to SCA events later on, I'm just doing lacing at the back sides. Also, it helps with losing/gaining weight that way. The skirt is gathered around and appears to really be just the typical rectangles with maybe some extra in the back. Again, SCA events, I'm just doing rectangles because trains and SCA events do not mix. Ever.

To start, I'm using a base I made from McCall's pattern 2806:


Really, the only thing you need to do to the above pattern to make it perfect for 1490s/1500s is take out the darts in the bodice. That's really it. The skirt is already just three rectangles put together.

I modified it slightly more than that - the shoulder straps are a bit long and the neckline is umm...more early 1520s and not sensible for anyone more than an A cup? So I raised the neckline, cut the straps slightly, also made the width a bit tighter, and I drafted out the darts so I could use this as a base.


The base!   I knew I had to add an inch or two to lengthen the bodice; I also wanted to move the side seam a bit and square out the neckline.  So, first, I drew around the existing base in brown marker.
Then, I took a red frixion (the kind you can erase!) marker and matched up the existing base back with the brown outline I just did.  I wanted to mark where I was moving the seem on both pieces and make sure the curve of the armscye was preserved.  
I only moved it over an inch, really.  You can see the new "red" outline for where I moved the seam over too.  
Inversely, on the back piece outline, I drew a red line to mark the new back side seam.
This picture is a bit hard to see but I squared off the back neckline.  I ended up doing the neckline in the back even deeper than this once I tried the mock up on.  However, the red lines mark the new template.
Front side bodice piece!   It has the new squared neckline and is lengthened.   
However, I realized when I tried to draw the correct length for the back piece that I didn't have enough room.  I ended up erasing the back piece and redrawing it all a lot higher on the paper.  
New back piece as well!!!
Comparison to the original bodice front, with the dart pinched and the new bodice front for the 1530's dress.  It's a lot longer and the neckline is higher.  Still, I realized I had a couple more issues that needed fixing still.  The underbust/rib cage waistline was 2" smaller than my actual rib cage.  My ribs do not shrink like my waist will.  They just don't.  So I ended up adding a bit to the bottom of the bodice so I can breathe.   Also, I didn't like the shoulder strap angle on the front bodice piece so I changed that as well.
The lining fabric!   I'm using teal silk dupioni for the lining.  The actual dress is out of the fabric pictured below.
This is going to be the skirt front.  It's just a 45" cut of the fabric.  The pink silk is silk I had on hand that I thought went well with the lighter gray/silver silk.  The dark lines are hunter green velvet trim.
This is the fabric for the upper sleeve as well as some trim ideas for it.  I like the idea of the pink with the silver trim.  I ordered some light green trim but it's not good for anything more than knitting or crocheting - it's recycled sari ribbon that was sewn together hastily.  I might check out the trim store here in town but, this is the direction I'm going so far.  

Friday, October 12, 2018

Teal Pumpkin Project


Although Halloween in Italy is very different from what it is in the US, I thought I'd still do this PSA. Some of you might see this a couple of times because I'm trying to get the information out before everyone buys up their Halloween treats.

The Teal Pumpkin Project

The Teal Pumpkin Project is all about food allergies. My nephew has it way worse than me. (It's not like people regularly hand out buckwheat and tomatoes at Halloween.) Oldest nephew is allergic to peanuts and eggs. No reeses, no mr. goodbar, no paydays... he typically has to give up on well over half his bag if not more because of allergies.

By putting out a teal pumpkin, it means you have allergy friendly treats available. I always gave out play-do in the States (80 cans are about $35. Even the big kids love play-do) but other fun things are Halloween Stamps which are 50 for $10.95 or whistles or even those spider rings that I scared my Mom to death with accidentally when I was a kid. :-) The Teal Pumpkin Project has a lot more idea for fun treats that aren't expensive.

Btw, I've been told that Target has teal pumpkins if anyone would like to get one. :-)

Tuesday, November 1, 2016

1920's Halloween

First, the inspiration:


I've been on a 1920's kick lately.   All I've wanted to do is make a 1920's style dress.  I was supposed to go to a party where the theme was fancy dress in monochrome but my truck decided to break down.  Instead, I finished the dress for Halloween.

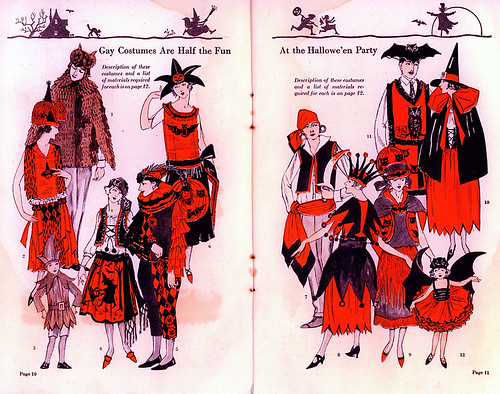
1922 Halloween Costumes
From this catalog page above, I really liked the idea of having just Halloween shapes cut out and adding them to the hem of a normal 1920's dress.  I took the crescent moon idea from the lady in the bottom left and the stars from the guy in the upper right.


1920's Celestial Fancy Dress
I couldn't track this one down to the source but I wanted to show another example of stars being used in Halloween costumes in the 1920's.

Gay Costumes are half the fun at the Halloween Party
This was not the original inspiration for the owl cut outs but I can't find the dress I saw that originally inspired it.  All I recall is that the dress was in the lower left hand side of the catalog page and had owls around the hem similar to the owls on the lower part of the upper right hand guy's tabard.  For a better idea:


1920's Owl Decoration

The cut outs for the hem of the dress are very similar to the head of the paper owl here. The eyebrows don't meet because these are fabric cut outs (black velvet) and the eyes also have to be somewhat more restrained.


Since I wanted to make a new dress for the 1920's, I had to make new undies as well.  Although my original 1920's bra was serviceable, I wanted something cuter and more attuned to my skills now.

1927 Bra

1927 undies

1920's Bra off of Etsy


Second,  making the outfit:


I don't have any pictures of making the bra and panties.  Basically, the underwear itself was pretty simple.  For the undies, I took two rectangles for the front and back, a small rectangle for the crotch out of both silk and cotton, and gores out of both the silk and lace for the sides.  Once I sewed it up, I added elastic to the waistband.

For the bra, it wasn't much more difficult.  I started with a band that was 3" bigger than my bust measurement at it's fullest by about 7".   I marked out where the darts should go - one bust dart on either side, darts for across the bust but under the arms, and one dart on either side directly under the arms.  The dart under the arms  is to straighten the band once you make the bust dart so the silk band will go around your back in a straight line.   I also added straps and lace to the front to make it pretty.

The hooks and eyes on the back of the bra are actually hook and eye tape.  I used that by folding the silk over the tape to hide it and add strength to the hooks and eyes.  This is also partly why I made the bad bigger - you'll lose a lot of fabric by folding the eyes into the fabric.

The dress - the dress is my own pattern as well.


I drew out each of these designs on just plain computer printer paper.  Using a box cutter, I cut four of each design from the scrap black velvet.  I glued each design exactly one foot apart on the hem of the dress - the skirt was made out of two 2 yard panels of silk.

Once the designs were glued on, I let them dry overnight.  This meant laying the entire four yards across my living room.  I had newspaper underneath to prevent the glue getting to the hardwood floors.

The tunic part of the dress was pretty simple.  I drew it out, cut it out, sewed the shoulders and sides, tried it on, and redrew where I wanted the neckline and underarms to be.   I then cut those pieces out better, and sewed down the rolled edges.

I realized I had cut the tunic a bit too short so I added a belt of black velvet.  I think it actually helps the dress a lot.


Third, the actual dress:


Materials: Silk, velvet, rayon lace, and a small amount of cotton
Notions: Thread, Glue
Cost: The white silk was $3 a yard at a closeout sale. The velvet and orange silk were stash as was the cotton. The was a Joann's remnant for $3, I think.  The pink silk was a joann's remnant that I bought years ago - I have no idea how much but I'm guessing $5 for the pink silk.   Since I only used under 3 yards for the dress, I don't think the dress cost much more than $20 to make.

Fourth, the critique:


My biggest complaints are as follows: I made the undies too short and the skirt of the dress too long.  The dress is pretty easy to fix - rip the skirt off the dress, chop six inches off from the waist,  and resew.  There isn't any help for the undies other than to make the rectangles more square like next time.

The coat I'm wearing in the photo is one I made a couple of years ago that works well for late teens and into the 1920's.

Saturday, October 31, 2015

It's Mario!!! Happy Halloween!

DSC09603

My two oldest nephews declared that they wanted to be Mario and Luigi this year. Their younger brother was to be toad (he was throwing a tantrum in the corner. 3 year olds.) and my sister in law was to be Princess Peach. My brother was to be Bowser.

Every year I make their Halloween outfits.  This year was a little bit different, however.  Most of what you see, besides Princess Peach's dress, is thrift store or Wally World finds.

Mario:  Red thrift store shirt, overalls from Wally World, the hat from Michaels.  I did add an M from Joanns to the hat and I also hemmed the overalls but that's it.

Luigi:  Green thrift store sweatshirt, overalls from Wally World, the hat from Michaels. I tried to dye the hat green and it came out sort of a lime mint green color. I also added the L from Joanns to the hat.

Bowser:   Yellow thrift store hoodie, red yarn from Joanns, bubble yellow fleece like stuff from Joanns, green fleece for the tail and turtle shell you can't see, yellow ric rack from the stash.  This one involved sewing.  I hand sewed the oval you see on the front of the sweatshirt.  I also hand sewed the red "hair" to the top of the hoodie.  The black straps are to the bookback turned turtle shell.


Princess Peach: My sister in law's dress is my own design. I made it big so she could wear a shirt beneath it if she wanted to.  The fabric is from Joanns, the puffy bridal petticoat I attached to the dress is from the thrift store.  The basic of the dress is simple - it's a basic bodice front with darts and an angled bodice back.  The skirt is just two panels of fabric sewn together and pleated.   The bright pink puffs were a circle that I cut in half, gathered along the circular edge, and then sewed to the skirt.  The straight edge was hemed.  

Toad:  Not seen but heard in the photo.  I took a straw hat I had lying around, added what was basically a large white circle, gathered at the edges, to make a cover.   I glued big red linen "dots" to it in a random pattern.   I then added some stuffing to it  to make it puffy like a mushroom.  The two older nephews tried it on and loved it.   I also made a basic brown fleece jacket and bought a tan t-shirt  at Wally World to go beneath that.

So that's what I've been working on and why I haven't been posting!   I had to gather up and/or sew all of that!