Showing posts with label gown. Show all posts

Tuesday, July 28, 2020

Sari made into a 1490's Venetian dress


I made this back in May and forgot to post it.  Self-drafted out of a sari I found at a thrift store last year. Although the paisley pattern on the sari isn't accurate for the late 15th/early 16th c   (EDIT: Please see my latest research here on the paisley print actually being pretty accurate for the period) , the sari was too pretty to not be made into something.

The pallu of the sari ended up being the faux underskirt and the gauntlets. The bodice is made from the blouse piece and part of the hem of the original sari skirt. I cut up the sari skirt into five panels - three panels have a "flower" design on them and make up the overskirt fronts and the back of the dress. The plain (it has the hem treatment but not design on the body of it) parts of the skirt became the sides of the gown. The upper part of the skirt had a lovely trim detail that I cut off and made into the trim you see around the open front and around the faux front on the bodice.

It fits really well.  I can't wait for this COVID to be over and I can wear it to an event!

Saturday, February 29, 2020

Carnivale Gown based loosely off of Felicity's Christmas Gown


After the Ball
The gown above is what I wore to the Mascheranda Ball during Carnivale in Venice.  It was one of the last balls (probably the last one this year) for the Carnivale season.  I had fun (even if I almost fainted at one point) and absolutely loved my gown.  It needs some small touches, but overall, it is one of my favorites so far.

The Inspiration:

The Couture Courtesan did a stunning recreation of the gown a few years ago that I got to see in person at one point. I really hadn't planned on making my own recreation but the silk taffeta I used was only €3 a meter and I cannot pass up a deal like that. Also, it is exactly the right color to make the gown. The silk taffeta begged to be made into Felicity's Christmas Gown. Since I've always been a fan of the pink front stomacher, I decided to go with that instead.

When planning out the gown, I wanted to keep it semi-historical as possible. I wasn't going to handsew the entire thing but I didn't want to get too anachronistic either. So, I decided to keep the colors and overall shape of the stomacher (more on that in a bit), the trim type (ie, the way it goes up and down the robings and is pleated), and the matching petticoat. When researching dresses with similar trims, I kept coming back to one thing:


Woman's Dress and Petticoat (Robe à la française) - LACMA


Robe á la Francaise
Robe á la Francaise- Nordiska Museet, Stockholm, Sweden


Robe à la Française - MET
They were all Robe à la Françaises and not Anglaise.  So, a Robe à la Française it is!  I may have bought uh....10 or so meters of the blue silk taffeta so I wasn't worried about fabric usage.  At all.

The stomacher on Felicity's dress is, of course, meant to kinda look right while also be expedient for making a doll's dress for little girls to play with.  The ombre pink ribbon with a twist in the middle isn't exactly period.  However, a very similar "look" was - this:

Portrait d'une femme en robe de satin bleu, 1760 Christian Friedrich Reinhold von Lisiewski


English American Stomacher - RISD Museum

Manchester Art Gallery
I kept with the three daggings meeting to make it look more like Felicity's dress, rather than add additional ones.  I used silver buttons, rather than pearls, mainly because I lost my beading needle and have no idea where it is.  I need to order a new one.

The materials:

The blue silk taffeta was really only €3 a meter at my local thrift store.  Once a season, they get in the "not quite right" fabrics from the designers in Milan.  These fabrics sometimes have something wrong with them - a spot here or a bit of undyed yarn.  I saw the orange stickers on the blue taffeta but I have zero idea what is wrong with it.  It looks fine to me.  

The pink shantung I got from Silks Unlimited on ebay for $17 a yard. They, luckily, have a pretty good selection and the color was exactly what I needed. I bought 5 yards and maybe used a 1/4 of that?

The silver trim is some trim I bought, I think, back in 2016 as part of a very large, very big bin of "just take it!" at a SCA shopping event known as Holiday Faire.  The entire bin (think enough to stuff a body in tubberware container) was $15.  And yes, I stuffed all the trims from that bin into my suitcase last year and brought them over with me.  Because...necessary.

The silver buttons were also stash.

The Pattern:

Technically, I used this:

To make a Robe à la Française.  Yes, it's not a Robe à la Française pattern.  In fact, my pattern, I seemed to have lost the sleeve too.  Basically, this was only a base and I went off from there.  I also drafted my own sleeve again.

The gown:


The skirt

The gown

The stomacher looking wonky 

Me, with the dress half off!  Ha!
It's not perfect, but I love it!  I still have some of the blue taffeta and a lot of the pink left.  I might make a very different gown out of it now that the Felicity one is out of the way!


Friday, October 26, 2018

Halloween: Vannozza Cattanei's gray/green archery dress in the Borgias Part 1

The problem - because there is always a problem before the start of a project: I wanted something Venetian for Halloween - living here in Veneto- but I didn't want to do the 1550's/1560's thing because I'm trying to lose weight again. I wanted a dress that will fit for a while - which are typically the higher waisted gowns. However, I have a TON of the early 16th C gowns and didn't want to add another to my already bloated collection. Solution?


This.

I saw the gown and was immediately in love. It's very similar to many 1520's/1530's styles. Also, I happened to have a nice five yards of a lighter gray silk stashed away that was perfect for this gown. I'm not coping it exactly - mainly because I'm trying to go with mostly stash fabric - but I'm trying to copy most of the lines. So, the back...


The sleeves are detachable. There is a seam at the back sides but it looks like it has a zipper (not very Renaissance...) up the center back. Because I want to wear this to SCA events later on, I'm just doing lacing at the back sides. Also, it helps with losing/gaining weight that way. The skirt is gathered around and appears to really be just the typical rectangles with maybe some extra in the back. Again, SCA events, I'm just doing rectangles because trains and SCA events do not mix. Ever.

To start, I'm using a base I made from McCall's pattern 2806:


Really, the only thing you need to do to the above pattern to make it perfect for 1490s/1500s is take out the darts in the bodice. That's really it. The skirt is already just three rectangles put together.

I modified it slightly more than that - the shoulder straps are a bit long and the neckline is umm...more early 1520s and not sensible for anyone more than an A cup? So I raised the neckline, cut the straps slightly, also made the width a bit tighter, and I drafted out the darts so I could use this as a base.


The base!   I knew I had to add an inch or two to lengthen the bodice; I also wanted to move the side seam a bit and square out the neckline.  So, first, I drew around the existing base in brown marker.
Then, I took a red frixion (the kind you can erase!) marker and matched up the existing base back with the brown outline I just did.  I wanted to mark where I was moving the seem on both pieces and make sure the curve of the armscye was preserved.  
I only moved it over an inch, really.  You can see the new "red" outline for where I moved the seam over too.  
Inversely, on the back piece outline, I drew a red line to mark the new back side seam.
This picture is a bit hard to see but I squared off the back neckline.  I ended up doing the neckline in the back even deeper than this once I tried the mock up on.  However, the red lines mark the new template.
Front side bodice piece!   It has the new squared neckline and is lengthened.   
However, I realized when I tried to draw the correct length for the back piece that I didn't have enough room.  I ended up erasing the back piece and redrawing it all a lot higher on the paper.  
New back piece as well!!!
Comparison to the original bodice front, with the dart pinched and the new bodice front for the 1530's dress.  It's a lot longer and the neckline is higher.  Still, I realized I had a couple more issues that needed fixing still.  The underbust/rib cage waistline was 2" smaller than my actual rib cage.  My ribs do not shrink like my waist will.  They just don't.  So I ended up adding a bit to the bottom of the bodice so I can breathe.   Also, I didn't like the shoulder strap angle on the front bodice piece so I changed that as well.
The lining fabric!   I'm using teal silk dupioni for the lining.  The actual dress is out of the fabric pictured below.
This is going to be the skirt front.  It's just a 45" cut of the fabric.  The pink silk is silk I had on hand that I thought went well with the lighter gray/silver silk.  The dark lines are hunter green velvet trim.
This is the fabric for the upper sleeve as well as some trim ideas for it.  I like the idea of the pink with the silver trim.  I ordered some light green trim but it's not good for anything more than knitting or crocheting - it's recycled sari ribbon that was sewn together hastily.  I might check out the trim store here in town but, this is the direction I'm going so far.  

Saturday, June 16, 2018

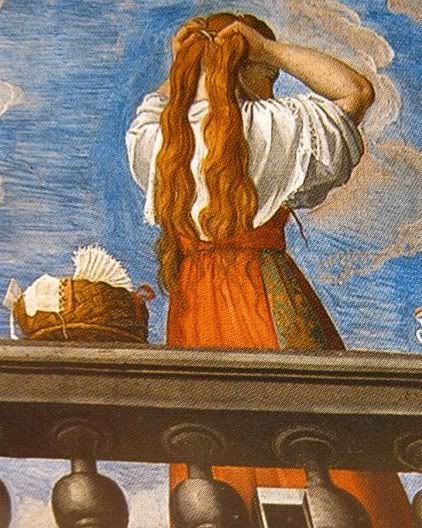
The Lady Combing Her Hair - 1530's, Bernardo Licinio


A couple of years ago, this painting began to circulate in the Renaissance costuming circles like wildfire.  The question that came up was a simple one; what the heck is she wearing?  Theories included some sort of petticoat stays despite it being the wrong region and a few decades two early, some sort of white gown, or just some early prototype of stays.

The painting is housed at the Belluno Civic Museum.  The museum isn't as grand as some of the others I've been to in Italy but it does have a few curious pieces, such as this beauty.   The painting is large and it's easy to see details in it.   That said, I'd like to start with tackling the petticoat stays theory regarding this painting.

Many people theorized the petticoat stays due to the fact she's combing her hair, her sleeves are rolled up and the lines in the painting make it look like stitching lines you'd see in stays.   However, this is not the only painting to show a woman doing her hair or with her sleeves rolled up.

   The above is from much later in the 1580s and was painted by Alessandro Allori.  It's part of a ceiling in Florence.   The lady is putting ribbons in her hair to wrap it up around her head.  Also, notice, she too has her sleeves up.  If you have big baggy sleeves, you'd want them out of the way too when you are doing your hair.  It's highly annoying otherwise.  

However, having rolled up sleeves wasn't just a "brushing your hair" thing.  This lady, from 1548, is currently house in the Louvre.   However, the painting is done by the Venetian artist Veronese.  Starlight Masquerade has a much large photo with a bit more information.  The nice thing about this painting is that it's closer to the time period suggested by the museum of the lady combing her hair painting.   

Of course, the important thing that has confused many people are the apparent lines that suggest stays.  Having seen the painting in person, I can say they aren't stitch line.  Really, is a combination of the painting being old and wrinkled (maybe it's the lines of the canvas underneath?) and what were probably, orginally, pinstripes.


Close up detail of the shoulder area.  Here, you can faintly see what look like white on cream pinstripes.  The dress is a different color than the chemise and the partlet underneath.   This is even more apparent in person than it is here.  


This is what killed any idea that is could be any type of petticoat stays.  The lines are on the skirt as well.   However, notice that you can see two distinctive folds in the skirt - one in the dead center and another near the ring finger.  This appears in a few other paintings and may be some sort of dog-legged closure.
The strips and gathering in the skirt are even more apparent beneath her arm to the right of the comb.  If the bodice of the gown was made into stays, then the skirt wouldn't have the same, even lines.  


Really, it reminds me of the fabric shown in Marietta Robusti's self portrait from much later in the century.


Although I'm personally now sure that the painting shows a dress and not any chance of it being stays, what has me still curious about it is the dating.  The lady combing her hair looks to be from at least a decade or two later than the given date.  By the tail end of the 1530's, the pointed waistline came in but this seems to fit more with the 1540s or 1550s overall in style.   Rather than the 1530s as the Museum has it, I'd put it in the 1540s.   


Friday, March 27, 2015

Historical Sew Fortnightly March Stashbusting Challenge

The Challenge:March – Stashbusting: Make something using only fabric, patterns, trims & notions that you already have in stash.


Fabric: A I'm-not-sure-what-it-is-but-it-has-silk lampas like drapery fabric probably circa 1976. I also used dark green silk dupioni and sand colored linen in the dress. Oh, and muslin...

Pattern: My own! :-)

Year: 1750's/1760's more or less

Notions: Silk thread, cotton thread, ribbon trim

How historically accurate is it? It looks much better than it actually is. The fabric is too heavy for the period but the design is pretty well in keeping with the later half of the 18th century styles (mix of floral and stripes). All the visible stitching is done by hand as are the stitches holding the skirt pleats to the back bodice.

Hours to complete: If it weren't for the sleeves, I'd guess only 16 hours or so. Because of the sleeves, it took 22, I think...

First worn: Hopefully, this Saturday!

Total cost: All stash! Every last thing. The linen I used for the hem was one of those Joann's remnants I hoard. It was a half yard and 50% off so, maybe $4.50 USD? The green dupioni was also a Joann's remnant. Probably another $3 or $4 USD there. The main dress fabric I bought back in November off of ebay for $17.99 USD with another $16 for shipping (did I mention it's heavy?). The silk thread I got on sale for $2 sometime last year (I just remember there was a sale on silk thread so I gobbled up a few different colors). The trim....I don't remember where I got it or how much it was. I *think* it was one my NYC trips but I really don't know. Knowing me, I doubt I paid more the $2 a yard.


I draped the patten using an old bedsheet.  I've mentioned before how much I hated these sheets.  They used to be in my room at my family's beach home.  When Mom said she got them from my room, I thought she meant the lovely blue and white ones....  

Anyway, I originally cut it to do a closed front anglaise but I didn't like that idea and went with the stomacher front instead.

The back pleats are all very pinned into place.  Only the right side is draped and drafted for the final pattern in this photo.  


This is what my animals were doing while I was draping fabric.
Eventually, Abby decided to investigate why I was taking pictures of things other than her.  This is the final pattern for the back, front, and sleeves of the dress.

I cut out and pleated the back as well as I could.  It's still a little wonky at the top but if it really bugs me later, I can always patch it over with more fabric.  

I had to cut the fabric long ways and make sure the floral pattern was running down the dress correctly. More on the fabric itself later.


To do the front robing, I just made the fashion fabric 2" longer width wise towards the front.  I then sewed it to the lining along the front edge.  Once I matched the side edges together, this created a small overlap in the fashion fabric towards the front.  I stitched along the channel (where the fashion fabric met the lining at the front) by hand and used this as a guide to fold the robings.  


This is where I folded it and hopefully the photos make more sense.  I then ironed it down before attaching it to the back bodice section.  


The full finished dress!!


Close up detail of the sleeve.  I added the ribbon trim to the cuff edges as well as the front of the stomacher.  Despite having five yards, just doing the cuffs and the stomacher used every last inch of trim I had.

The back of the dress.  It looks more wonky that it really is because the dress dummy doesn't have arms.

The lining of the cuffs.  I wanted something that would go well with the dress.  I was going to cannibalize a UFO that had spring green silk when I saw this dark green remnant in my stash that went a lot better.  (okay, I compared the spring green to the fabric and...no.  Just no.  So I ran back and got the dark green.  It looked way better) 


The stomacher front.  I took what was left of the trim and ran it down the center stripe.  I had just enough left.

And this is what is left of the fabric I used for the dress.  It's maybe a half yard.  It's enough to do the sleeves over if I wanted to.  

Evil sleeves.   Okay, so the first time I put them in, it was totally my fault.  I matched the seams wrong and had to rip them out.  Fine.  Then the right sleeve kept giving me trouble.  It would bunch up at odd points or it wouldn't line up correctly.  It took 3 1/2 tries (the last time it bunched up , I just ripped out that section and redid it) before the sleeve looked okay.   

The fabric:  Well, truth be told - you are looking at only 4 yards of fabric.  With most 18th C dresses, you do need 9 yards - and even that doesn't feel like enough- because you need the matching petticoat, the dress, the self trims....tons and tons of fabric.   This fabric is over 52" wide (I'm not sure by how much, I measured the skirt and its 104" around so...not sure how much got eaten up into the seams).  This helped a lot for the skirts.   The front skirt is just a rectangular panel - 41" long- that I pleated to a strip of the fabric (3" wide strip that folded over).   The back of the dress isn't much different (just the back panel of the bodice plus a 41" long skirt).  Because of this,  I cut out the front from the excess above the back panel skirt, next to the back bodice.   

The sleeves and cuffs were cut out from the remaining fabric and the stomacher was cut out even more scrap (from next to the front bodice piece).  I used a little less than 4 yards to make the dress.  

Inspiration:

Dress at the Met circa 1760
This was the main inspiration for my dress.  I was going to do the self trim along the opening but the fabric really is just too heavy to do that well.  That, and I didn't have any of the ribbon trim left. ;-)
Other inspiration pieces included this early 1770's dress at the Met, this pink and green dress recently sold at Christies (probably early 18th C based on the robings), and this one at the Met as well.  

Because of the yardage issue, I liked the idea of a closed front dress.  I liked the overall style as well because none of them are overly trimmed - it's more about letting the patterned fabric speak for itself.