Tuesday, August 16, 2016

Sling for a little boy


One of my co-workers was telling me today about how her five year old boy fell and broke his arm in two places. Eck! Poor baby got out of surgery around 3 am, woke up around noon, and was asking for his Mom (her sister was with him), so she left work to go see him. He's more upset that he might not be able to play sports than he is about the break itself.

My co-worker told us (myself and a few other co-workers) that her son loves Teenage Mutant Ninja Turtles or anything with Ninjas. So, I decided to make him a simple sling for his arm. It's just a 12" square with a slight curve for the elbow. It's a very simple pattern that, I hope, will fit him. If not, I have a lot of fabric left over. The strap is adjustable with the buckle towards the front.

Monday, July 4, 2016

Pennsic Dresses!

I've now finished my 1500's orange linen Venetian.  I've posted about the 1570's green linen and I've also finished my own 1570's purple linen that is similar to my sister in laws.   These are the photos my brother took for me of each of the dresses.  Unfortunately, I didn't lace the purple linen one correctly and didn't realize it until I took the dress off.  It is the only one that is 100% hand sewn.  The other two are a mix of hand sewing and machine sewing.


The green one is really a linen cotton blend.  The purple is purple linen that I made into a bias tape to use as trim.  This dress was very pieced as I only had a little over three yards to deal with.


I'm not completely happy with the purple linen one - the back came out a bit wonky.   However, it fits and it is hand sewn.  Even the lining is linen.  


I know, I have my eyes closed in the first photo.  :-)  I love, love this style because it's so comfortable and easy to make.  The trim is one I've had in my stash for years.  This only took me a day to make - I machine sewed the seams for the sides of the bodice, the sides of the skirt, the hem of the skirt, and attaching the hand gathered skirt to the bodice.  The skirt was hand gathered, the neckline was whip stitched closed, and the trim was hand sewn on.  Of course, the inside of the bodice and the eyelets were hand sewn as well.  

Right now, I'm working on another Italian dress - 1490's this time- which I hope to share by the end of the week.  

Saturday, July 2, 2016

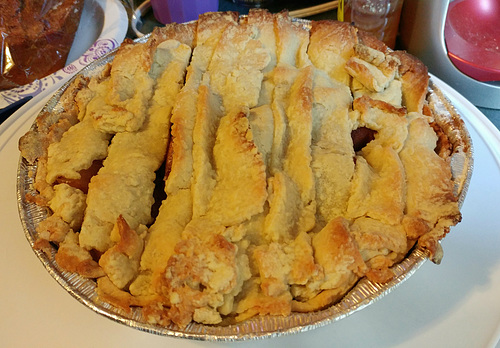
Medieval Apple Pie Perfected!

Apple pie


Long time readers will know that for years, I've tried to work on making a good, yummy, apple pie that was also period correct for the SCA. My favorite recipe is a 16th c one. And while the filling is delicious, the crust always left something to be desired. Until now.

Earlier this year, I tried a new way to make a 15th C pie crust but it wasn't quite there. However, I knew I was finally on the right track. This is what I did this time.

First, the recipe for documentation purposes:

then make a dough of sugar, flour, oil, water and salt, mix them together to make the dough, spread it over the bottom of a low pan, and put the mixture in so that it is no more than a finger deep; cook it in the oven or on the fire as is directed for the other tortes; when almost cooked, get wafers, crumble them over the Tart - those wafers should be made with good sugar; when cooked, garnish with sugar and rosewater. (Italy, 15th C)

Then, what I used:

  • 2 1/4 cups flour
  • 1/2 cup of sugar
  • 1/2 cup of oil
  • 1 teaspoon of sea salt
  • 1/2 cup ice cold water


Basically, I cut the oil down from last time and dramatically increased the sugar in the crust. I also kneaded in more flour than is shown here before rolling it out. After mixing everything together and rolling out the dough, I put half the dough in the pie pan and baked it for about 12 min at 375F. The other half I cut into strips to add as the cover for the pie.

The filling was the same as always, sugar and cinnamon on top of the boiled apples. It's simple, it's period, and it's delicious.

The nice thing about this crust is it's thin, it's flaky, and it's pretty good on it's own - basically, everything you want in a crust. Also, it's period correct for the 15c and it's correct for Lent. Yay!

Sunday, June 19, 2016

Victorian Bathing Suit!

A couple of months ago, I wrote on some common myths about Victorian and Edwardian bathing suits.  While doing the research, I fell in love with one of the bathing suits I came across:

I adore the short sleeved bathing suit from 1870.  Since I had a Victorian seaside party to go to, I thought what is essentially to the modern eye capris and a short sleeved bolero with a button up vest is far more practical than making a silk bustle dress (I have some lovely orange silk and white silk brocade.  One year, I will make the orangesicle dress!).

Since the theme for this month in the Historical Sew Monthly is travel, I realized that a Victorian Bathing suit would be perfect.   After all, even then, if you were traveling to the beach to take in the vapors (or get away from them) you needed your bathing suit.

My first thought for making my own bathing suit was to use white and red wool - as these were popular colors- and then I thought "but what if it really gets wet?" and struck that idea out.  White fabrics and water tend to make the white fabrics see through.

I ended up doing black and hot pink mainly because that was what was in the stash (but also because it matches my hair now!)

Like most first wearings, I do know I need to edit it a bit.  I made the front too low cut - it was easy to deal with with a chemise top underneath and I had seen chemises poking through in some later Edwardian photographs.

The skirt isn't quite the right shape and is too long - it's actually a pretty simple recut since all I did is take a rectangle of fabric, line it, and pleat it to a waistband.

Better buttons on the knees - one popped.  Whoops!

Still, I'm pretty happy with it and the way it came out.

This was the initial try on over my pj's.  I was just pleased it fit...particularly as this was midnight and I had to wear it when I woke up.  :-)

The Challenge: 
June – Travel – make a garment for travelling, or inspired by travel.
Material:
Lightweight black wool and lightweight pink wool twill
Pattern: 
A couple of different ones with some edits of my own. For the bloomers, Butterick B4861. I've used the long version many times for work pants. The short version (View B) looks like Victorian bicycling pants so I used that as is with only a minor addition: on the legs, you have to add an 1" width to the front and back at the inside from the crotch down.  They made the pattern without enough in the seat for most people.
For the jacket, I used Butterick B5232. I've used it before and know it's a bit on the loose side for what I wanted this time around.

So, after cutting it out, I checked it over the corset on the dress dummy to make it more fitted. The faux vest front and the skirt are both my own patterns and additions.
Year: 
1870

Notions:
Buttons! Hooks and Eyes! Ribbon! I used jet buttons for the vest front and the knees of the bloomers. I used mother of pearl looking buttons for the skirt. Hooks and eyes everywhere else. The ribbon was used to make loops for the buttons on the front of the vest.

How historically accurate is it?
They had sewing machines! The ribbon isn't a period material but the rest of the outfit is pretty close to what would have been worn.

Hours to complete:
About six or seven

First worn:
June 18, 2016

Total cost:
The pink was left over from my pink wool Italian dress from three years ago. The black I *think* I got at the thrift store but I really do not remember. The buttons were thrift store purchases - I bought a huge bag full for $1. Since it was all either left overs or stash, this probably wasn't more than $5 (I'm trying to remember how much the black wool was! Most of the thrift store fabrics are under $5).

In the end, I'm glad I wore this.  It was comfortable (it's capris and a short sleeved top so...yeah.  It's a bit too similar to what I normally wear.  :-) ) and I loved not worrying about getting it messed up (it's mostly black and wool - it can handle dirt).  With some minor changes, I will be wearing it again.

Sunday, June 5, 2016

Mostly Done Late 16th Century Italian Dress

Inspiration:


1570's (?) Italian Peasant

1560's Italian


After figuring out how small I had originally cut the bodice for the green linen dress, I used the scrap to piece together another bodice. The trim lines hide a lot of the piecing pretty well. The dress is half machine sewn, half hand sewn. I still need to do the eyelets which is why it's only mostly done.


The last picture, the one of the close up front of the bodice, is the most true to color. It's a bright green but not neon. The purple is a true purple. I hope to wear the dress in a couple of weeks. I used the same mccalls pattern as last time but, this time, I made sure I measured each piece before cutting it out. The front is pieced under the outer trim and the back is pieced both directly in the back and under the arms. Luckily, piecing is period!

Tuesday, May 31, 2016

Historical Sew Monthly: Holes

The Challenge:  
  • May – Holes – sometimes the spaces between stuff are what makes a garment special.  Make a garment that is about holes, whether it is lace, slashing, eyelets, etc.
Material:  Linen
Pattern:   I used the bodice from Mccall's M5444 as a base.  From there, I lengthed it slightly, took out the darts, and just used the length of fabric for the skirt.  
Year: 1570's   Italian

Notions:  Cotton Thread and a piece of ribbon to lace with since I couldn't find my normal laces
How historically accurate is it?    The entire dress is handsewn.   Linen and cotton are both period correct for Italy - Italy not being far from the cotton capital of the 16th C world, Egypt.   The cut is correct and the colors are correct.   
Hours to complete:    I have no idea.   It got thrown in the corner for a bit when I realized I cut it out too small for me.  However, I realized it would fit my sister in law perfectly...
First worn:  Probably not until the fall when we get to go to the Maryland Renaissance Festival.  
Total cost:  about $10.  The yellow saffron trim was scrap from another dress.  The purple linen I got at the thrift store for under $5.  The blue lining was originally white that I got at the thrift store for $4.   The thread I had on hand.   The inner lining was stash but even it was only $1 a yard when I bought it.


Although holes can be decorative in clothing, they can also be practical.  In this case, the eyelets are meant to be holes for lacing the dress shut in the front.  There are also holes at the top of the shoulder straps to lace sleeves to the dress.  A peasant wouldn't spend money, necessarily, on buttons or hooks and eyes - eyelets are a cheap and easy way of getting the job of keeping the clothing closed.  

Friday, May 27, 2016

Pink Cape For a Little Girl


It's rather simple but I wanted to post this because it's the first thing I've completed on my old sewing machine that I've started to use again.  My singer finally gave up the ghost (I've had it for five years of near constant use) and I realized that five years ago my sewing machine expertise weren't quite what they are now.  So, I took out my old sewing machine, a EuroPro, to see if I could fix the problem.

Five years ago, I was very frustrated with it and was going to take it in but realized that just buying a new machine would be cheaper so...the EuroPro went to sit in the corner like a bad machine.  I never went to get it fixed because the Singer worked so well for so long!   However, after the bad, impossible to fix, issues the Singer gave me, I dug the EuroPro back out.  The problem?  The tension was off.  Within a minute I had it working good as gold.  /facepalm.  Oh well, good thing I never got rid of it!

So this pink and green cape was sewn on the EuroPro.  I'm doing the Reddit Santa thing again and the lady I got said she has two pups and a 6 year old girl.  Both Mom and Daughter's favorite colors are pink and green.  I went to Joanns and picked up some pink cotton flannel and basic green broadcloth.  I only got a yard of each.  The cape is just three panels - one cut on the fold.  the hood is two rectangles.  The straps are just scrap pink flannel that I folded over and stitched down.

I pleated the hood to the neckline of the cape, leaving a few inches on either side of the opening free.  I bag lined most of the rest of the cape - just pulling the hood through the very bottom back of the cape and then sewing that shut.   It's simple but I think it's cute.   I'm hoping the 6 year old Daughter likes it.   I think every kid needs at least one good cape growing up - whether to play superheros or fairy tale characters.