I'm not at Pennsic due to sudden changes in plans. I really REALLY wish I was there but it's just not possible right now. Seriously, I would LOVE to be there.
Since I can't be, I've been working on other things - such as my homepage. I've had the http://www.strawberriesncreame.com for about a decade. I haven't done anything with it since 2007 or so. I sort of left it to die, really.
However, this past Friday, I worked on it, did up some new graphics, and revamped the entire thing. Feel free to take a look and tell me what you think. It's not perfect yet but I've gotten it into "alive" condition. :-)
I'm currently finishing up or reworking about six different outfits. Pictures when I'm done with them - hopefully tomorrow!
Sunday, July 28, 2013

Tuesday, July 23, 2013
Progress!

The Vampire Dress! I threw the veil over the headless, broken, dress dummy just to show the color contrast. I'll do a full write up for the Historical Fortnightly (Doctor Who is historical! ...Yeah, I know. But this dress actually does follow the lines of the back lacing 1580's gowns enough that I can easily wear it again without the blue veil.) The sleeves are pinned on in the photo - I'll add lacing rings tomorrow. The insides are not sewn up yet. My dress dummy is broken and doesn't have hips which is why it looks very long waisted. It's not.
More pictures tomorrow when it's completely done - I just wanted photographic evidence that it was in dress form before midnight...although it's after midnight now when I'm posting. ;-)
Eh, it works.
This will be so much fun to walk in for opening ceremonies on Saturday!
Saturday, July 20, 2013
Challenge Accepted!
I'm going to Pennsic in about a week (OMG! PENNSIC!!!!!!!!!!!!!!!!11!!!!!) and beyond being super excited, I'm trying to get a bunch of things done for Pennsic. I'm almost done sewing up my friends' wardrobe but I also now need to work on mine. You see, I found out that it's going to be cool this year - not warm. I'm used to the 95 during the day/ 45 at night Pennsics. This is going to be 75 during the day. ....
So....my thin linen chemise and linen dresses probably aren't the best idea then, right? Right. I have velvet gowns - which I'm bringing- but then I ran into another problem.

So....my thin linen chemise and linen dresses probably aren't the best idea then, right? Right. I have velvet gowns - which I'm bringing- but then I ran into another problem.
***Opening Ceremonies will take place at ~~~ 8 PM Saturday July 27~~~ Please gather in Atlantian Royal on N40 about 7:30 so we can form up and process in our usual Grande Atlantian Style. Please, if possible, wear Blue and/or White and, if you have any appropriate banners or pennants, please carry them that day.
Although I have a lovely blue linen dress, I have nothing in an appropriate shade of blue or white that would work for Opening Ceremonies. Hmm...
Then I thought of my little blue box....
And Venice....
And....
My little geeky heart could not look back. The veils are blue. The dresses are...well, off white... but how can I say no? I need to make a Vampires in Venice outfit because it just so needs to be done.
So, research!
After DVRing the episode and watching it about as many times as the Girl in the Fireplace one (face it, fellow costumers, if you like Doctor Who, you already know exactly which episodes these are and why I'd watch them a gazillion times over), I realized each of the dresses are different. Only today I found a picture that confirms that:
 The dresses range from white to a yellow cream color. Most are done in some pseudo mid 16th C style with some more accurate than others. Some have a print on them, some don't. Luckily for me, all the "vampires" are brunettes. :-) I'll fit right in.
Supplies:
I have a white lace parasol and a pair of white gloves. I really just needed the correct color sheer material for the veil and something vaguely white to ivory - preferably with a print- for the dress.
I'm debating about getting this GORGEOUS cotton jacquard at Joanns that has a peacock feather print. I'm going to double check my bins of fabric to see if I have anything that might work. I recently used a lot of it up so I don't *think* so but we all know that means very little.
As for the veil:

The color could not be more perfect. I found it at Wally World for $1.50 a yard. Yes, it's 100% dead dino but the color and the weight are just what I need. Besides, this will be at 8 pm when it will already be cooling off rapidly. I probably won't wear this through out the day. (Okay, maybe I will. I want to see how many people scream when they see me.)
Fun time! Now, to make this and at least one other dress plus finish the doublets in under a week. Challenge: Accepted!
So, research!
After DVRing the episode and watching it about as many times as the Girl in the Fireplace one (face it, fellow costumers, if you like Doctor Who, you already know exactly which episodes these are and why I'd watch them a gazillion times over), I realized each of the dresses are different. Only today I found a picture that confirms that:
Supplies:
I have a white lace parasol and a pair of white gloves. I really just needed the correct color sheer material for the veil and something vaguely white to ivory - preferably with a print- for the dress.
I'm debating about getting this GORGEOUS cotton jacquard at Joanns that has a peacock feather print. I'm going to double check my bins of fabric to see if I have anything that might work. I recently used a lot of it up so I don't *think* so but we all know that means very little.
As for the veil:

The color could not be more perfect. I found it at Wally World for $1.50 a yard. Yes, it's 100% dead dino but the color and the weight are just what I need. Besides, this will be at 8 pm when it will already be cooling off rapidly. I probably won't wear this through out the day. (Okay, maybe I will. I want to see how many people scream when they see me.)
Fun time! Now, to make this and at least one other dress plus finish the doublets in under a week. Challenge: Accepted!
Friday, July 19, 2013
How to take a commercial pattern and make it into a reasonably period pattern
Most of the big 3 pattern companies have the same issue when it comes to historical costuming; they aren't correct. The big 3 patterns are for people who want a cool costume to a party - not really for those that want decent garb or historical clothing. So what do you do if you want a nice piece of garb but can't really draft your own patterns yet? This tutorial is to show you how to take one of those big 3 patterns and make it into a reasonably period cut pattern for a bodice.
First, the supplies!
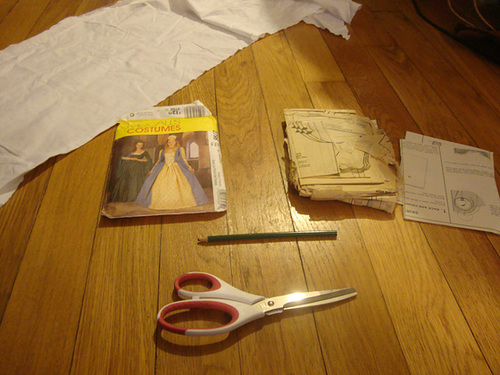
You'll need a "historical" pattern, sewing pins, a pencil (or something else to trace with), scissors, and material to transfer your new pattern on to (you can use a sturdy paper as well. I just like muslin.) For this tutorial, I used McCall's 2798. It's OOP but it's a cute "Renaissance" dress. What I really liked about the pattern for this tutorial is that the bodice has both a princess seam and darts - two big No Nos in 16th C costuming.
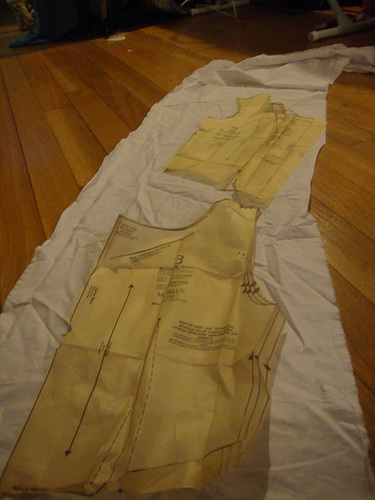
For any basic pattern, you really only want to cut out the bodice pieces since it's the most structured. You *might* want to cut out the sleeves as well depending on the era you are attempting. Post 17th Century, you need the sleeve pattern as well. 17th C and earlier, it's normally pretty optional when it comes to Western European costume. The skirt to any dress is normally 4/5 yards of fabric pleated/gathered to the bodice. You might have to adjust it for the front "point" a bit but the skirt really tends to be nothing more than a very long piece of fabric. Hence why I didn't bother to cut it out.
We'll start with the back bodice piece and the darts.
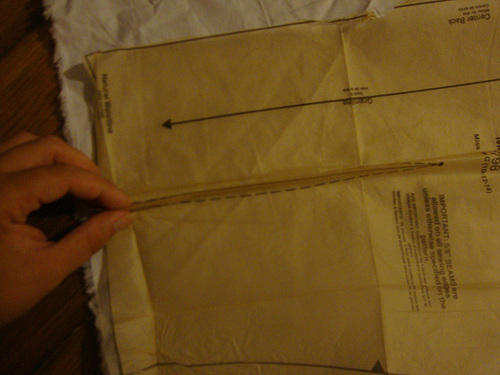
I pinch the bottom of the dart until the dotted lines line up. I then fold the dart down - as you would if you were making the dart in fabric- and pin the pattern down.
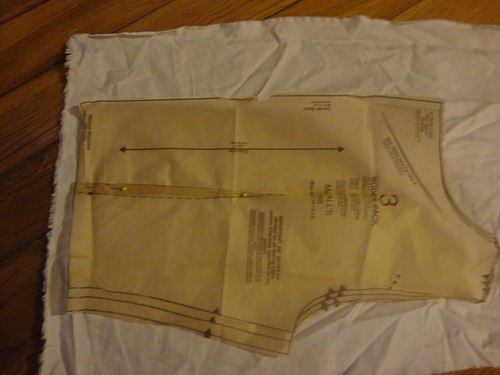
You can see the dart is pined on the pattern. I haven't pinned the rest of the pattern simply because I cut the pattern too big many years ago and need to resize it for the smallest size.
Once the dart is taken out of the pattern (remember, don't pinch the fabric WITH the paper), you trace around the paper on the fabric with your pencil.
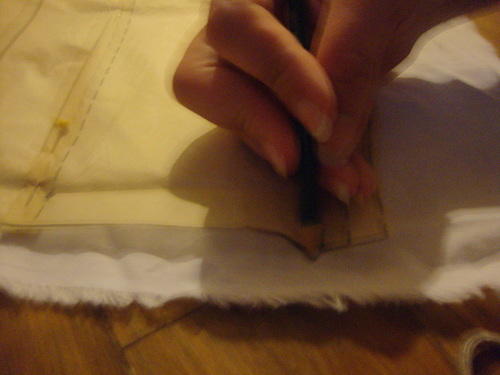
Sorry the picture is blurry but I wanted to show that I really am just tracing around the edges. Taking a picture with one hand and tracing with the other was interesting!
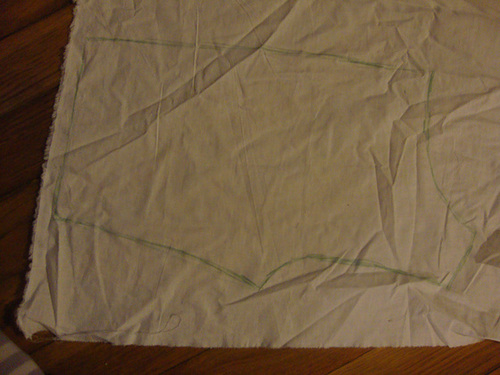
The new bodice back! If you are doing under arm lacing or front lacing, this is fine. However, if you want to do side back lacing, we need to go through a couple of more steps after we trace the front piece.
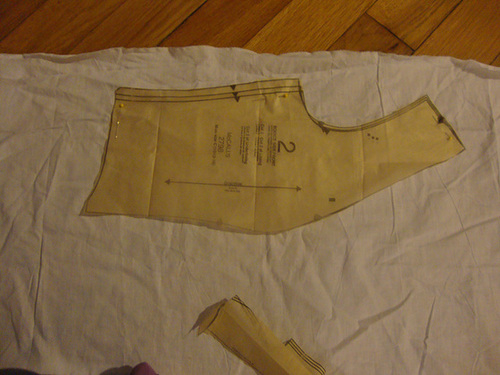
For the princess seams in the front, you want to place the piece with the armscye down first. Pin the sides but not where the princess seam is.
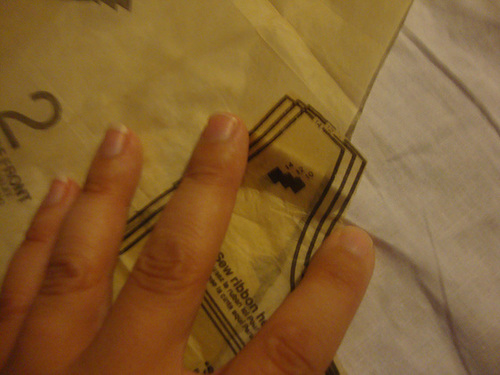
Take the front piece you haven't pinned (it's basically a stomacher) and match the squares from the front piece to the front side piece. Do not match the triangles. Once you have it fully placed, the triangles will be across from each other - not directly on top of each other unlike the squared. Pin the top in place.
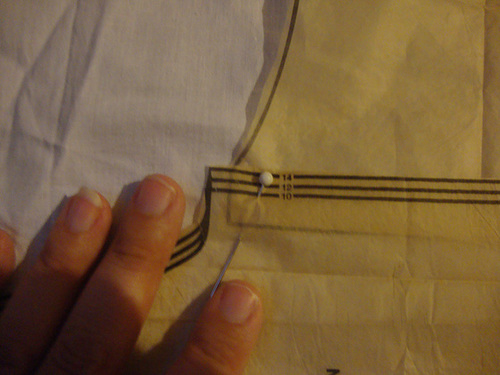
Match the bottom of the front and front side as best you can. When you trace, just smooth that small "notch" out by flipping up that corner and creating a smooth curve.
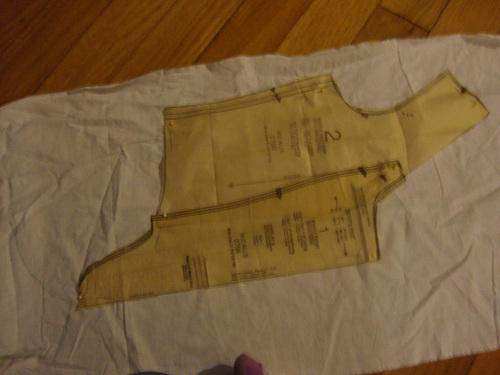
What the pinned front looks like. Trace around this.
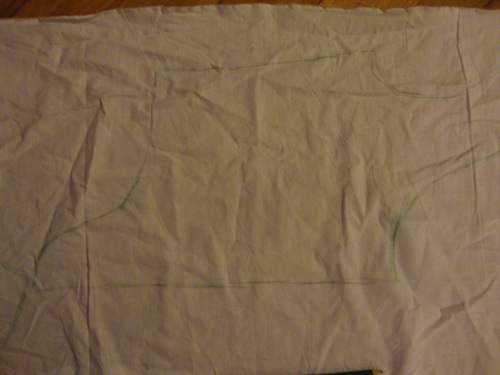
Cut out your new bodice front and back!
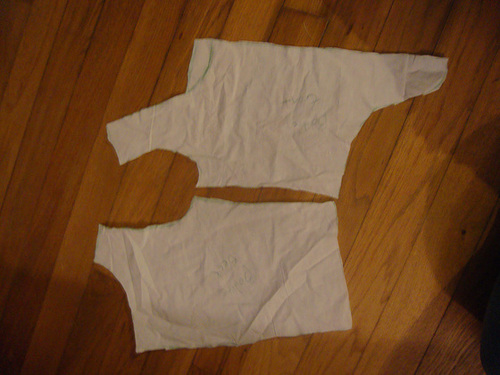
Now, to make it lace at the back sides, you need to make a new front bodice piece.
Fold the back bodice piece back to create a smooth line from the back strap to the back waist line. Place this and the front bodice pattern you just created on to the muslin again.
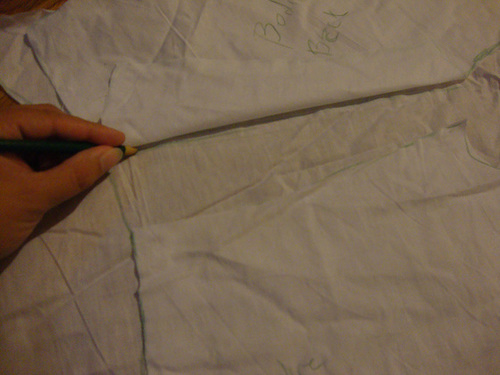
Trace the new folded edge of the back piece and draw a line to the waist edge of the front piece. Re-trace the rest of the front piece and follow with extending the armsyce curve to the new folded edge - creating a new front piece.
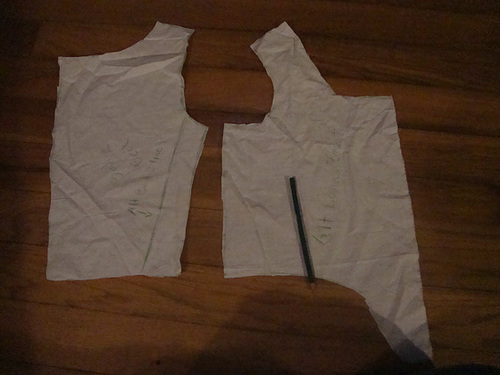
This is the new front piece shown with the bodice back. I just draw a line to show where I folded the back piece. There really isn't a reason to waste more fabric and create a whole new back piece.
You can play with necklines and use this "new" pattern to make a variety of styles. However, without the darts and princess seams, the pattern is now a lot closer to something they would have used in period to create a dress or gown. It's not perfect - the neckline is too low in the original pattern (I raised it up when I traced to create a square neckline which is why you see a curvy green line beneath the straight neckline of the new bodice front) and the back should probably be a bit lower as well. However, this is a thousand times better than the original for creating garb that you will wear for years to come.
I hope that helps! Please feel free to ask questions or add comments below.
First, the supplies!
You'll need a "historical" pattern, sewing pins, a pencil (or something else to trace with), scissors, and material to transfer your new pattern on to (you can use a sturdy paper as well. I just like muslin.) For this tutorial, I used McCall's 2798. It's OOP but it's a cute "Renaissance" dress. What I really liked about the pattern for this tutorial is that the bodice has both a princess seam and darts - two big No Nos in 16th C costuming.
For any basic pattern, you really only want to cut out the bodice pieces since it's the most structured. You *might* want to cut out the sleeves as well depending on the era you are attempting. Post 17th Century, you need the sleeve pattern as well. 17th C and earlier, it's normally pretty optional when it comes to Western European costume. The skirt to any dress is normally 4/5 yards of fabric pleated/gathered to the bodice. You might have to adjust it for the front "point" a bit but the skirt really tends to be nothing more than a very long piece of fabric. Hence why I didn't bother to cut it out.
We'll start with the back bodice piece and the darts.
I pinch the bottom of the dart until the dotted lines line up. I then fold the dart down - as you would if you were making the dart in fabric- and pin the pattern down.
You can see the dart is pined on the pattern. I haven't pinned the rest of the pattern simply because I cut the pattern too big many years ago and need to resize it for the smallest size.
Once the dart is taken out of the pattern (remember, don't pinch the fabric WITH the paper), you trace around the paper on the fabric with your pencil.
Sorry the picture is blurry but I wanted to show that I really am just tracing around the edges. Taking a picture with one hand and tracing with the other was interesting!
The new bodice back! If you are doing under arm lacing or front lacing, this is fine. However, if you want to do side back lacing, we need to go through a couple of more steps after we trace the front piece.
For the princess seams in the front, you want to place the piece with the armscye down first. Pin the sides but not where the princess seam is.
Take the front piece you haven't pinned (it's basically a stomacher) and match the squares from the front piece to the front side piece. Do not match the triangles. Once you have it fully placed, the triangles will be across from each other - not directly on top of each other unlike the squared. Pin the top in place.
Match the bottom of the front and front side as best you can. When you trace, just smooth that small "notch" out by flipping up that corner and creating a smooth curve.
What the pinned front looks like. Trace around this.
Cut out your new bodice front and back!
Now, to make it lace at the back sides, you need to make a new front bodice piece.
Fold the back bodice piece back to create a smooth line from the back strap to the back waist line. Place this and the front bodice pattern you just created on to the muslin again.
Trace the new folded edge of the back piece and draw a line to the waist edge of the front piece. Re-trace the rest of the front piece and follow with extending the armsyce curve to the new folded edge - creating a new front piece.
This is the new front piece shown with the bodice back. I just draw a line to show where I folded the back piece. There really isn't a reason to waste more fabric and create a whole new back piece.
You can play with necklines and use this "new" pattern to make a variety of styles. However, without the darts and princess seams, the pattern is now a lot closer to something they would have used in period to create a dress or gown. It's not perfect - the neckline is too low in the original pattern (I raised it up when I traced to create a square neckline which is why you see a curvy green line beneath the straight neckline of the new bodice front) and the back should probably be a bit lower as well. However, this is a thousand times better than the original for creating garb that you will wear for years to come.
I hope that helps! Please feel free to ask questions or add comments below.
Saturday, July 13, 2013
Historical Fortnight #14: Eastern Influence
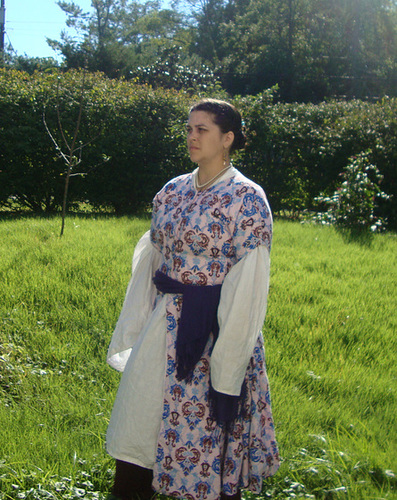

The Challenge: Eastern Influence
Fabric: Linen, linen, and more linen...with a silk scarf but I didn't make that
Pattern: My own! Seriously.
Year: 16th Century but more towards the middle
Notions: Very evil purple thread that wanted to break every foot
How historically accurate is it? The fabric is correct, the cut is correct, I did machine sew it but the only non-handsewning that is visible on the coat are the buttonholes.
Hours to complete: More than it should have been. The stupid purple thread kept breaking as I was sewing on the machine
First worn: At Pennsic
Total cost: I got all the fabric on sale a year ago when I first saw the print. I think the total is rougly $55 but I'm not sure.
And now, the rest of the story! I love the Turkish coats of the 16th C. They were worn in Turkey and Italy. You can see a few pins of paintings depicting ladies in Italy wearing the Turkish style. It was popular and it is comfortable. I went with a linen print that really does mimic some of the prints of the day. The pants I plan on wearing with the coat are out of a purple linen. I already have a chemise as I've worn this style before. It's great for Pennsic mainly because you are wearing pants and don't have to worry about your hem dragging through mud.
Feel free to ask questions! I have a link to my old documentation for this style above.
Saturday, June 29, 2013
A&S Project
Below is my documentation for my entry into the Religious A&S that was held in June 29th 2013 at Storvik Novice. The first judge was less than kind. His first words were "Well anyone who knows how to cook would know this is wrong" upon seeing that the filling to the apple pie was watery. I was in a hurry an put too much brown sugar in it. Not a big deal, normally, but when I tried to explain that no, it wasn't because the apples weren't cooked right - his explanation- but because I put too much brown sugar, he got even more huffy and declared "It's still wrong!" and went all Gordon Ramesy on my apple pie. Er...this is a Novice tourney? I've been cooking medieval style for two years? And that is NOT the way a judge should act - particularly when you are showing someone else around. The saddest part is that it wasn't just my entry. He went crazy when the individual who made the sekanjabin had they syrup out and hadn't put out ready made sekanjabin, even though their documentation stated what they had done. He declared that "How dare they serve it to me like this!" No, seriously. Followed by a mini rant of how this is not how it is done and how they should have had it already watered down. 0_o? Umm...maybe it's just me, but I'd like to taste the syrup to see what the full flavor is. Plus, if he was serious, the water ten was only ten feet away. It wasn't like he could grab a glass and water it down himself...
Anyway, the other judges seemed nicer and I did get a lot of compliments on the bread from everyone else. The lady running A&S "stole" the bread and was eating it as her lunch. So, clearly, it wasn't a total loss.
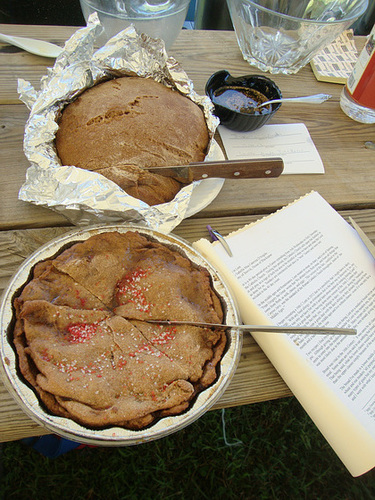
Lent is a 40-day period prior to Easter extending from Ash Wednesday to Holy Saturday in the Catholic Church. During this period, the Catholic Church calls upon the faithful to fast and pray as a sign of faith but also to be mindful of what we have and what the Lord has done for us. Sundays are considered feast days (a "mini" Easter) and were not included in the 40 day count.
In the middle ages and Renaissance, Lent meant no meat, no diary, and a lot of fasting. "Pope Gregory the Great wrote that 'We abstain from flesh meat, and from all things that come from flesh, as milk, cheese, and eggs.' This version of the fast, codified in the Corpus Juris, was the standard of the Roman Catholic Church throughout most of the Middle Ages."[1]
I began recreating a 16th C Lent in 2012 due to a possibility that I might have a dairy allergy. With any food allergy, an elimination diet is the best way to discover it, so, my thought was why not have fun with it and learn about medieval cooking during Lent? I have learned a great deal - now having done some version of the 16th C Lenten diet twice- including the fact that, yes, I am allergic to dairy. However, doing the "medieval thing" helped me cope a great deal with the dairy allergy as they already figured out how to bake without milk in the middle ages and live without cheese - even if it was only for a month and a half out of the year.
Two recipes I find myself making a lot during Lent are a medieval bread recipe and apple pie. Although giving up sweets is popular for Lent in the modern era, this idea didn't seem to enter into the medieval mind at all. Many recipes call for sugar or honey.[2] This was most likely due to the amount of food they were already giving up.
Bread was vital in the 16th Century.[3] It was eaten by all classes and was central to the meal. Some saints are even said to eat nothing but bread with herbs during their fasts. [4] That being said, what the lower classes would have enjoyed as a bread would be different than the upper classes simply because of the access to better milled wheat.
The bread I've made is a lower middle class type bread. The flour is a mix of whole wheat and our modern "all purpose" flour. In period, the flour could have been from many types of grain but my own food allergies prevent me from using two specific types and I went with what I knew I could eat.
Rather than yeast, as we would use in modern bread making, a starter was used in the middle ages/Renaissance. [5] My starter is relatively new at only three weeks old. However, it has been bubbling up properly and I have already made two loaves with it. All a starter is is fermented dough. I used half flour/half water, place it in a jar, and cover the jar with a paper towel or a piece of cloth. This way, air can still get to the dough but dust and grime stay out. Every other day, I add more flour and more water as necessary to keep the dough bubbly and happy.
My recipe is based on the instructions given by Jean le Renaud de Pyranees.[6]
Bread in Lent
3 cup flour
2 tablespoons olive oil
1 tablespoon honey
1 teaspoon salt
1/2 cup starter
Water as needed to make the dough
It isn't possible to mix all the flour in at once. Also, my measurements tend to be a bit funny since, rarely, are measurements given in medieval recipes. I tend to eyeball it and sometimes decide that it just needs a bit more honey than it really does.
First, I mixed up the starter, olive oil, honey, and salt. I then added 2 cups of the flour with a bit of water to form the dough. Once I had a decent dough, I took it out and kneaded it. At this point, I put out another 1/2 cup of flour to be kneaded into the bread. Once the dough begins to get tough, I placed it in a bowl to let it rise overnight.
The next day, I kneaded it again with the remaining 1/2 cup of flour and let it rise overnight again, this time on a cooking sheet. In the morning, I put the risen dough in the oven set for 380F for 35 minutes.
The bread is to be eaten with olive oil and herbs as is said the saints did and how bread is still eaten in the Mediterranean.
Apple Pie
Apple Pie is found, in some form, in nearly every medieval cookbook I have seen. In a 15th C Italian cookbook, the following recipe for apple pie is written:
Tartare Alla Franzesa de Pome. Fa cocere le pome quale tu vorai ho in aqua ho in mosto cotto, ho in uno tegamo al forno ho sotto le braxe; poi piglia pignoli stati a moglio in aqua una notte, che non siano ranzi, he pistali bene cum le pome; poi piglia assai zucaro he poco de canella, uno poco de zenzaro he un poco de zaffrano, he uno bichero de ova de luzo bene piste he passate per la stamegna, he miscola tute queste cose insieme he passa per la stamegna cm aqua rosada ho altra aqua; poi fa una pasta pigliando zucaro, farina, olio, aqua he sale, he miscola insieme he fa questa pastal, poi distendela sopra lo fondo de una padella bassa, he poi poneralli dentro questa tale compositione che non sia alta piu de uno digito; poi falla cocere a lo forno ho al foco como he dito de le altre torte; poi, quando sera quasi cotta, piglia nevole he spolvarizale de sopra questa Tartara - che siano fate le dite nevole cum bono zucaro; he quando sera cotta, getta de sopra zucaro he aqua rosa.
French-Style Apple Tart. Cook whatever apples you want, whether in water or in must syrup, whether in a baking dish in the oven or under the coals; then get pinenuts that have soaked a night in water, and are not rancid, grind them up with the apples; get a lot of sugar, a little cinnamon, a little ginger, a little saffron and a beaker of ground and strained pike eggs, and mix and strain everything with rosewater or some other water; then make a dough of sugar, flour, oil, water and salt, mix them together to make the dough, spread it over the bottom of a low pan, and put the mixture in so that it is no more than a finger deep; cook it in the oven or on the fire as is directed for the other tortes; when almost cooked, get wafers, crumble them over the Tart - those wafers should be made with good sugar; when cooked, garnish with sugar and rosewater. (Italy, 15th C)[7]
What I liked about this recipe was the description of the pie crust; it's a dough of sugar, flour, oil, water, and salt -perfect for Lent. However, the idea of pine nuts in an apple pie along with pike eggs didn't sound very appetizing to my modern pallet so I looked to other cookbooks for the filling.
There is a German recipe from the 16th C that sounds far more appetizing:
225. To make a good tart with roasted apples. Peel the apples and cut them into four pieces, cut out the cores, and put them in pot, which should be well covered, and let them stew in the pot. One should watch them frequently, so that they do not scorch. Afterwards spread them on the pastry shell, which should be made of good flour, and put a half pound of sugar and a half ounce of finely ground cinnamon therein.[8]
Although German food and Italian food are very distinctly different, variations on this same theme - apples with cinnamon and sugar in a pie crust- are found in multiple cookbooks from multiple areas and eras.
For to make Tartys in Apples: Take good apples and good spices & figs and raisings and pears and when they are well braid colour with safron well and do it in a coffin and do it forth to bake well.
Original recipe from Curye on Inglysh:
Tak gode applys & gode spycis & figs & reysons & perys, & wan bey arn wel ybrayd colour wyb safroun wel & do yt in a cofyn, & do yt forth to bake wel.
- Hieatt, Constance B. and Sharon Butler. Curye on Inglysch. New York: Oxford University Press for The Early English Text Society, 1985. [9]
1.65. To make pasties during Lent
Grind hundred walnuts and a small handfull of almonds very finely in a mortar. [With] this grind 20 good apples, well peeled, without core. Add powdered sugar, ginger and ground cinnamon, or use grains of paradise instead of ginger. Colour this mixture with some saffron.[10]
Grind hundred walnuts and a small handfull of almonds very finely in a mortar. [With] this grind 20 good apples, well peeled, without core. Add powdered sugar, ginger and ground cinnamon, or use grains of paradise instead of ginger. Colour this mixture with some saffron.[10]
Although each recipe calls for something slightly different, the core of the pie is the same - cooked apples with cinnamon, typically ginger, and sugar. Saffron is also frequently mentioned.
Given this, I used the following:
For the Crust:
2 cups flour
Generous 1/2 cup of light brown sugar
1 tablespoon olive oil
1 teaspoon salt
1/2 cup of water with a pinch of saffron
I mixed the following together to get a basic dough. I kept adding more sugar to make it sweet so I'm not entirely sure how much really went in. I split the dough in half after kneading it for a few minutes - one pile for the bottom crust and the other for the top. I smoothed out the bottom crust and finger pinched it into the pie pan. I set the oven to 375f and baked it for 10 minutes.
For the filling:
4-5 apples
1 tablespoon of cinnamon
3/4 a cup or so of brown sugar
1 teaspoon ginger
After slicing and peeling the apples, I put them in a pot to boil. Once they boiled for about ten minutes, I drained the water and placed them in the bottom crust. On top of this, I sprinkled the sugar/ginger/cinnamon mixture. I placed the top crust on the pie and baked it at 375F for a half hour.
Please, if you have any questions, feel free to ask or visit my blog at isabelladangelo.blogspot.com where I have a LOT more information on food practice during fast or fish days.
[1] http://www.keeleranderson.net/Hello/Lent/RecreatingLent.htm
[2] http://isabelladangelo.blogspot.com/2013/01/honey-in-lent.html
[3] http://www.engr.psu.edu/mtah/articles/flower_of_wheat.htm
[4] http://www.newadvent.org/cathen/09653b.htm
[5] http://www.sca.org.au/stow/Breadmaking.pdf
[6] http://www.sca.org.au/stow/Breadmaking.pdf
[7] http://www.medievalcookery.com/notes/piecrust.html
[8] http://www.godecookery.com/nboke/nboke04.htm
[9] http://www.godecookery.com/friends/frec40.htm
[10] http://www.coquinaria.nl/kooktekst/KAGent15.1.2.htm#1.65
Saturday, June 15, 2013
Tiaras and Jampagne Dress
The story behind this dress is simple - Jasper, the incredibly evil cat- peed on my silk velvet I was going to use for the jumper to the Requiem dress. So, I had to wash it - and let it dry on it own- and then wash it again. He has learned his lesson about peeing where he is not supposed to but I didn't have the time to wait for the fabric to dry since this was Thursday night and I was leaving for Dress U on Friday.
Plan B. Plan b is never someone you already have - that's always plan c or d- it's something you can make quickly and will still look nice. Enter in the fantasy version of an early 16th C Italian dress.
The cut is based off of a painting and a sketch from the 1500's. Many people are familiar with the painting of the two courtesans on a roof top playing with a couple of dogs - one lady wears a green dress with what looks like a yellow apron. If you ever get to see the painting IRL or blown up in a book, it's clear that their is a piece of yellow chiffon behind her as well. A sketch, from the same time period, shows a lady standing, with what looks like a flab of possible sheer fabric to the front of back of her dress, open at the sides, but tied off at the sides as well. You can see both here. The sketch is the very first image, the painting is roughly halfway down the page.
Knowing that, I thought maybe an embroidered sheer front and back would look awesome. I have a TON of dupattas and saris that I can cut up. I played with all of them and finally found some old duponi silk I bought years ago that matched one of the dupattas well enough. I cut the dupatta in half so I had a front and a back. The Italian dress, I cut out from my own pattern done in a style I've done tons of time before.
The only other glitch was, that by the time I made a decision and found all the trim, it was 10:30 at night. On Thursday. I needed to leave Friday. So... I finished this on Sunday via sewing machine. Luckily, my roommate wasn't upset with me. At least I had everything cut out, right? ;-)
I managed to finish this at 8 pm Sunday. The party started at 7:30 pm so I wasn't horribly late. Close. But not horribly late.
Because it was a rush job, there are some issues. I need to fix the bodice, again, because of that weird wrinkle in the middle. I also need to fix the skirt slightly. Over all, another fun gown to wear to the Renn Fest though!
It's not H/A simply because of the fabric choices. The duponi I used is very slubby - something that I've only heard of possibly being used as a lining in period, and the front and back pieces don't seem to bee embroidered. Also, silk net? Not really used like this.
Overall, I'm pretty happy with the way it came out. The colors went together perfectly and it's certainly sparkly which is what I was going for. :-)
Subscribe to:
Posts (Atom)